
Picture this: You’re cruising down the highway, music playing, air conditioning humming, when suddenly that ominous “Charging System Malfunction” alert flashes on your Toyota’s dashboard. Your heart rate spikes as questions flood in; will the car die mid-trip? How much will this repair set you back? Is it safe to keep driving?
Rest assured, while this warning demands attention, it’s rarely an immediate catastrophe. With proper knowledge, most Toyota owners can navigate this issue confidently, often resolving it affordably or preventing it entirely through smart maintenance. As seasoned automotive experts who have diagnosed thousands of Toyota electrical systems, we’ll walk you through everything; from the warning’s true meaning to advanced troubleshooting, model-specific quirks, cost breakdowns, and proactive strategies to keep your Toyota reliably powered for years to come.
Decoding the Toyota Charging System Malfunction Warning
At its core, this alert signals disruption in the vital circuit responsible for maintaining your vehicle’s battery charge during operation. Your Toyota relies on a sophisticated charging ecosystem: the alternator converts mechanical energy from the engine into electrical power, replenishing the battery and powering all onboard electronics; from headlights and infotainment to critical engine control modules.
When everything functions optimally, the system delivers steady voltage (typically 13.7–14.7 volts) while the engine runs. But when output drops or fails, the battery begins depleting rapidly. The onboard computer detects this voltage irregularity and triggers the warning to prevent you from being left powerless far from help.
Important nuance: It’s perfectly normal for the light to illuminate briefly in accessory mode (ignition on, engine off) as no charging occurs then. The real concern arises when the warning persists or appears during driving; it essentially means your Toyota is now surviving solely on stored battery power, with a limited window (often 30–90 minutes depending on electrical load and battery health) before systems begin shutting down or the engine stalls.
Root Causes Behind Toyota Charging System Failures
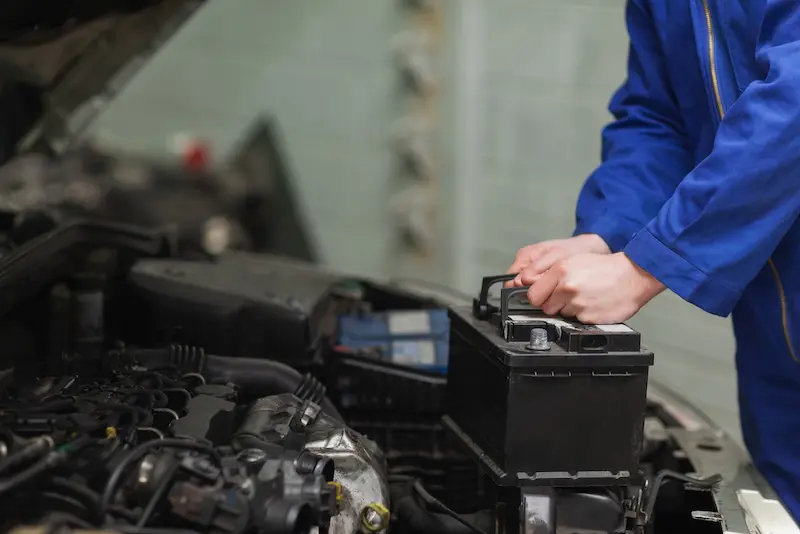
Battery-Related Troubles: The Most Frequent Offender
The 12-volt battery serves as the heart of your Toyota’s electrical network. When it weakens, the entire charging system appears faulty; even if the alternator performs perfectly. Common battery culprits include:
- Natural Aging and Degradation: Conventional lead-acid batteries typically deliver reliable service for 4–5 years, while premium AGM variants in many modern Toyotas (especially hybrids) often stretch to 6–7 years under ideal conditions. Heat, frequent short trips, and deep discharges accelerate sulfation and capacity loss.
- Corrosion Buildup: That chalky white, greenish, or bluish residue on terminals acts like an insulator, blocking efficient current flow and mimicking deeper failures.
- Connection Instability: Loose or improperly torqued battery cables create resistance, leading to voltage drops, intermittent warnings, and erratic performance.
- Incompatible Replacement Batteries: Installing a standard flooded battery in place of an AGM-designed unit (common in Highlanders, RAV4 Hybrids, and Prius models) confuses the smart charging system, triggering persistent alerts.
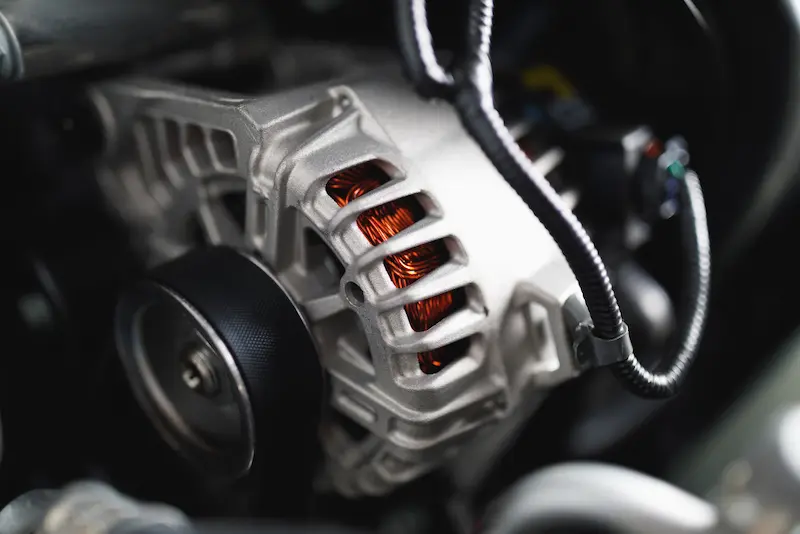
Alternator Failures: When the Power Plant Stops Producing
The alternator acts as your Toyota’s onboard generator. When it underperforms or quits entirely, no amount of battery capacity can compensate long-term. Key failure modes include:
- Complete Alternator Failure: Bearings seize, windings burn out, or diodes fail, halting all output.
- Worn Internal Brushes and Slip Rings: Over tens of thousands of miles, these components erode, reducing contact and output consistency.
- Overrunning/Decoupler Pulley Malfunction: Many newer Toyotas feature pulleys designed to freewheel and reduce belt strain; when the clutch mechanism fails, the pulley spins freely without turning the alternator shaft.
- Voltage Regulator Defects: Integrated regulators that malfunction cause erratic or insufficient charging voltage, confusing the ECM and illuminating warnings.
Wiring, Connections, and Fuses: The Hidden Troublemakers
Often overlooked yet surprisingly common, these issues create open circuits or high resistance:
- Blown Charging Circuit Fuses: A single failed fuse (check under-hood and interior fuse boxes) can disable charging entirely.
- Insulation Damage or Chafing: Harnesses rubbing against engine components or heat shields develop shorts or opens over time.
- Loose or Oxidized Connectors: Alternator plugs, ground straps, and main power junctions corrode or work loose from vibration.
- Poor Ground Paths: Weak engine-to-chassis or battery-to-body grounds disrupt the entire electrical return path, causing phantom warnings across multiple systems.
Early Warning Signs You Should Never Ignore
Smart Toyota owners catch charging problems before the full warning appears. Stay alert for these telltale clues:
- Headlights noticeably dimming at idle, then brightening when RPMs increase
- Power windows, seats, or audio systems operating sluggishly or erratically
- Extended cranking times or clicking sounds during startup attempts
- Flickering interior/exterior lights, erratic gauge behavior, or random system resets
- Simultaneous illumination of battery, brake, or other electrical warning lamps
- Whining, grinding, or rattling noises emanating from the alternator area (often belt-driven pulley related)
Step-by-Step Diagnosis of Toyota Charging System Issues
Simple At-Home Inspections Anyone Can Perform
Begin with these no-cost or low-effort checks before investing in parts or professional help:
- Thorough Visual Examination: Pop the hood and inspect battery terminals for corrosion, frayed cables, loose clamps, damaged insulation, and fluid leaks.
- Battery Date Code Check: Locate the manufacturing date code (often stamped on the case). If beyond 4–5 years, assume reduced capacity even if it still starts the car occasionally.
- Alternator Noise Assessment: With the engine running, listen closely near the front of the engine bay for abnormal sounds indicating bearing wear or pulley issues.
- Dynamic Headlight Observation: At dusk or night, observe headlights while revving gently from idle; if brightness surges dramatically, suspect weak alternator output under load.
Using a Multimeter for Accurate Readings
A basic digital multimeter (available for under $20) provides definitive data:
- Static Battery Voltage: Engine off, probes on terminals; healthy reading hovers around 12.6V (fully charged). Below 12.4V indicates partial discharge; under 12.0V signals serious trouble.
- Charging Voltage at Idle: Engine running, no accessories on; expect 13.7–14.7V. Readings below 13.5V point to insufficient alternator performance.
- Loaded Voltage Test: Activate headlights, rear defroster, blower fan, etc.; voltage should hold above 13.5V. Significant drops reveal the system struggling under demand.
When to Seek Professional Diagnostic Tools
Dealerships and well-equipped independents offer deeper insights using:
- Advanced scan tools to retrieve Toyota-specific trouble codes (DTCs) related to charging circuits
- Bench testing of removed alternators for output, diode integrity, and regulator function
- Current draw/parasitic load tests to identify hidden battery drains
- Inspection of hidden harness sections and ground points
- Specialized hybrid/EV system analyzers for high-voltage battery interactions with 12V systems
Model-Specific Charging System Challenges in Popular Toyotas
Toyota RAV4 and RAV4 Prime Quirks
The RAV4 lineup experiences several recurring charging-related complaints:
- 2018–2020 models frequently display warnings from seemingly tight battery terminals; oxidation inside connectors or micro-movements often prove responsible.
- RAV4 Prime plug-in hybrids occasionally trigger “Hybrid System Malfunction” alongside charging alerts due to relay or control module glitches, sometimes heat-aggravated.
- Hot climates accelerate battery degradation and alternator strain, with many owners noting issues surfacing above 90°F ambient temperatures.
- Alternator wear often manifests between 50,000–80,000 miles, particularly if accessory loads (aftermarket stereos, lights, winches) exceed stock capacity.
Toyota Highlander Electrical Gremlins
Highlander drivers commonly report:
- Recurring “battery charging” notices traced to inadequately torqued battery clamps after routine service visits.
- Hybrid variants strictly requiring AGM batteries; substituting conventional types almost guarantees warnings and reduced performance.
- Overheating alternators from poor airflow or heavy accessory use leading to premature failure.
- Parasitic drains from aftermarket installations or accessories left powered when the vehicle sleeps.
Toyota Prius Prime Plug-In Specific Issues
Prius Prime models present unique challenges tied to their dual-battery architecture:
- 2023+ models faced documented concerns addressed via Technical Service Bulletin updates focusing on charging assembly components, often temperature-triggered.
- Pre-2023 units occasionally suffer from 6.6kW onboard charger sub-assembly or DC-DC converter irregularities.
- Temporary resolution sometimes occurs after 12V battery disconnection/reset, though root causes typically recur without proper repair.
- Extended charging cord connection without active charging can deplete the 12V battery due to control module sleep-mode failures (addressed in later TSBs like T-SB-0054-24).
Practical DIY Solutions for Common Charging Problems
Many charging alerts resolve without expensive parts. Try these proven steps in order:
Restoring Battery Terminals to Factory-Fresh Condition
- Safely disconnect cables; negative (-) first to prevent sparks.
- Prepare a neutralizing solution: baking soda mixed with water into a paste-like consistency.
- Scrub terminals, clamps, and posts vigorously using an old toothbrush or wire brush.
- Rinse thoroughly with clean water, then dry completely with compressed air or cloth.
- Reconnect; positive (+) first, then negative; and apply dielectric grease to prevent future corrosion.
Securing All Critical Electrical Connections
- Verify battery cables are wrench-tight at both ends (battery and distribution points).
- Inspect and tighten alternator output and control wiring plugs.
- Locate and secure engine/chassis ground straps (often braided cables).
- Examine fuse boxes for blown charging-related fuses; replace with identical amperage ratings.
Evaluating and Upgrading the Battery
When testing reveals weakness:
- Visit major auto parts retailers for free load and conductance testing.
- Select the precise battery type, group size, CCA rating, and terminal orientation specified in your owner’s manual.
- For hybrids/PHEVs, opt for dealer-installed units when programming or registration is required for seamless integration.

What to Expect from Professional Repairs and Associated Costs
When home remedies fall short, anticipate these typical repair scenarios (2025–2026 pricing estimates, varying by region and labor rates):
Alternator Replacement: The Big-Ticket Item
- Total Cost Range: $500–$950 (parts $300–$650, labor $200–$300)
- Typical Labor Time: 1.5–3.5 hours depending on accessibility
- Recommendation: Toyota OEM or premium remanufactured units often outlast cheaper alternatives
- Red Flags Requiring Immediate Attention: Noisy bearings, complete power loss, or severe dimming
Battery Replacement: Straightforward and Essential
- Total Cost Range: $180–$400 (conventional $150–$250, AGM/hybrid $250–$400)
- Labor Time: Usually 20–45 minutes
- Pro Tip: Hybrid models may incur additional “registration” or programming fees at dealerships
Wiring and Connection Repairs: Variable but Critical
- Total Cost Range: $180–$600 depending on extent of damage
- Common Repair Zones: Alternator pigtail harnesses, main battery cables, corroded grounds
- Challenge: Accurate tracing can inflate diagnostic time and therefore labor charges
Hybrid and Plug-In Specialized Repairs
- Total Cost Range: $250–$2,500+ depending on failed module (DC-DC converter, charging ECU, etc.)
- Key Components: Onboard chargers, high-to-low voltage converters, control units
- Best Option: Toyota dealerships possess proprietary tools, software updates, and factory training

Proactive Strategies to Avoid Charging System Headaches
Prevention beats cure every time. Incorporate these habits:
Consistent Maintenance Routines
- Test battery condition yearly starting at age 3
- Clean and tighten terminals during every oil change
- Inspect serpentine belt condition and tension regularly
- Periodically log voltage readings to detect slow degradation
Smart Driving and Usage Patterns
- Minimize very short trips that prevent full recharge cycles
- Avoid prolonged accessory use with engine off
- Follow Toyota hybrid 12V battery care guidelines precisely
- Garage vehicles during extreme heat or cold when feasible
Choosing Superior Replacement Components
- Prefer OEM or trusted aftermarket brands with strong warranties
- Select batteries from manufacturers offering 3–5 year free replacement periods
- Consider high-output alternators if you’ve added significant electrical accessories
- Always match exact specifications listed for your model and trim
What to Do When the Warning Appears While Driving
Stay calm and follow this emergency protocol:
- Minimize Electrical Demand Immediately: Switch off AC, heated seats, radio, interior lights; anything non-essential.
- Plan Your Next Stop Carefully: Battery-only operation typically lasts 30–60+ minutes; choose the nearest safe exit or service area.
- Attempt a Jump if Needed: If the vehicle stalls, a jump can restart it temporarily; but address the root cause promptly.
- Secure Roadside Assistance: Use Toyota’s included roadside program or your insurance provider to arrange towing if distance to repair exceeds safe battery range.
- Quick Reset in Desperate Situations: Disconnecting/reconnecting the battery may temporarily clear the warning and restore partial function (not a permanent solution).
Dealer vs. Independent Mechanic: Which Is Right for Your Toyota?
Opt for a Toyota Dealership When:
- Your vehicle remains under factory or extended warranty coverage
- You own a hybrid, plug-in hybrid, or electric model requiring specialized knowledge
- A relevant Technical Service Bulletin exists for your exact symptoms
- Software updates, coding, or system registration become necessary
Choose a Trusted Independent Shop When:
- Your Toyota has exceeded warranty mileage/age
- You drive a non-hybrid model with straightforward charging concerns
- You’ve already pinpointed the failed component through testing
- Cost savings on labor rates matter significantly
Toyota’s electrical architecture remains among the industry’s most dependable, yet no system lasts forever without care. By understanding the warning, acting on early symptoms, performing routine checks, and addressing issues promptly, you’ll maximize reliability, minimize unexpected downtime, and protect your investment for countless worry-free miles ahead.
