Most drivers never think about their car battery until the morning it refuses to start. But a car battery is not a sealed, maintenance-free black box, at least, most of them are not. Inside that plastic casing is a chemical reaction that requires the right balance of water and sulfuric acid to function correctly. Let that balance drift too far in the wrong direction, and you will be calling for a jump start or shopping for a new battery far sooner than you should.
The good news is that maintaining your battery’s electrolyte level is one of the simplest, cheapest, and most effective things you can do to extend its life. Here is everything you need to know about it.
What Is Battery Electrolyte and Why Does the Level Drop?
The electrolyte inside a conventional lead-acid car battery is a solution of sulfuric acid and water, approximately 35% sulfuric acid and 65% water by volume. This mixture conducts electricity between the battery’s lead plates, enabling the chemical reactions that store and release electrical energy.
During normal battery operation, both during use and especially during charging, the electrolyte heats up. When it gets hot enough, it starts to boil. Sulfuric acid is not volatile, so it does not evaporate. But water does. The water component of the electrolyte turns to steam and escapes through the battery’s vent caps, permanently reducing the total volume of electrolyte inside.
This process accelerates significantly in hot conditions. If your battery is located in a poorly ventilated engine bay or in a vehicle that spends time in high ambient temperatures, the electrolyte level will drop faster than it would in a cooler environment. Overcharging, where the alternator or a battery charger pushes too much current into the battery, also dramatically increases the rate of water loss by causing excessive boiling.
As water boils off, the remaining electrolyte becomes progressively more concentrated. Instead of the correct 1.29 g/cm³ density, the acid to water ratio shifts toward a higher concentration. This increased density is corrosive to the battery’s internal lead plates. Over time, the plates suffer accelerated degradation, surface erosion, sulfation, and in severe cases, physical damage, all of which permanently reduce the battery’s capacity and cranking power.
When temperatures drop in winter, a battery with depleted electrolyte is especially vulnerable. A properly maintained electrolyte resists freezing down to very low temperatures. An electrolyte that has lost its water content and become more concentrated acid-heavy can freeze at much less extreme temperatures, physically cracking the battery casing and destroying the plates. Winter is when a neglected battery finally gives up completely.
What Kind of Water Should You Add?
This is not optional, it must be distilled water, and nothing else. Tap water contains dissolved minerals including calcium, magnesium, chlorine, and various salts depending on your local water supply. Even water that tastes clean and looks clear can carry mineral content that is highly damaging inside a battery.
When tap water is added to battery electrolyte, those minerals participate in the electrochemical reactions happening at the battery plates. They form deposits that coat the plate surfaces, reducing the active area available for the chemical reaction and permanently cutting the battery’s effective capacity. Chlorine attacks the plate material directly. Calcium and magnesium salts accumulate as scale.
Most bottled drinking water is also unsuitable, the mineral content varies widely between brands, and even “natural spring water” with low mineral content is not reliably pure enough. Distilled water, by definition, contains only hydrogen and oxygen. It has been boiled into steam and condensed, leaving all dissolved minerals behind. It is the only type of water that can be safely added to a car battery without introducing contaminants.
Distilled water is inexpensive and widely available at supermarkets, pharmacies, and auto parts stores. A bottle typically costs less than a dollar. There is no good reason to substitute anything else.
Is Your Battery the Type That Needs Water?
Before you start unscrewing caps, confirm that your battery is a serviceable type that accepts water top-ups. There are two broad categories to be aware of:
Conventional Flooded Lead-Acid Batteries
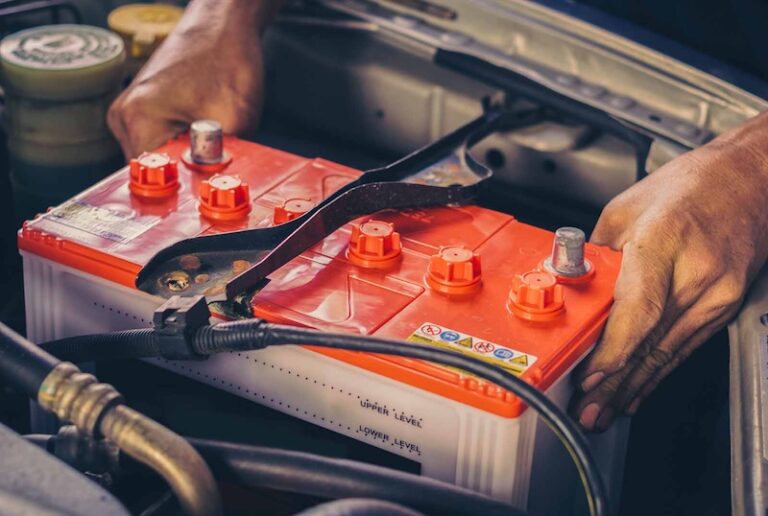
These are the traditional batteries that have been used in vehicles for decades. They have removable caps on the top, usually six individual caps or a single strip covering all six cells, that allow access to the electrolyte. These batteries require periodic electrolyte level checks and distilled water top-ups as described in this article.
Some of these batteries are labelled “low maintenance” or even “maintenance-free” on the label, which can be misleading. Many batteries carrying that description still have serviceable caps, sometimes hidden under a label or sticker on the top of the battery. Peel back the label and you may find the caps sitting right underneath. If you can see or access individual cell caps, the battery can be topped up.
Sealed Maintenance-Free Batteries
Truly maintenance-free batteries, including AGM (Absorbent Glass Mat) and gel batteries, have no cell caps at all. The top of the battery is completely smooth with no openings. These batteries use a recombination technology that converts the gas produced during charging back into water within the battery itself, dramatically reducing water loss. They are genuinely sealed and require no electrolyte maintenance. Do not attempt to open or add water to these batteries.
If your battery has no visible caps and no way to access the cells, it is sealed and maintenance-free. If it has caps, removable strips, or a sticker concealing caps, it is a serviceable battery that benefits from regular electrolyte checks.
How to Check the Electrolyte Level
Always check the electrolyte level when the battery is fully charged. Checking a discharged battery gives you an inaccurate reading because the electrolyte level changes with the battery’s state of charge. Connect the battery to a charger and bring it to full charge before checking.
There are several ways to determine the electrolyte level depending on your battery type:
Method 1: Built-In Indicator
Some batteries have a small colored indicator window on the top. This indicator shows the battery’s electrolyte level and density state at a glance. The indicator typically shows three states:
- Green: Battery is sufficiently charged and electrolyte level is adequate
- Black or dark: Battery needs charging
- Clear or white: Electrolyte level is low and water needs to be added
The specific color code varies slightly between manufacturers, so check the label on your battery to confirm what each color indicates.
Method 2: Min/Max Markings on the Case
Many batteries have a semi-translucent or transparent casing with minimum and maximum level marks printed or moulded into the sides. In good lighting, you can see the electrolyte level through the case and read it against these marks. The level should sit between the two marks, and ideally closer to the maximum.
Method 3: Visual Inspection Through the Cell Caps
Remove the cell caps or the cover strip and look into each cell. The electrolyte should be clearly visible as a liquid. The correct level is 15 to 20 millimeters (approximately 0.6 to 0.8 inches) above the top of the battery plates. Some batteries have a small plastic indicator tube inside the cell, the electrolyte should just cover the tip of this tube.
If the plates are visible above the electrolyte surface, partially or fully exposed, the level is critically low and needs to be corrected immediately. Exposed plates will sulphate rapidly and the damage is permanent.
While you have the caps off, take a moment to look at the electrolyte itself. It should be clear and transparent. If it appears dark, brown, or cloudy, the plates inside that cell are deteriorating. A battery with contaminated or discoloured electrolyte has internal damage and is likely near the end of its service life regardless of what you do with the water level.
Method 4: Measuring Electrolyte Density
For the most accurate assessment of battery condition, measure the electrolyte density with a hydrometer or a refractometer. Both tools are inexpensive and available at most auto parts stores. They measure how dense the electrolyte is, which tells you both the acid concentration and the battery’s state of charge.
The correct density for a fully charged battery at normal operating temperature is approximately 1.27 to 1.29 g/cm³. Values below this range indicate either a discharged battery, depleted electrolyte needing water, or a failing battery. Values above this range may indicate excessive water loss (the electrolyte has become too concentrated).
Test each cell individually if your hydrometer allows. A significant difference in density between cells, more than 0.05 g/cm³, indicates that one or more cells are failing and the battery may need replacement regardless of water level.
How Much Water Does a Battery Need?
The exact amount depends on how low the level has dropped and the capacity of your specific battery. Here are general estimates for common battery sizes when the electrolyte has dropped to its lowest acceptable level:
| Battery Capacity | Total Electrolyte Volume | Approximate Water Content |
|---|---|---|
| 55 Ah | ~2.6 L (0.68 gal) | ~1.64 L (0.43 gal) |
| 60 to 62 Ah | 2.7 to 3.1 L (0.71 to 0.81 gal) | 1.77 to 1.95 L (0.46 to 0.51 gal) |
| 65 Ah | ~3.6 L (0.95 gal) | ~2.29 L (0.60 gal) |
| 75 Ah | 3.7 to 4.1 L (0.97 to 1.08 gal) | 2.41 to 2.60 L (0.63 to 0.68 gal) |
| 90 Ah | 4.3 to 4.8 L (1.13 to 1.26 gal) | 2.86 to 3.13 L (0.75 to 0.82 gal) |
These figures represent the total water content of the electrolyte, not the amount you need to add. The amount you actually add depends on how low the level has dropped in each cell. Add water gradually and check the level in each cell frequently as you work, it is much easier to add more than it is to remove excess.
How to Add Distilled Water to Your Battery: Step by Step
This is a simple process but requires care, you are working with sulfuric acid, which is corrosive. Wear safety glasses and gloves, work in a well-ventilated area, and keep the battery away from open flames or sparks (batteries produce hydrogen gas during charging).
- Bring the battery to full charge first. Connect it to a charger and charge completely before checking or adding water. As mentioned, the electrolyte level is only accurate on a fully charged battery.
- Let the battery rest at room temperature. If the battery has been in a cold environment, allow it to come up to room temperature for several hours before opening. Cold electrolyte is denser and can give a misleading level reading.
- Clean the top of the battery. Wipe the top surface clean before removing the caps. Any dirt, grime, or debris on the surface can fall into the cells when you open them, contaminating the electrolyte.
- Remove the cell caps carefully. Unscrew or pry off the caps, depending on the battery design. Set them aside in a clean location.
- Check the level in each cell. Use a flashlight to look into each cell and assess the electrolyte level. Note which cells are low.
- Add distilled water slowly. Use a plastic syringe, a squeeze bottle with a narrow tip, or a funnel. Add water gradually to each low cell, stopping frequently to check the level. The target is 15 to 20 mm above the top of the plates, not above the max line on the case, and not overflowing.
- Do not overfill. If you add too much, remove the excess immediately using a clean plastic syringe or turkey baster. Overfilled cells will overflow during charging, and the electrolyte will spill on surrounding components, which is corrosive.
- Replace the caps securely. Screw or press the caps back into place on all cells.
- Allow the water to mix before charging. Leave the battery for at least several hours, ideally overnight, before charging. The distilled water needs time to integrate with the sulfuric acid electrolyte. If you charge immediately, the unmixed water at the top of the cells can cause localised boiling before it has fully diluted into the electrolyte.
- Charge the battery and monitor it. Connect to a charger and bring it back to full charge. Watch for signs of excessive boiling or gassing. Moderate bubbling during charging is normal in a flooded battery. Violent, continuous boiling suggests overcharging, reduce the charge current or check the charger settings.
- Verify the electrolyte density. Once fully charged and rested, check the density with a hydrometer. Each cell should read approximately 1.27 to 1.29 g/cm³. If it reads below this after a full charge, the battery may be too far gone to recover, regardless of the water you have added.
What Happens If You Add Too Much Water?
Over-filling is a common mistake, and it has real consequences. Too much water dilutes the electrolyte, reducing its density below the correct level. A diluted electrolyte has lower conductivity, which means the battery produces less power and holds less charge. Cranking power drops. Cold weather performance suffers significantly, the battery’s freezing resistance drops when the electrolyte is too dilute, making winter failures more likely, not less.
During charging, overfilled cells are more likely to overflow as the electrolyte expands with heat. Spilled battery acid on metal components, wiring, or the battery tray causes corrosion that can be expensive to address. If the overflow reaches a spark or flame, the hydrogen gas produced can ignite.
If you have overfilled, act immediately, remove the excess with a clean syringe before it has time to mix significantly with the acid. Removing water immediately after adding is straightforward and does not compromise the electrolyte, because the mixing process takes time.
How Often Should You Check the Electrolyte Level?
For most conventional flooded lead-acid batteries in normal use, checking the electrolyte level every three to six months is sufficient. However, several conditions warrant more frequent checks:
- Hot climates or high under-hood temperatures: Water evaporation accelerates with heat. Check monthly in summer if your battery runs warm.
- High-mileage driving: More driving means more charging cycles and more opportunity for water loss through gassing.
- An aging alternator: An alternator that overcharges the battery causes excessive boiling and rapid water loss. If you notice frequent low electrolyte levels, have the charging voltage checked, it should be between 13.8 and 14.4 volts at normal operating temperature.
- Before a long trip or before winter: Check and top up before any period where battery reliability becomes especially important.
Keeping a small bottle of distilled water in the garage costs almost nothing and takes seconds to use when needed. Regular checks take less than five minutes. The alternative, replacing a battery that died prematurely because the plates dried out, costs significantly more in both money and inconvenience. That is an easy trade-off to make.