
The Driver Information Center (DIC) buttons on your car’s steering wheel or dashboard are essential tools for staying informed while on the road. Nestled conveniently on the left side (typically beneath the tachometer), these 4 to 8 small but mighty controls allow you to navigate menus, reset trip data, monitor fuel efficiency, and access vital vehicle stats at a glance. When they suddenly stop responding, it can feel frustrating; especially when you’re trying to track mileage or clear a maintenance reminder. The good news? This issue is fairly common in many GM vehicles, including various car models, and often stems from straightforward electrical or mechanical glitches rather than a catastrophic failure.
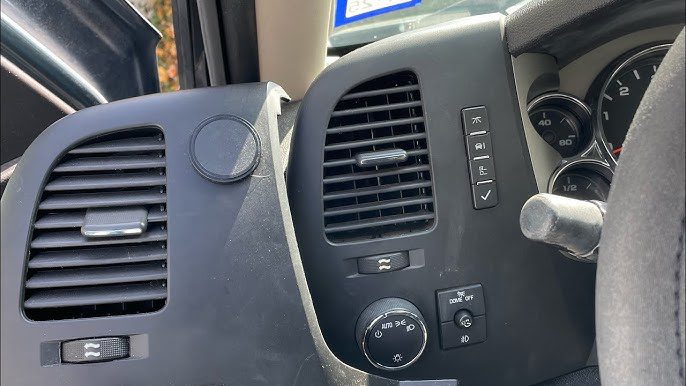
Driver Information Center (DIC) buttons are common in many makes like Chevrolet, Buick, GMC, Honda, and Chrysler, with controls typically being arrow keys and a check/set button to navigate menus and customise settings.
Don’t rush to the dealer just yet. Before heading out, invest a few minutes in understanding the potential culprits and some initial troubleshooting steps. In this in-depth guide, we’ll explore what the DIC buttons do, why they might fail, practical diagnostic tips, step-by-step fixes (including safe DIY attempts), and when professional help becomes necessary. By the end, you’ll have the knowledge to restore full functionality and keep your dashboard conversations flowing smoothly.
What Exactly Are Driver Information Center (DIC) Buttons?
Think of the Driver Information Center as your vehicle’s personal dashboard assistant. The DIC is an integrated display system; usually part of the instrument panel cluster; that relays real-time data right in your line of sight. It shows everything from average fuel economy and trip distance to engine oil life, tire pressure (on equipped models), transmission temperature, and customizable alerts.
The physical controls; the DIC buttons; are what make this system interactive. Mounted on the steering wheel or dashboard (often in a vertical stack on the left spoke for easy thumb access without taking hands off the wheel), these buttons let you scroll through menus, select options, and reset values like the trip odometer. Depending on your car model year and trim; whether it’s a Silverado, Malibu, Corvette, Tahoe, or another GM platform; you might have 4, 6, or even 8 buttons. Common layouts include dedicated “Info,” “Reset/Select,” up/down arrows, and menu navigation keys.
In some older or base configurations, instead of steering wheel buttons, a single stalk or knob on the instrument cluster handles similar functions. But in most modern vehicles with multifunction steering wheels, the buttons are the primary interface.
These controls do far more than just cycle displays:
- Reset trip odometers (A/B modes) to accurately measure distances for business, maintenance, or efficiency tracking.
- Monitor instant and average fuel consumption, helping optimize driving habits for better MPG.
- Access detailed system info, such as battery voltage, coolant temperature, transmission fluid temp, tire pressures, and service reminders.
- Clear warning messages or customize vehicle settings (like door lock behavior or lighting preferences on some models).
When everything works seamlessly, the DIC enhances safety and convenience by keeping critical info accessible without distracting you from the road. But when the buttons go silent; no response, no menu changes, no resets; the entire system feels locked, limiting your ability to interact with valuable data.
Common Causes of DIC Buttons Not Working; and How to Address Them
Malfunctioning DIC buttons rarely happen out of nowhere. In Chevrolet and other GM vehicles, the issue usually traces back to a handful of electrical, mechanical, or compatibility problems. Here’s a breakdown of the most frequent causes, backed by patterns seen across forums, service bulletins, and technician experiences.
1. Faulty DIC Switch Assembly
The top offender in many cases is a worn or defective switch itself. These buttons rely on a resistor network or membrane contacts inside the steering wheel controls. Over time; especially with heavy use, exposure to temperature swings, or minor spills; the internal components can degrade. A common failure point is the resistor ladder on the instrument panel cluster (IPC) circuit board that interprets button presses, or frayed/coroded wiring leading to the switches.
Symptoms often include intermittent response (buttons work sometimes but not others), complete failure of one or more buttons while others (like audio controls on the same wheel) function normally, or no registration at all.
Initial Troubleshooting Steps:
- Perform a quick power cycle: Turn off the engine, press the gas pedal to the floor three times rapidly within a few seconds (a soft reset trick that works on some GM models to clear temporary glitches), then restart and test.
- Disconnect the negative battery terminal for at least 10–15 minutes (this resets modules and can clear transient faults in the Body Control Module or IPC).
If those don’t help, deeper diagnosis is needed.
Advanced Fix:
A professional scan with a GM-compatible tool (like Tech2, MDI, or modern equivalents such as GDS2) can read Diagnostic Trouble Codes (DTCs) specific to the DIC circuit, such as B3567 variants (Info Display Select Switch issues: short to battery/ground, open circuit, etc.). These codes pinpoint whether the problem is in the switch, wiring, or IPC.
If confirmed faulty, replacement of the DIC switch pad (often sold as a steering wheel control module) is straightforward but requires airbag disconnection for safety; best left to a certified technician to avoid airbag deployment risks.
2. Steering Wheel Switch Cluster or Wiring Interference
Sometimes, internal wiring inside the steering wheel “cluster” (the bundle routing through the column) gets pinched, frayed, or interferes when buttons are pressed. This creates ground interference or poor contact, especially if debris or wear causes wires to touch unexpectedly.
How to Address It:
- If comfortable with basic disassembly, remove the DIC button pad (after airbag disable) and inspect for loose clusters, pinched wires, or debris.
- Use a multimeter to check continuity on the switch circuits.
- For precise diagnosis, a GM scan tool can display live data or force module tests to see if button presses register at the Body Control Module (BCM) but fail downstream.
If wiring looks compromised, repair harness sections or replace the affected control assembly. In stubborn cases, full steering wheel control module replacement resolves it.
3. Incompatible or Mismatched Components
Aftermarket steering wheels, swapped clocksprings (the spiral cable that carries signals through the steering column), or mismatched DIC buttons from different model years can cause total incompatibility. The wiring harness expects specific resistance values or pinouts; if they’re off, the system ignores inputs or throws faults.
This is especially common in modified vehicles or after collision repairs where parts aren’t OEM-matched.
Resolution Steps:
- Verify part numbers match your vehicle’s specs (use VIN lookup on GM parts sites).
- Test by jumping known good signals at the DIC connector (after safe airbag disable) to isolate if the issue is column-side or harness-side.
- Often, the fix involves replacing the clockspring (a ~$200–$500 part depending on model) or the button assembly itself. Professional installation ensures proper alignment and calibration.
4. Faulty Ground Wire (Often the Black Wire) or Poor Ground Connections
A surprisingly frequent hidden cause is a compromised ground; particularly the black ground wire feeding the instrument cluster or DIC circuit. Poor grounding leads to dim or blank DIC displays, flickering, and non-responsive buttons because the circuit lacks a stable reference.
Symptoms pair button failure with dim/blank screens or erratic gauge behavior.
Quick Checks and Fixes:
- Inspect the main cluster connector (behind the dash) for corrosion, loose pins, or a damaged black wire.
- Clean terminals and ensure tight connections.
- Trace grounds to the firewall/engine bay (common GM ground points near the battery or brake booster) and clean/tighten them.
- In severe cases, add a supplemental ground strap from the cluster to chassis.
Restoring solid ground often revives the entire system instantly.
Diagnostic Scanning and When to Go Pro
Modern vehicles store valuable DTCs when DIC buttons fail. A technician can scan for:
- Switch state (normal = INACTIVE when not pressed; ACTIVE when pressed).
- IPC recognition of state changes.
- Shorted/stuck switches (scan shows INACTIVE even when disconnected).
If signals reach the BCM but not the cluster, wiring or IPC faults are likely. Replacement options include new DIC switches, repaired IPC, or harness fixes. Avoid DIY soldering unless experienced; improper work can introduce new issues.
FAQs: Your Most Pressing DIC Button Questions Answered
Can I scan the normal state of DIC switches myself?
Yes, with an advanced scan tool. Techs test for INACTIVE (at rest) vs. ACTIVE (pressed), IPC detection, and shorts/stucks. If BCM sees changes but cluster doesn’t, focus on wiring/IPC. Replacement or harness repair usually follows; professional recommended.
Should I repair or replace the instrument cluster?
Assess damage first: Remove and inspect for broken gauges, bad solder, or corrosion. Many clusters suffer stepper failures or display issues; repair services fix these affordably. If widespread damage exists, a remanufactured or new cluster (plug-and-play on many models) is wiser. Always reinstall carefully to avoid alignment problems.
Final Thoughts
Your car’s Driver Information Center isn’t just a fancy add-on; it’s a window into your vehicle’s health, efficiency, and performance. When the DIC buttons stop cooperating, you lose easy access to trip data, fuel stats, and alerts, which can lead to overlooked maintenance or less optimal driving. Catching and fixing the issue early prevents bigger headaches.
Whether it’s a simple reset, ground cleanup, switch replacement, or deeper electrical repair, most DIC button failures are solvable without breaking the bank. Start with basic resets and visual checks, then escalate to scans and pros as needed. Restoring these controls brings back that seamless connection between you and your ride; keeping every drive informed, efficient, and enjoyable.