Most people know that pressing the brake pedal slows the car down, but not many think about how much force that actually takes. If your brakes depended only on leg power, every stop would feel like a workout—especially in a heavier vehicle or during a sudden emergency stop. That’s why modern vehicles use a brake booster. It helps multiply the force from your foot so braking feels easier, smoother, and more controlled.
Hidden inside that system is a small but very important part called the brake booster check valve. It’s easy to overlook because it’s small, inexpensive, and not something most drivers ever think about. But if it’s damaged, leaking, or installed the wrong way, the effects show up fast: a hard brake pedal, weak brake assist, strange vacuum-related symptoms, and a car that no longer feels as confident or predictable when you stop.
Table of Contents
After explaining brake systems to a lot of drivers over the years, I can tell you this: the check valve is one of those parts that seems minor until you realize how much depends on it. It doesn’t create braking power by itself, and it doesn’t replace the booster, master cylinder, or brake fluid. What it does is protect the vacuum side of the booster and help keep that extra braking assist available when you need it most.
For many people, the biggest confusion is not what the check valve does—it’s which way it goes. The valve is physically easy to install, but it’s also easy to install backward if you’re not careful. And if that happens, the booster may not get or hold vacuum correctly. That can leave you with a brake pedal that suddenly feels hard, inconsistent, or much less responsive than normal.
This guide is here to clear that up. We’ll go through how the brake booster works, what the check valve actually does, why direction matters, how to tell which way it should face, how to remove and reinstall it, how to test it, what signs point to a bad valve, and what common mistakes people make during installation. I’ll also straighten out a few misunderstandings, because brake advice online is not always as accurate as it should be.
If you want the short version first, here it is: the brake booster check valve should be installed so air can move out of the booster toward the engine’s vacuum source, while preventing air from flowing back into the booster. On many valves, that means the directional arrow points toward the engine or intake side—not toward the booster. Still, because designs can vary, it’s always smart to confirm the valve’s one-way flow before installing it.
Now let’s walk through the whole system in a practical, easy-to-follow way.
Why the Brake Pedal Alone Isn’t Enough
To understand the check valve, you first need to understand why a brake booster exists in the first place. On the surface, braking sounds simple: you push the pedal, pressure builds in the brake system, and the car slows down. But in reality, creating enough hydraulic pressure at the master cylinder takes more force than most people realize. If all of that effort had to come straight from your leg, stopping the vehicle—especially repeatedly—would take much more effort than most drivers would find comfortable.
That’s where the brake booster comes in. In many gasoline-powered vehicles, the booster uses engine vacuum to assist your pedal effort. Instead of relying only on your leg, the booster adds force to what you’re already doing. The result is a brake pedal that feels manageable in daily driving but still generates plenty of pressure when you need serious stopping power.
It’s one of those systems you barely notice when it’s working properly. The pedal just feels normal. But the moment the booster loses vacuum—or the check valve keeps it from doing its job—you feel the difference immediately. Suddenly, the brakes take much more effort, and you realize just how much work the booster had been doing for you all along.
That’s why a bad or backward check valve can make such a noticeable difference. It doesn’t usually mean the brakes have completely failed. Instead, it takes away the vacuum assist that makes normal braking feel easy and controlled. The hydraulic braking system may still work, but you’ll have to push much harder to get the same stopping effect.
Drivers often describe it like this:
- “The brake pedal feels really hard.”
- “I suddenly have to press much harder to stop.”
- “It feels like the power assist disappeared.”
- “I almost have to stand on the pedal.”
Those aren’t random complaints—they’re exactly the kind of symptoms you’d expect if the brake booster can’t get or hold vacuum properly. And that’s where the check valve comes into the story.
Summary of How the Brake Booster Works
The brake booster’s job is simple: it increases the force you apply to the brake pedal. It does this by using vacuum—usually intake manifold vacuum on gasoline engines—to create a pressure difference across a diaphragm inside the booster. That pressure difference helps push on the master cylinder.
Inside a typical vacuum brake booster, there are two chambers separated by a flexible diaphragm. Under normal conditions, both sides are under vacuum. When you press the brake pedal, the booster changes that balance. Air is allowed into one side while vacuum remains on the other. That difference in pressure pushes the diaphragm forward, which adds force to your pedal input and helps drive the master cylinder more effectively.
Here’s the process in a clear step-by-step way:
- You press the brake pedal.
- The pedal moves a pushrod into the brake booster.
- The booster changes the pressure balance across its internal diaphragm.
- Vacuum remains on one side while atmospheric air enters the other.
- That pressure difference pushes the diaphragm and booster mechanism forward.
- This increases the force from your foot.
- The master cylinder receives that added force and pushes brake fluid through the brake lines.
- The brakes at the wheels engage and slow the vehicle.
Without the booster, the system would still work mechanically, but the pedal effort would be much higher. That’s why cars with a failed booster or lost booster vacuum often still can stop—but the braking feels heavy, hard, and far less comfortable.
The original explanation describes the booster as having two sides separated by a diaphragm and a shaft connecting the brake pedal to the booster and then the master cylinder. That’s basically right. The key thing to remember is this: the booster doesn’t create braking on its own. It simply helps amplify the force you already apply so the brakes work more effectively with less effort from you.
And that brings us to the check valve. The booster only works properly if it has vacuum available and can hold onto it. If vacuum disappears too easily, the booster loses its advantage. The check valve exists to prevent exactly that.
What the Brake Booster Check Valve Actually Does
The brake booster check valve is a one-way vacuum valve fitted between the engine’s vacuum source and the brake booster. Its main job is to let vacuum reach the booster while stopping air from flowing back into it when engine vacuum drops or disappears.
If that sounds too technical, here’s a simpler way to think about it:
- The engine creates vacuum.
- The brake booster uses that vacuum for brake assist.
- The check valve helps the booster keep that vacuum.
- If engine vacuum suddenly drops—like during hard acceleration or after shutting off the engine—the valve helps stop the booster from losing all its stored vacuum right away.
That’s why the check valve is so important. It doesn’t just help the brakes while the engine is running smoothly. It also helps hold vacuum in reserve so the booster can still give you assist when conditions change. In many vehicles, it’s the reason you still get one or two assisted brake applications even after the engine has been switched off.
The original text suggests the check valve prevents air from the booster from entering the master cylinder and brake lines. That’s not really the best way to describe it. The valve’s real role is to protect the booster’s vacuum reserve by controlling airflow between the booster and the engine vacuum source.
A more accurate way to put it is this: the brake booster check valve lets vacuum be pulled from the booster while blocking reverse airflow that would ruin the booster’s stored vacuum.
That reserve becomes especially important in real driving. Think about accelerating hard uphill or running under conditions where manifold vacuum drops. Without the check valve, the booster would lose assist more quickly. And once the engine is off, the stored vacuum would disappear much sooner too.
From a practical standpoint, the check valve really does three important things:
- It helps keep vacuum inside the booster.
- It blocks reverse airflow back into the booster.
- It helps the brake assist stay consistent when engine vacuum changes.
That’s a lot of responsibility for a part this small—but that’s often how important automotive valves work.
Brake Booster Check Valve Direction: Which Way Should It Face?
This is the part that trips people up most often. The brake booster check valve is easy to physically plug in, but direction matters completely. Put it in backward and the booster may not receive vacuum the way it should, or it may not hold vacuum at all.
The simplest rule is this:
The valve should let air move out of the brake booster toward the engine vacuum source, and stop air from flowing back into the booster.
In practical terms, that usually means the permitted flow direction is away from the booster and toward the engine, if you’re thinking about actual airflow. That’s why many check valves have an arrow on the housing. In most cases, that arrow points toward the intake manifold or engine vacuum source.
Why is that the correct direction? Because the engine vacuum source is essentially pulling air. The booster needs to be evacuated so vacuum can build and stay there. The valve allows that airflow in the correct direction. But if vacuum on the engine side drops, the valve closes and protects the vacuum trapped in the booster.
The original text says the valve direction should be away from the booster and toward the engine, and that’s the right general idea. But here’s the important caution: always check how your specific valve is marked. Not every aftermarket valve is labeled in exactly the same way, and assumptions can get you into trouble.
As a practical rule, if there’s an arrow on the valve body, it usually shows the allowed flow direction. On most brake booster check valves, that means the arrow points from the booster side toward the engine side.
If the valve is installed backward, you may notice:
- the booster doesn’t build vacuum the way it should,
- brake assist feels weak or disappears,
- the brake pedal becomes stiff,
- and engine vacuum behavior may seem off as well.
So yes—direction absolutely matters.
How to Tell Which Side of the Check Valve Is Which
Some valves make direction obvious. Others don’t. If you’re unsure, don’t guess. Use one of these simple methods:
- Look for an arrow. If the valve has one, that’s usually the fastest answer.
- Compare it to the old valve. Before removing the old one, take a photo so you can match the new valve to the original orientation.
- Do a simple blow or suction test. Air should pass in one direction only. The direction that allows air to move toward the engine vacuum side is the correct one.
- Check the service manual. This is especially useful if the valve design is unusual or integrated into the grommet.
- Follow the hose routing. One side goes to the engine vacuum source. The other sits in the booster grommet.
The safest habit is simple: if the old valve is still installed, take a picture before touching anything. That one step can save a lot of frustration.
What Happens If the Valve Is Installed Backward?
If the brake booster check valve is installed the wrong way, the booster won’t manage vacuum properly. Depending on the design, it may not receive vacuum correctly, or it may fail to store it. Either way, brake assist suffers.
Common symptoms of backward installation include:
- a very hard brake pedal,
- more effort needed to stop the car,
- little or no brake assist,
- strange vacuum-related engine behavior,
- loss of stored vacuum after shutting the engine off,
- and inconsistent pedal response if you press the brakes repeatedly.
A good way to picture it is this: the booster is like a vacuum-assisted muscle. If the check valve is installed wrong, that “muscle” either never charges properly or loses its stored energy too quickly. The brakes may still work hydraulically, but the easy assist you’re used to is gone.
And that’s not just annoying—it’s a real safety issue. A car with a hard pedal can still stop, but it may surprise the driver badly in an emergency situation.
Symptoms of a Bad Brake Booster Check Valve
Even if it’s installed correctly, the check valve can still fail over time. Age, cracking, contamination, internal sticking, heat damage, or a worn grommet can all cause trouble. When that happens, the booster may lose vacuum or fail to hold it the way it should.
Common signs of a bad brake booster check valve include:
| Symptom | What It Usually Points To |
|---|---|
| Hard brake pedal | The booster isn’t getting or holding enough vacuum |
| Brake assist fades quickly | The booster isn’t storing vacuum properly |
| Hissing near the booster or hose | Vacuum leak at the valve, hose, or grommet |
| Engine rough idle or stalling while braking | Vacuum leak affecting engine operation |
| No assisted brake feel after shutdown | The valve isn’t preserving vacuum reserve |
The original article correctly mentions a stiff brake pedal and possible stalling, and those are both real warning signs. A major vacuum leak in this area can absolutely affect engine idle, because it changes airflow into the intake in a way the engine isn’t expecting.
A useful real-world test is this: with the engine off, pump the brake pedal a few times. The pedal should gradually get firmer as stored vacuum is used up. If the booster and valve are healthy, you’ll often still get one or two assisted presses after shutdown. If assist is gone immediately, the check valve or booster vacuum reserve deserves attention.
Is the Check Valve Present in Every Brake Booster?
This needs a careful answer. The original text says the check valve is in all brake boosters. The more precise answer is:
Yes, in vacuum brake booster systems, the check valve is a normal and necessary part of the setup. But not every vehicle uses a vacuum brake booster.
Some vehicles use hydro-boost systems or other forms of brake assist that work differently. In those vehicles, you may not find this same style of vacuum check valve.
So if we’re specifically talking about a vacuum brake booster, then yes—the check valve is a standard and very important part of the system.
How to Properly Install a Brake Booster Check Valve
The original article gives a useful starting point, but it needs a cleaner, more practical order. Here’s a clearer and more mechanic-friendly way to handle replacement.
Before you start, gather these basic items:
- the correct replacement check valve,
- pliers,
- a Phillips screwdriver if your hose clamp uses one,
- a small amount of silicone spray or light lubricant for stuck rubber fittings,
- clean towels,
- and gloves.
Before You Remove Anything
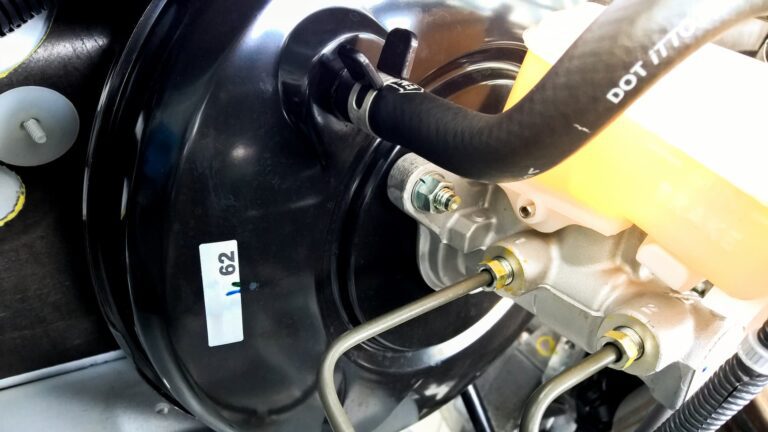
Make sure the engine is off and the vehicle is parked safely. If the engine has been running, give it time to cool. Find the brake booster—it’s usually the large round black housing mounted on the firewall behind the master cylinder.
The check valve is usually:
- pushed into the booster through a rubber grommet,
- connected to the vacuum hose leading to the engine,
- or mounted inline in the hose, depending on the design.
Before removing it, take a clear picture of the setup. That gives you an easy reference if you need to confirm direction later.
Removal and Installation Steps
- Find the brake booster check valve. It will either sit directly in the booster housing or inline with the vacuum hose.
- Check how the hose is secured. Some systems use spring clamps, others use screw clamps, and some simply push on.
- Loosen the clamp if needed. Use a screwdriver for screw-type clamps or pliers for spring clamps.
- Apply a little lubricant if the fitting is stuck. This helps loosen the valve without tearing the rubber grommet.
- Remove the vacuum hose carefully. Twist gently before pulling. Old hoses can crack if forced.
- Twist and pull the old valve out of the booster grommet. If it’s an inline type, disconnect it from both sides.
- Inspect the rubber grommet. Make sure it stays in place and is not cracked, hardened, or loose.
- Compare the old and new valves. Check size, fitting shape, and directional markings.
- Confirm the flow direction. Use the arrow or a one-way airflow test if needed. The valve must allow air to move from the booster side toward the engine vacuum source.
- Push the new valve into the grommet. Seat it firmly and evenly without forcing it sideways.
- Reconnect the vacuum hose. Make sure it goes fully onto the valve fitting.
- Re-secure the clamp. It should hold the hose snugly without cutting into it.
- Double-check everything. Confirm the valve direction, hose routing, and clamp position before starting the engine.
The job itself usually isn’t difficult. What matters most is orientation, hose condition, and making sure the grommet still seals properly.
How to Test the Check Valve After Installation
Replacing the valve is only part of the job. You still want to confirm it’s working properly afterward. These simple tests can help.
1. One-Way Airflow Test
If the valve is out of the vehicle, you can test it pretty easily:
- Air should pass one way,
- and it should block the other way.
If air moves both ways, the valve is faulty. If no air moves either way, it’s faulty too.
2. Brake Pedal Drop Test
With the engine off:
- Pump the brake pedal a few times to remove stored vacuum.
- Hold the pedal down.
- Start the engine.
- If the booster and valve are working, the pedal should move slightly downward as vacuum assist builds.
This is one of the easiest and most useful checks for basic booster function.
3. Vacuum Retention Check
Let the engine run for a short time to build vacuum, then shut it off. Wait a few minutes and press the brake pedal. You should still feel some assist on the first press or two. If the pedal is instantly hard, the booster isn’t holding vacuum the way it should, and the valve or booster may still have an issue.
Common Installation Mistakes
A lot of brake booster problems come from simple installation errors, not bad parts. The most common ones are:
- Installing the valve backward — easily the most common mistake.
- Ignoring the rubber grommet — if it’s cracked or loose, it can leak vacuum even with a new valve.
- Using the wrong replacement valve — some parts look similar but flow or seal differently.
- Cracking the vacuum hose during removal — old hoses get brittle.
- Leaving the clamp loose — that can create a vacuum leak and mimic a bad booster.
- Skipping testing after the repair — a job isn’t really finished until you confirm it works.
Good brake repair is not just about replacing parts. It’s about making sure the whole system still seals and behaves the way it was designed to.
Can a Bad Check Valve Affect the Engine Too?
Yes, it can. The original article mentions that a bad check valve can cause the engine to stall, and that’s absolutely possible. The reason is that the valve and hose connect directly to the engine’s vacuum system. If there’s a major leak here, it acts like extra unmetered air entering the intake.
That can lead to:
- rough idle,
- hissing vacuum-leak noises,
- stalling during braking in more severe cases,
- lean-running symptoms,
- or unstable idle compensation.
So if you’re diagnosing a booster check valve issue, don’t assume the symptoms will show up only at the brake pedal. Sometimes the engine tells part of the story too.
FAQs
Is the check valve available in all brake boosters?
In all vacuum brake booster systems, yes—it’s a standard and necessary part. It helps hold vacuum in the booster and prevents reverse airflow. But not every vehicle uses a vacuum booster. Some use hydro-boost or other assist systems, so the layout may be different.
Will a faulty check valve affect my brakes?
Definitely. A bad or wrongly installed check valve can reduce or completely remove brake assist, which makes the pedal feel hard and forces you to press much harder to stop. A leak can also affect engine idle or, in some cases, contribute to stalling.
What direction should the brake booster check valve face?
It should allow air to move from the brake booster toward the engine vacuum source, while stopping reverse airflow back into the booster. On many valves, the arrow points toward the engine or intake side. If you’re unsure, always verify before installing it.
Can I drive with a bad brake booster check valve?
You might still be able to drive, but it’s not a good idea. The brake pedal may become very hard, brake assist may disappear, and stopping effort can increase a lot. That’s a real safety problem, especially if you suddenly need to stop fast.
How do I know if the valve is installed backward?
Typical signs include a hard brake pedal, weak or missing brake assist, no stored vacuum after shutoff, or the system feeling worse right after replacement. If the brakes changed immediately after the install, direction should be one of the first things you recheck.
Do I always need a mechanic to replace the valve?
Not always. On many vehicles, it’s a fairly simple job if you’re careful and you know the correct direction. But since this part directly affects brake assist, it’s smart to get professional help if you’re unsure. Brakes aren’t the place for trial and error.
Final Wrap
A bad brake booster check valve can turn a light, assisted brake pedal into one that feels hard, heavy, and unpredictable. It can weaken brake assist, create vacuum problems, and even contribute to engine-running issues in some cases. That’s why this little valve deserves much more attention than it usually gets. It may be small, but it plays a big role in making sure the booster can do its job properly.
The most important thing to remember is simple: direction matters. The valve has to be installed so air can move from the booster toward the engine vacuum source, while reverse flow back into the booster is blocked. If that direction is wrong, the booster won’t work the way it should.
If you’re dealing with a hard brake pedal, weak assist, vacuum hissing, or strange brake-related engine behavior, inspect the check valve, hose, and grommet carefully. And if you replace the valve, don’t stop there—double-check the orientation, secure the hose properly, and test the system afterward. If anything feels off, let a qualified mechanic take a look. Braking is one of those systems where “almost right” is still wrong.
In the world of car repair, some of the smallest parts can have the biggest impact. The brake booster check valve is one of them. Get it right, and your brakes will feel smooth and properly assisted—exactly the way they were meant to.
SEO-Optimized Title
Focus Keywords
- brake booster check valve symptoms
- how to install brake booster check valve