If you’re like most people, your car isn’t just transportation; it’s an investment, a daily tool, and often one of the most valuable things you own outside your home. That’s exactly why keeping it in good condition is not merely a “nice-to-have,” but a practical strategy for avoiding expensive repairs later. The tricky part is that many vehicle problems don’t announce themselves dramatically at first. They start quietly: a dull headlight lens, a scratch that becomes corrosion, a sticky residue that attracts dirt, a foggy windshield that compromises visibility, or a foul odor that suggests hidden debris. When ignored, small issues tend to multiply, and what could have been a low-cost fix can turn into a costly repair visit.
It’s also no secret that cars are expensive; parts, labor, insurance, fuel, and maintenance costs add up quickly. But here’s the good news: not every improvement requires a big budget or a fully equipped garage. There are affordable fixes you can make to keep your vehicle cleaner, more comfortable, safer, and better protected from everyday wear. Some of these are simple habits (like keeping odors under control or preventing clutter), while others are clever DIY workarounds (like organizing your trunk or removing stubborn residue). A few of the tips below also touch on “internet-famous” hacks; useful in certain situations, but best approached with the caution and judgment of an experienced car owner. Wherever a method could potentially affect paint, plastics, or safety systems, I’ll flag the risks so you can make smart decisions.
From small tweaks like changing your car freshener regularly to bigger upgrades like installing a dashcam, the ideas in this guide aim to save money and prolong your car’s life; without turning routine car care into a stressful project. So don’t wait; start addressing those minor car issues before they turn into major ones. Here are 45 car problems and repairs to help you keep your vehicle running smoothly, looking sharp, and staying road-ready.
1. Vaseline is your new best friend
Vaseline (petroleum jelly) is one of those surprisingly versatile items that helps when you need a quick solution and don’t want to spend money on specialty detailing products. It’s well known for skincare, but in the car-care world it can also serve as a budget-friendly dashboard shiner. When applied correctly, it can give plastic surfaces a refreshed look and a glossy finish that resembles the effect of some commercial interior dressings.
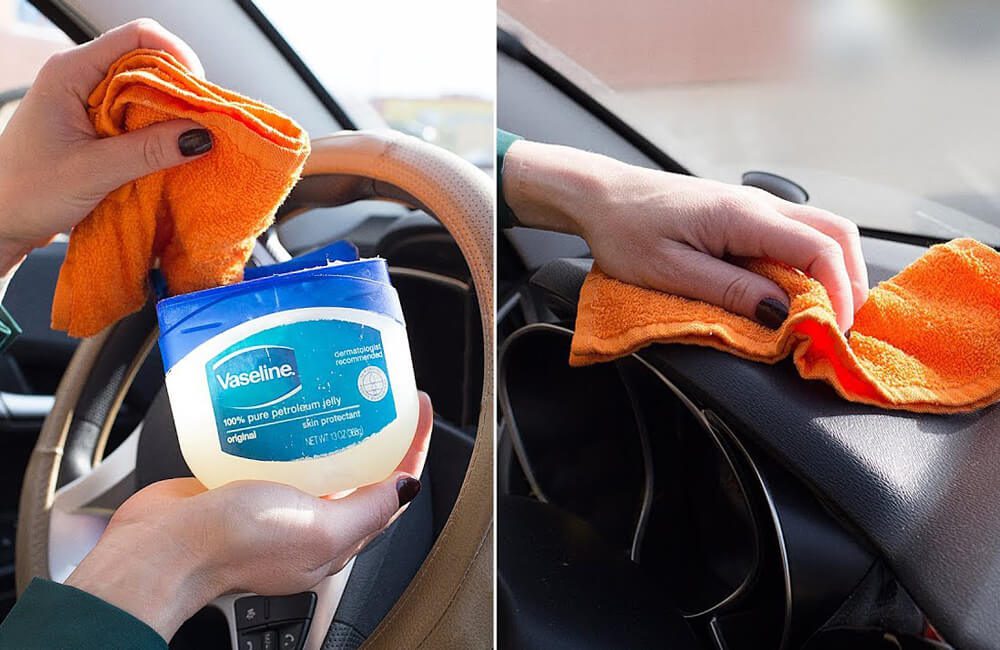
Start by cleaning your car’s interior using water and a mild cleaning solution so you’re not sealing dust and grit into the surface. Let everything dry completely before proceeding. Then apply a small amount of Vaseline onto a soft fabric (microfiber is ideal), and gently polish the dashboard. The key is using a very light layer; too much can attract dust or create a slippery surface. Avoid applying it to steering wheels, pedals, or any control surfaces where grip matters. Used with restraint, you’ll be impressed by how shiny and clean the dashboard looks.
Expert note: Always test on a small, hidden area first. Some interior plastics and textured finishes may respond differently, and you want to ensure you like the result before doing the entire dashboard.
2. DIY car freshener
If you have an old candle jar at home, you’re already holding the foundation for a simple DIY car freshener. This is a clever way to keep your car smelling pleasant without relying on chemical-heavy sprays that can be overpowering. The beauty of this approach is that you can choose a scent that genuinely suits you; something subtle and clean, rather than intense and distracting.
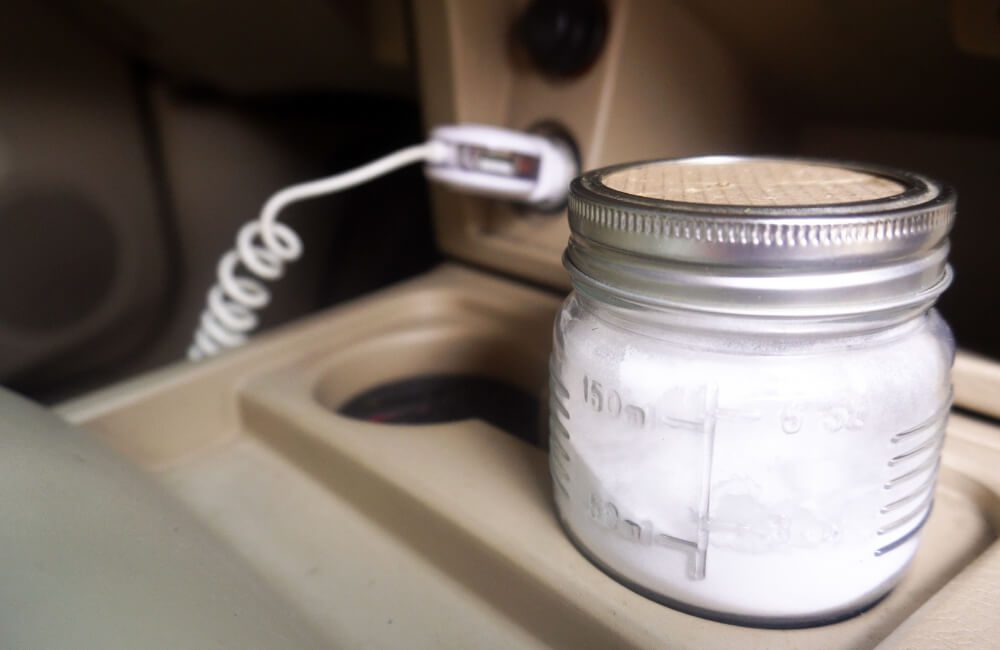
Drill holes in the bottom of the old jar and scoop fragrant wax from a new candle into it. Place the jar in your car, and even without lighting the candle, the wax will slowly release scent. This provides a steady aroma that’s less likely to overwhelm your senses compared to strong air fresheners. As with anything in a vehicle cabin, place the jar securely so it won’t tip over during braking or turns.
Expert note: Avoid placing wax fresheners in direct sunlight on very hot days, especially on the dash, where heat buildup could soften wax and make a mess. A cupholder or stable console area is usually safer.
3. Keep your coins in place
We all know the frustration: a coin slips out of a pocket, a key drops between the seat and the console, and suddenly you’re digging around like you’re searching for buried treasure. Those tight crevices are notorious for swallowing small items. Beyond being annoying, loose items can become distractions while driving, which is a real safety concern.
A foam pool noodle offers a surprisingly effective solution. Cut it lengthwise and fit it down into the gap between the seats and the center console. Once snug, it blocks the drop zone so coins, keys, and other small items can’t disappear into hard-to-reach places. The result is less clutter, fewer distractions, and no more “mission impossible” searches under the seat.
Expert note: Make sure the pool noodle doesn’t interfere with seat belt buckles, seat movement, or any wiring beneath the seat (some vehicles have airbags or sensors there). Fitment should be secure but not forced.
4. Work on those dents
Dents can be infuriating because they often don’t affect how the car drives, yet they ruin the appearance; and professional repair can be expensive. Many dents are cosmetic, especially those in flexible bumper areas or wide, shallow panel dents without paint damage. For these, a basic DIY approach can sometimes reduce or remove the dent enough to be worth the effort.
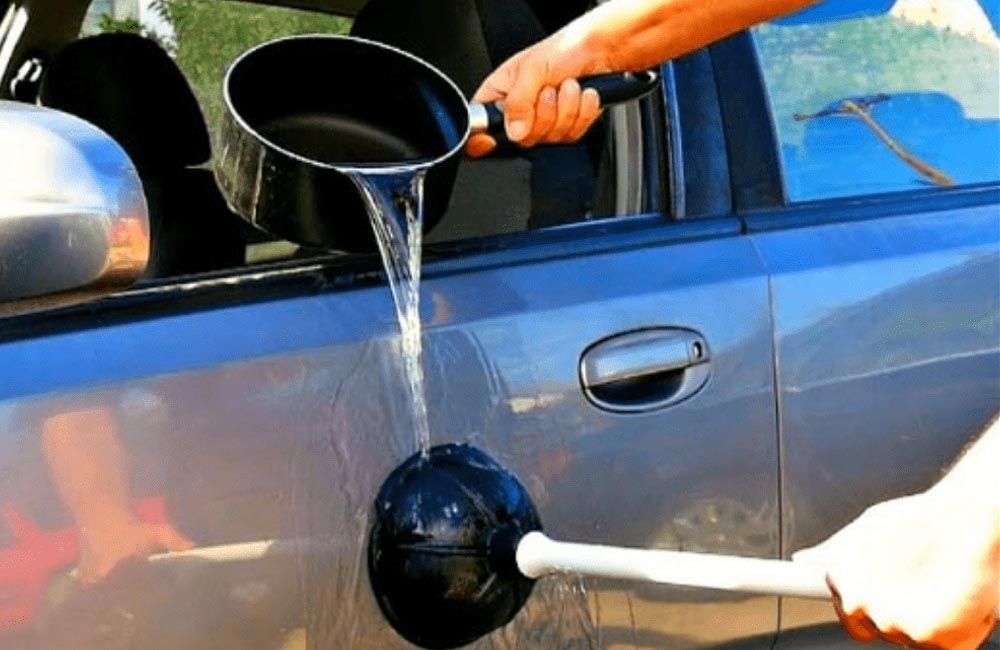
Splash hot water onto the dent area (particularly useful on plastic bumpers), then use a plunger to push and pull until the dent pops back out. This can save you a trip to the repair shop. The method works best when the dent isn’t too sharp and there’s no major crease or underlying structural damage. If paint is cracked or metal is sharply folded, professional repair is usually the safer choice.
Expert note: Be careful with very hot water and painted surfaces. Use controlled heat and avoid sudden temperature shocks, especially in cold weather, which can stress paint and clearcoat.
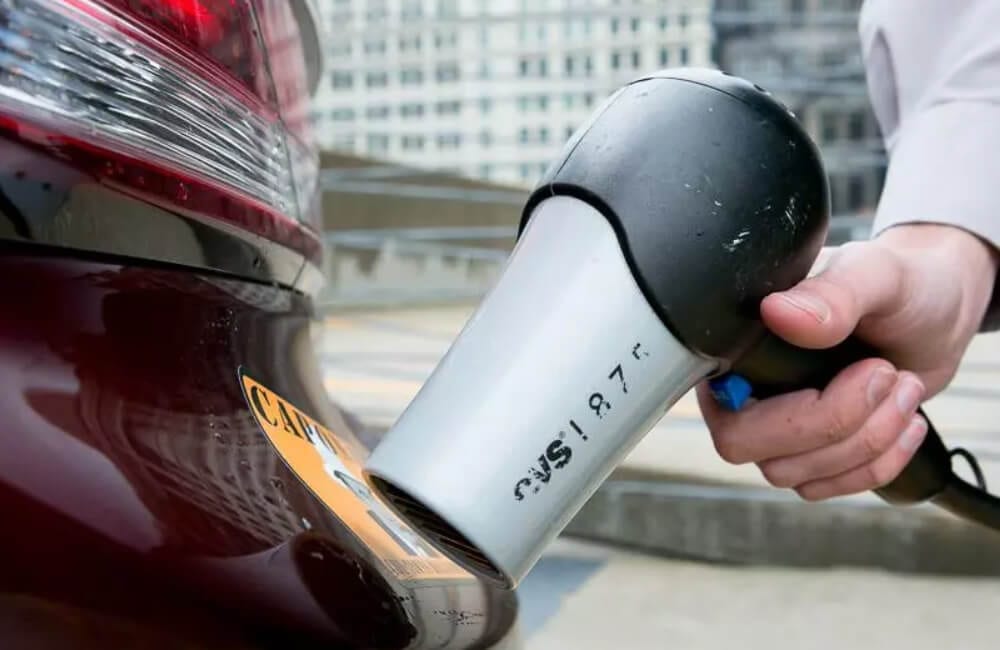
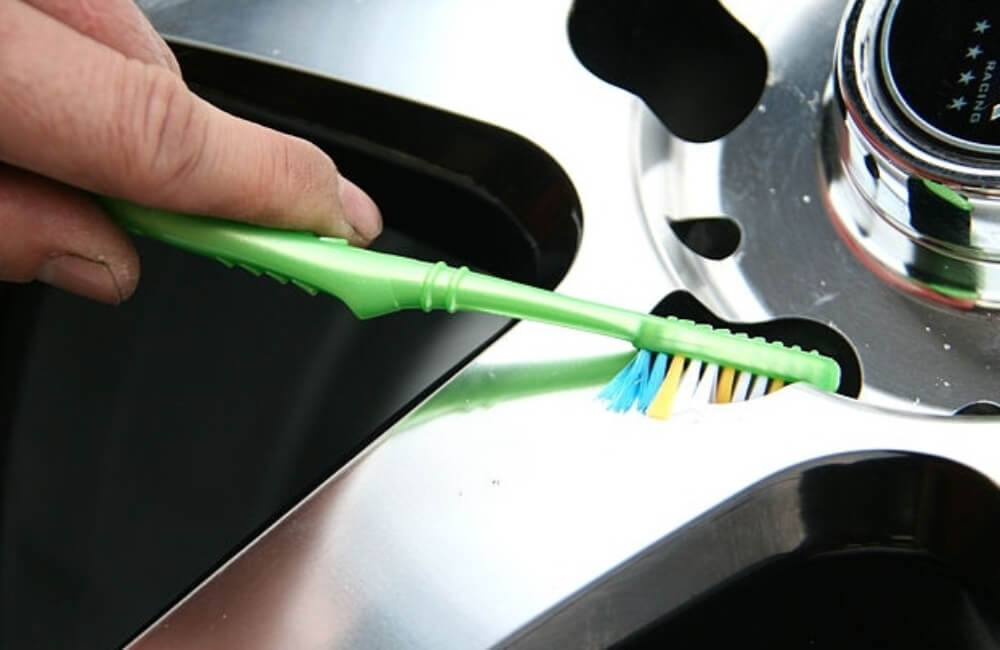
5. Magic of toothpaste on headlights
Your headlights live a hard life: sun exposure, road grit, rain, chemical residue, and temperature swings. Over time, many headlight lenses develop a yellow or hazy layer that reduces light output and makes night driving less safe. Before replacing your headlights (which can be surprisingly costly), you can try restoring clarity with basic household supplies.
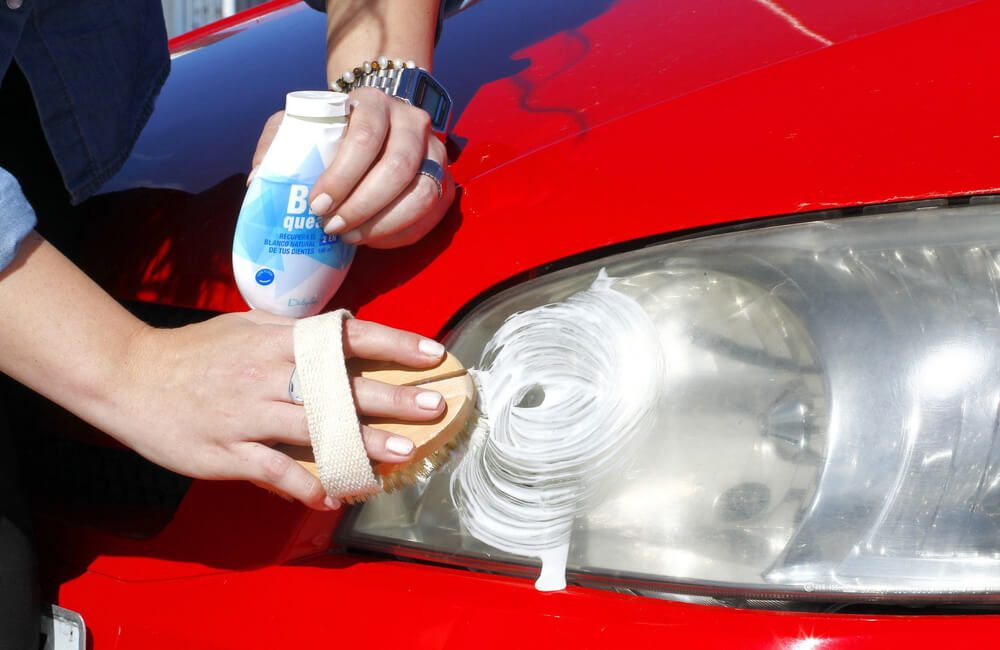
You can improve yellowed headlights in under 30 minutes using a cloth, soap, water, and whitening toothpaste. First, wash the lights with a gentle cleanser to remove dirt. Then apply whitening toothpaste and rub in circular motions for several minutes. After about 4–5 minutes of rubbing, rinse and wipe clean. You’ll typically notice a clearer finish and improved appearance.
Expert note: Toothpaste offers mild abrasive polishing, but it may not last long without a protective sealant. For longer-term results, consider a headlight restoration kit with UV protection; but toothpaste is a reasonable low-cost improvement for mild haze.
6. Use your phone hands-free
Not every car includes built-in navigation, so it’s no surprise that most drivers rely on GPS apps. However, holding your phone while driving is extremely dangerous and often illegal. The goal is to keep the screen visible for directions while keeping both hands available for steering and vehicle control.
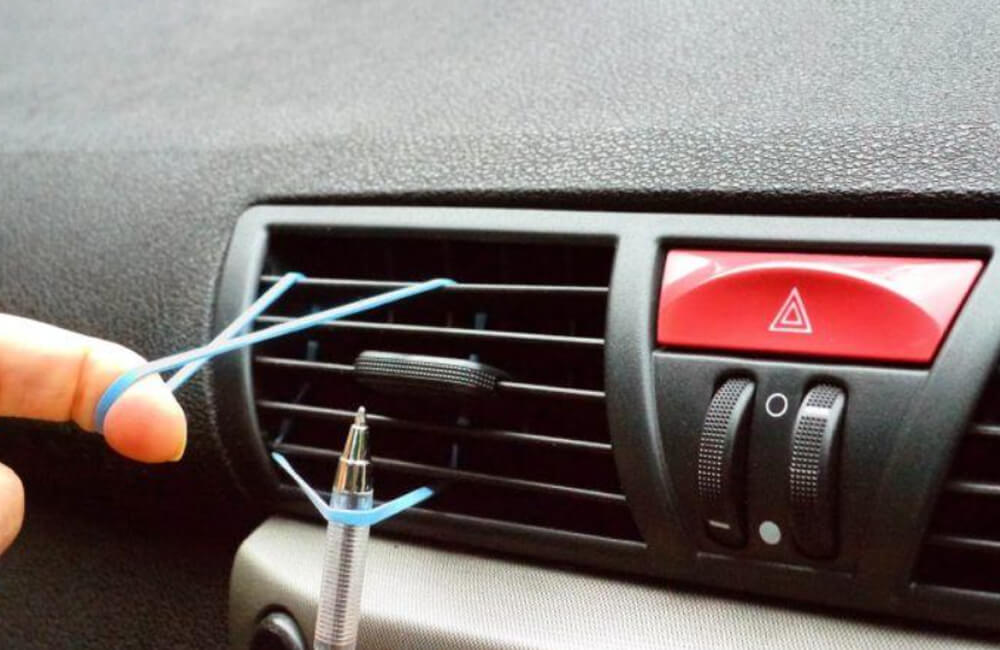
With an elastic band and a pen, you can create a basic phone holder that anchors to your ventilation system. Wrap the cord around one of the vents, secure it with clips, and place your phone inside the elastic loops. This quick fix can help in a pinch, especially if you’re traveling and forgot a mount.
Expert note: Ensure the phone doesn’t block airflow if you need defrosting or cooling, and keep it positioned so it doesn’t obstruct your view of the road. A proper phone mount is still the safest long-term solution.
7. Easy deep clean
Windshield wipers are easy to ignore; until the first rainy day when you realize they smear instead of clear. Even in summer, wiper blades collect oils, dust, and residue. In rainy weather, you rely on them constantly, and poor wiping performance can reduce visibility, especially at night with glare.
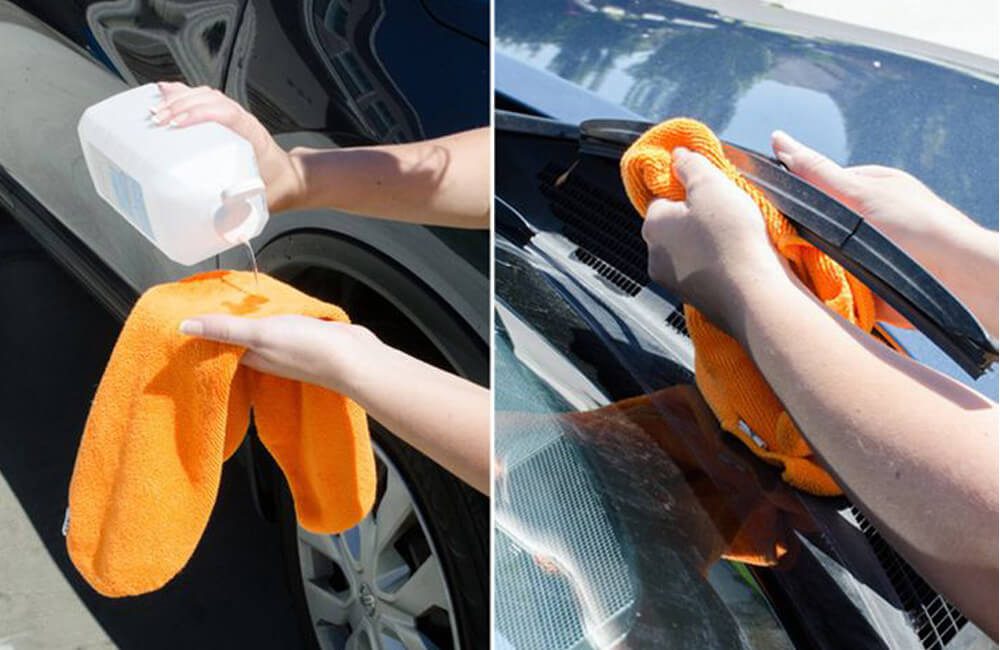
To keep the rubber bristles clean, a deep clean is worthwhile. If you don’t want the hassle of using water, isopropyl alcohol works well. Rub alcohol along the blade edge to degrease and lift grime. This often improves wiping performance immediately and can extend blade life slightly, buying time before replacement.
Expert note: If blades are cracked, hardened, or tearing, cleaning won’t restore them; replace them. Also clean the windshield itself; a dirty windshield quickly re-contaminates clean blades.
8. Learn all about the button controls
Many drivers use climate controls automatically and never touch some of the most useful buttons. One of the most important for comfort and ventilation is the recirculation button. It changes whether your HVAC system pulls air from outside or recirculates cabin air. Used correctly, it can improve comfort and even reduce workload on the system.
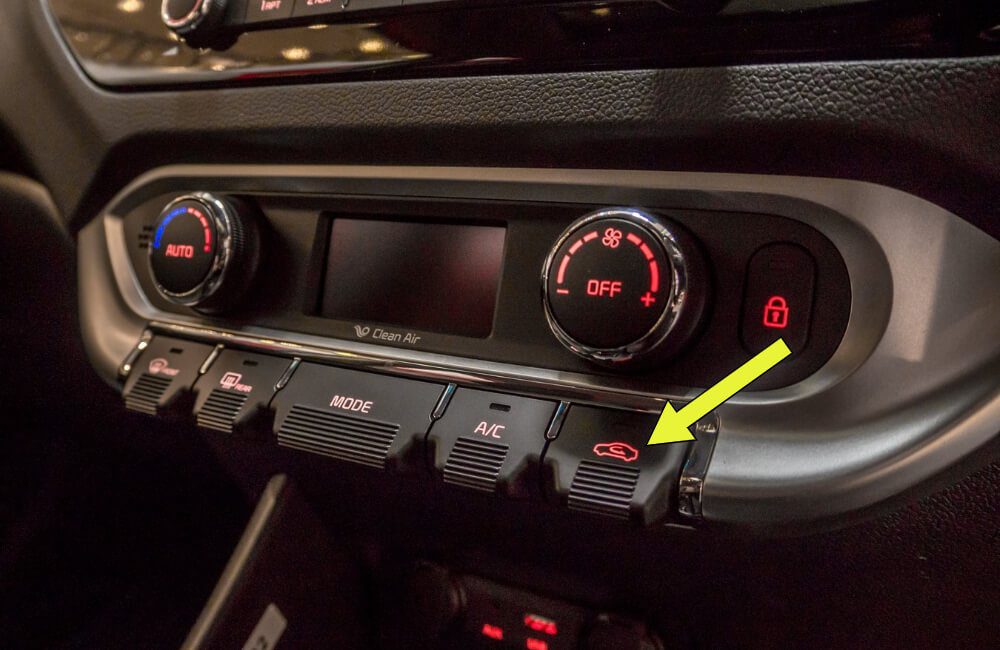
There is a flip side: using outside air can bring pollutants into the cabin when you’re stuck in traffic. In that situation, press the recirculation button to seal the cabin air and reduce intake of exhaust fumes. It can also help the AC cool the cabin faster and may save some fuel because the system doesn’t work as hard cooling hot outside air.
Expert note: Don’t keep recirculation on constantly in cold or wet weather if it causes windows to fog. Switching back to outside air helps remove humidity.
9. Onion for burnt leather
If you’re preparing to sell your car, details matter; especially interior condition. Leather seats can develop stains, burn marks, or discoloration that makes the cabin look older than the mileage suggests. Some blemishes are stubborn, and buyers tend to notice them immediately because they sit right in the “touch zone” of the interior.
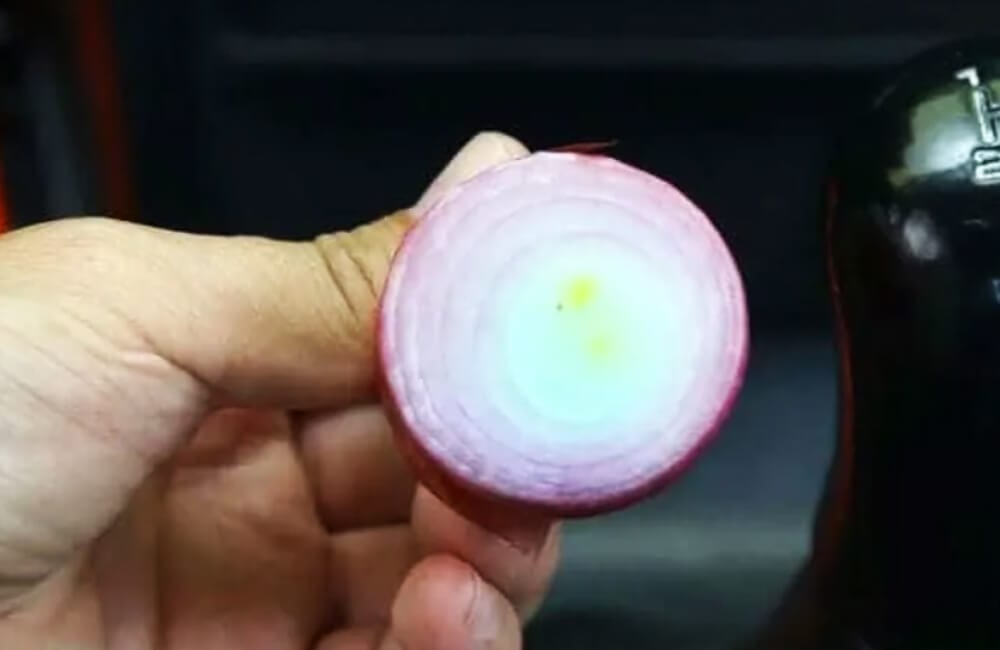
This tip suggests using raw onion: slice one into small pieces and place them on affected areas where burn marks or stains appear. Leave the spots uncovered overnight, and you may notice the marks look less visible by morning. The idea is that onion juices can help lift some surface discoloration and reduce harsh contrast in certain stains.
Expert note: Always test in a hidden area first. Leather finishes vary, and moisture can sometimes leave rings or affect coatings. For best results, follow up with a proper leather cleaner/conditioner.
10. Clean all the corners
Some of the dirtiest areas in a car are the ones you barely notice: narrow seams, button edges, console gaps, and AC vent slats. These areas collect skin oils, dust, spilled drinks, crumbs, and airborne particles. Over time, buildup can contribute to unpleasant odors; and in vents, it can reduce airflow efficiency and make the system feel “stuffy.”

A sticky cleaning gel with a slimy consistency is a practical tool for these spaces. Press it into crevices and lift it out; the gel grabs dust and debris without needing harsh scrubbing. It’s especially useful for air conditioning vents and tight interior seams. With consistent use, you can maintain a cleaner interior and keep ventilation working more effectively.
Expert note: Choose gels designed for automotive interiors so they don’t leave residue. Avoid pressing gel into electronic openings or damaged trim where it could break apart.
11. Deal with the melted crayon situation
If you have kids, you already know: a car can go from “clean enough” to “what happened here?” in one trip. Crayons are a classic culprit. They’re great for keeping kids occupied, but they also melt easily and can transfer onto seats; especially on warm days when cabin temperatures spike.
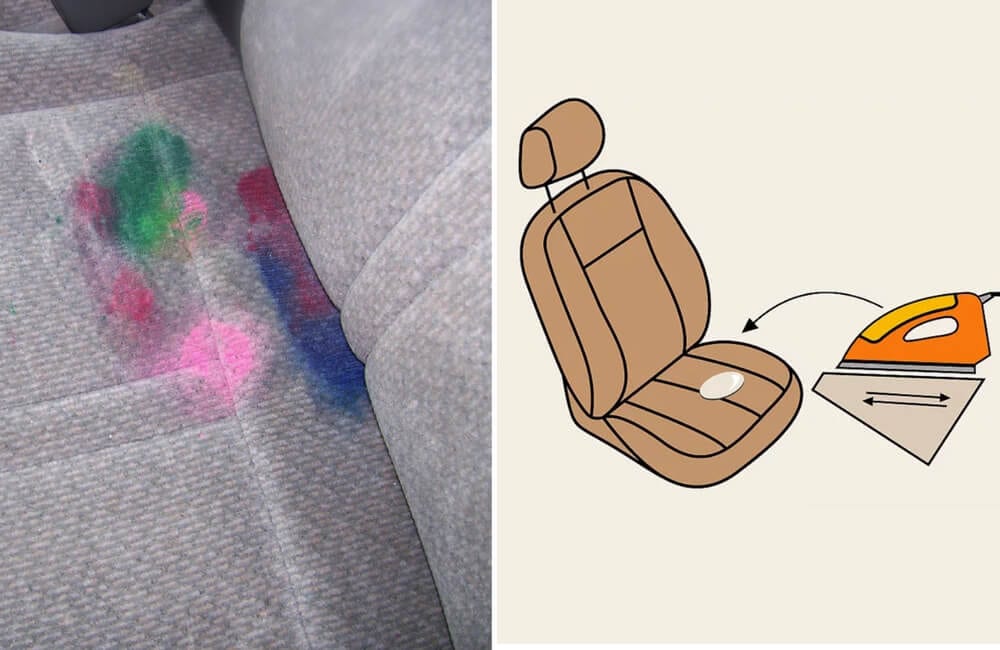
To remove melted crayon marks, use waxed paper and a hot iron. Place the waxed paper over the stain and gently run the iron over it so the heat transfers the softened crayon into the paper. Repeat the process with a clean section of paper until the stain is gone or significantly reduced.
Expert note: Use low to medium heat and keep the iron moving to avoid damaging fabric or upholstery. This is especially important on synthetic seats where heat can distort fibers.
12. No more foggy windshields
Winter driving often comes with a visibility problem: condensation and fogging on the inside of the glass caused by warm, moist cabin air meeting cold windows. Fog reduces visibility and reaction time, which makes it more than an inconvenience; it’s a safety hazard, especially at night or in traffic.
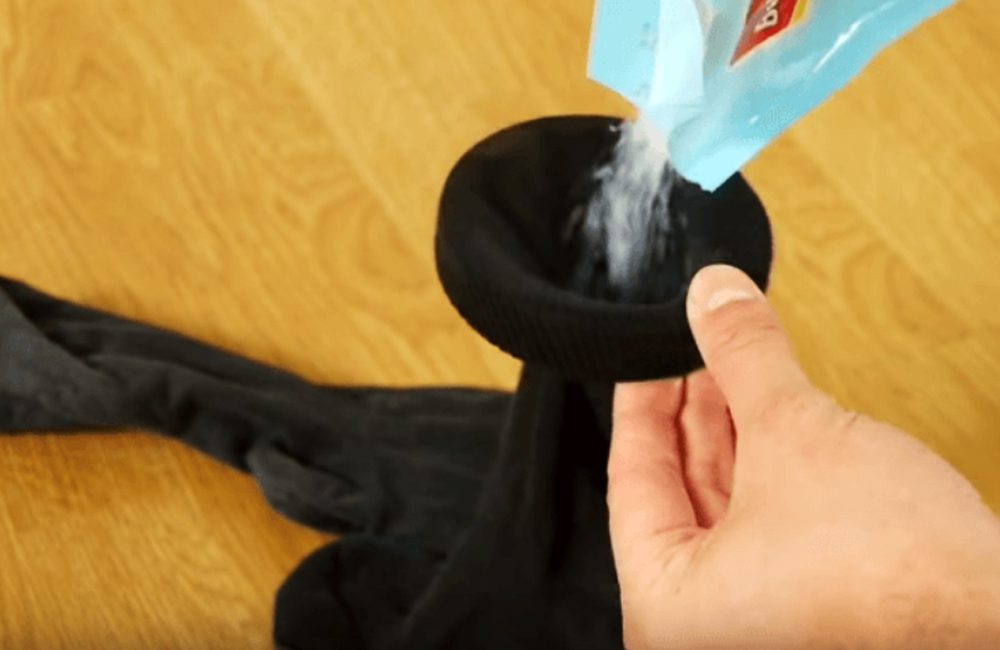
A low-cost moisture absorber can help: cat litter. Many formulas contain silicate, which is designed to absorb moisture. Put cat litter into old socks, tie them tightly, and place them around interior areas where moisture collects. This can reduce humidity in the cabin and help prevent foggy windows.
Expert note: This is a supplemental fix. If fogging is severe, also check for wet carpets, water leaks, clogged cabin air filters, or HVAC issues. Persistent moisture often indicates an underlying problem.
13. Don’t just drink your cola
Coca-Cola is famous in DIY circles for cleaning because it contains acids that can loosen oxidation and certain types of buildup. If you have rust stains on your car, cola can help reduce the appearance; especially on bare metal areas or certain surfaces where rust is superficial.
Pour some soda onto the rust stains and let it sit for a short time. Then wipe with a soft cloth. You’ll often see the rust lighten or partially lift. However, use caution: this approach is not recommended for car paint because it can damage the lacquer. If you try it anywhere near painted panels, you risk dulling the finish or leaving sticky residue.
Expert note: After using cola, rinse thoroughly with water and dry the surface. Sugar residue can attract dirt and moisture, which is the last thing you want around rust-prone areas.
14. Have perfect clean leather interiors
Leather seats look premium, but they require smart care. Over time, leather can dry out, crack, or lose its finish; especially in hot climates or vehicles parked in the sun. If you want leather that lasts, the key is gentle cleaning followed by light conditioning.
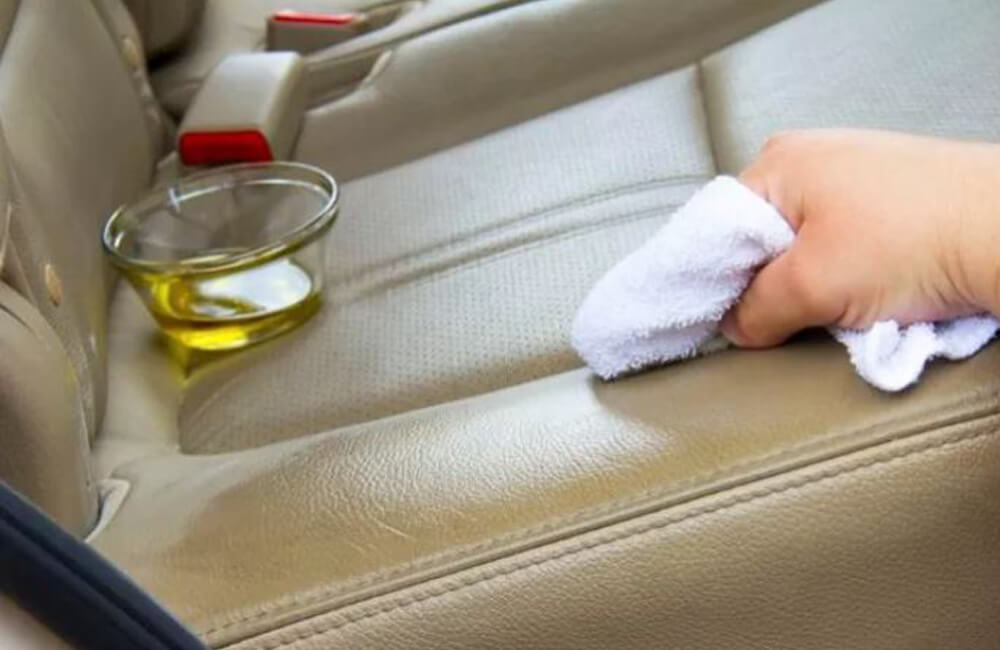
Start by cleaning the seats with hot soapy water to remove dirt, grime, and marks. After the surface is clean and dry, rub a small amount of olive oil onto the leather. This can help reduce dryness and slow cracking. If there are existing cracks, leave the olive oil on for a few hours before wiping off the excess.
Expert note: Use olive oil sparingly. Too much can create a slippery surface and may attract dust. Many modern leathers are coated, so a dedicated leather conditioner is more consistent; but this hack can help when you need a quick at-home solution.
15. Use an automatic Dashcam
This tip may feel more expensive than the others, but it’s one of the best long-term investments you can make for security and peace of mind. A quality dashcam can protect you in disputes, document accidents, and provide evidence for insurance claims. Good models; such as the Garmin Dash Cam mentioned here; often include strong GPS sensor technology and a wide-angle lens capable of capturing the road ahead clearly.

Many modern dashcams allow you to start/stop recording or take photos using voice commands. With a 3.7-megapixel sensor, it can handle low light more effectively and deliver 1440p video quality, which helps capture plates and signage. Most importantly, a dashcam can serve as proof for insurance claims, often saving money and stress if liability is disputed.
Expert note: Install the camera so it doesn’t obstruct your view, and check local rules on windshield-mounted devices. Also consider using a high-endurance memory card designed for continuous recording.
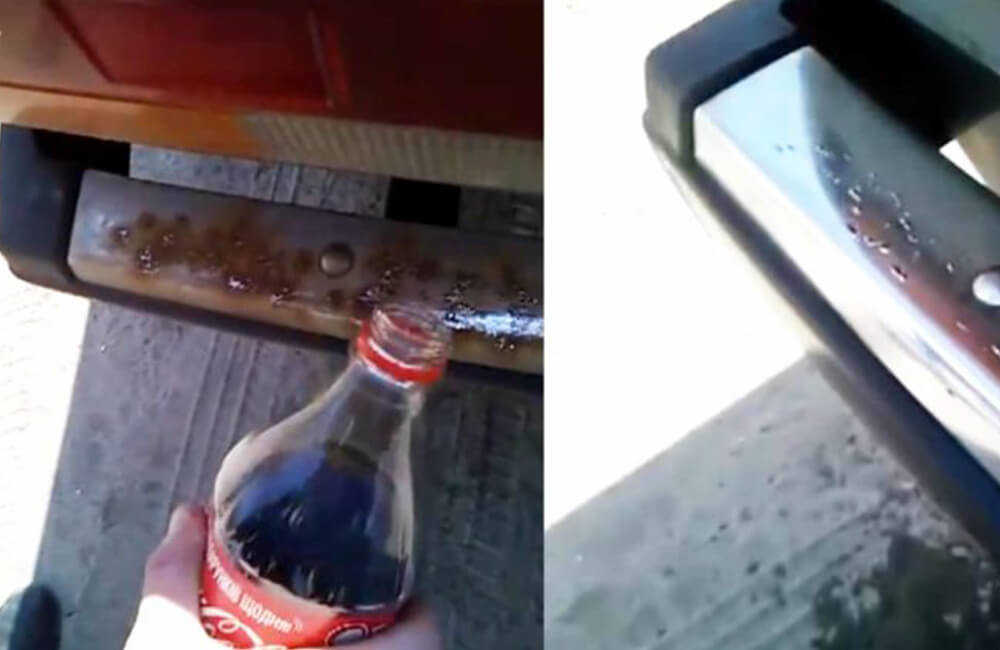
16. Soda to remove corrosion
Battery terminals collect dust, grease, and corrosion over time. When corrosion builds up, it increases electrical resistance, which can make your starter work harder and sometimes prevent the car from starting. Even if the engine still turns over, corroded terminals can contribute to inconsistent electrical behavior and shorten battery life.
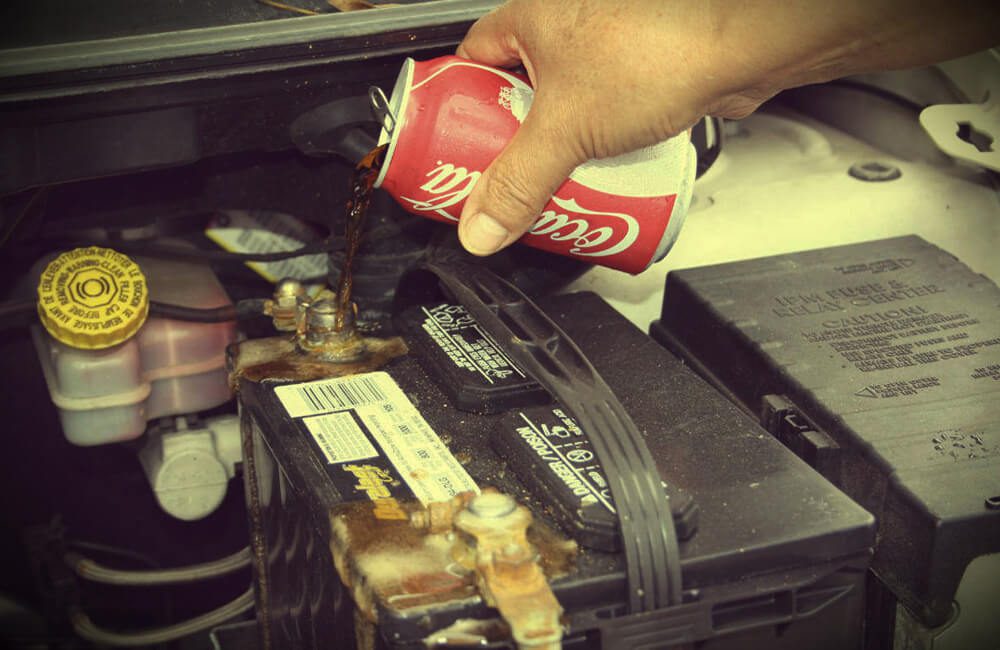
A simple approach uses coke: pour it onto a cloth that has been rinsed in warm water, then use that cloth to wipe debris and corrosion from the terminals. This can help remove grime and improve contact. After cleaning, ensure everything is dry and secure so the connection remains stable.
Expert note: Always use caution around batteries. Disconnecting terminals and cleaning corrosion should be done with protective gloves and eye protection. For best practice, use a dedicated terminal cleaner and apply terminal protectant afterward; but this soda method can help when you need a quick cleanup.
17. Sock protection for the windshield wipers
Those lone socks in your laundry pile can actually earn their keep in winter. When temperatures drop, windshield wipers can freeze to the glass, especially if moisture refreezes overnight. Forcing frozen wipers loose can tear the rubber, reduce performance, and create streaks when you finally need them most.

Cover each wiper blade with a sock so the rubber doesn’t stick to the windshield. When you’re ready to drive, remove the socks and your wipers should be free. As a bonus, the socks also create a soft buffer between blade and glass, which can help reduce freezing contact and keep the wipers from slapping the windshield if they fall.
Expert note: This hack works best if you also clear snow and ice properly and use winter washer fluid. Socks are not a substitute for safe winter prep; but they can prevent a common annoyance.
18. Penny test for your safety
Pennies might not buy much anymore, but they can still help protect you on the road. Tire tread depth is a major factor in braking distance, hydroplaning resistance, and overall traction. If your tires are worn, you’re not just risking a flat; you’re risking control, especially in wet conditions.
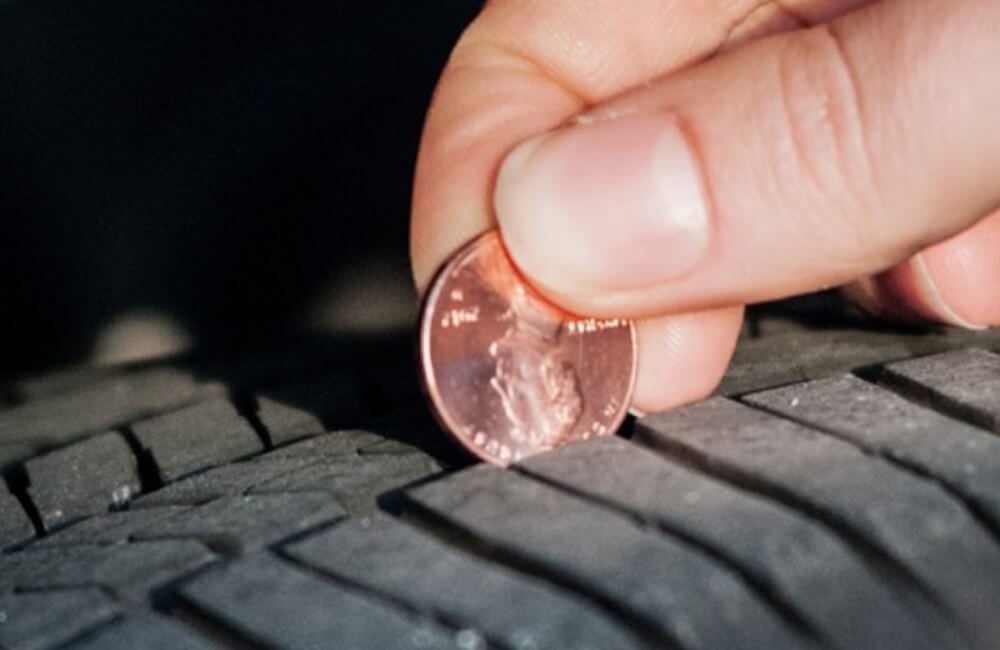
Use the penny test to check tread depth. Place a penny into the tread starting from the bottom. If the tread reaches Lincoln’s head, the tires still have usable depth. If the tread doesn’t reach past his brow, it’s time to plan for new tires. This quick check helps you avoid driving on worn rubber that can compromise safety.
Expert note: Use the penny test as a quick indicator, not a full inspection. Also check for uneven wear, cracks, bulges, and tire age. Proper tire pressure is equally important for safety and fuel economy.
19. No more stinky car
If you eat in your car; or drive with pets or kids; you already know how quickly odors build. Crumbs and spills left behind can cause persistent smells that linger for days. Many people try to cover it with heavy air fresheners, but that often creates a “smell layered on top of a smell,” which isn’t exactly pleasant.
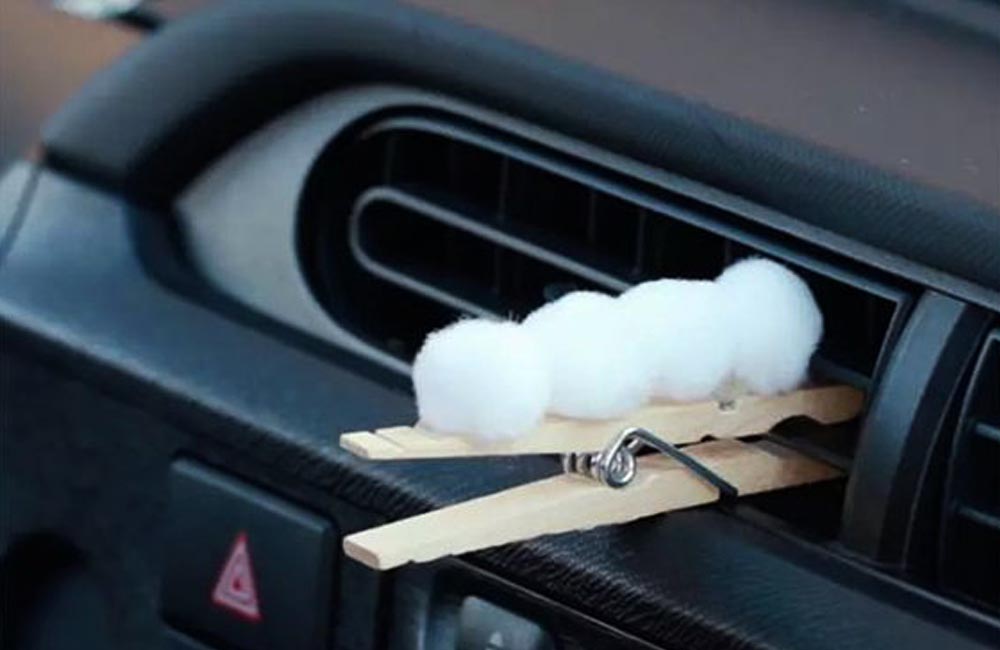
Instead of relying on chemical-based air fresheners, use essential oils on a cotton ball. Lavender, mint, and citronella are popular options. Place the cotton ball in a safe spot; like a cupholder insert or a small container; and the oil will release slowly, helping the cabin stay fresh without overpowering the senses.
Expert note: Essential oils can stain some plastics or fabrics if they leak. Keep them contained and avoid direct contact with upholstery or dashboards.
20. No more annoying imperfections
Minor scratches on the body can be annoying, even if they don’t affect driving. The problem is that small scratches can also become entry points for moisture, which increases the risk of corrosion over time. Before you schedule a repair, you can try a few household items to make light scratches less noticeable.
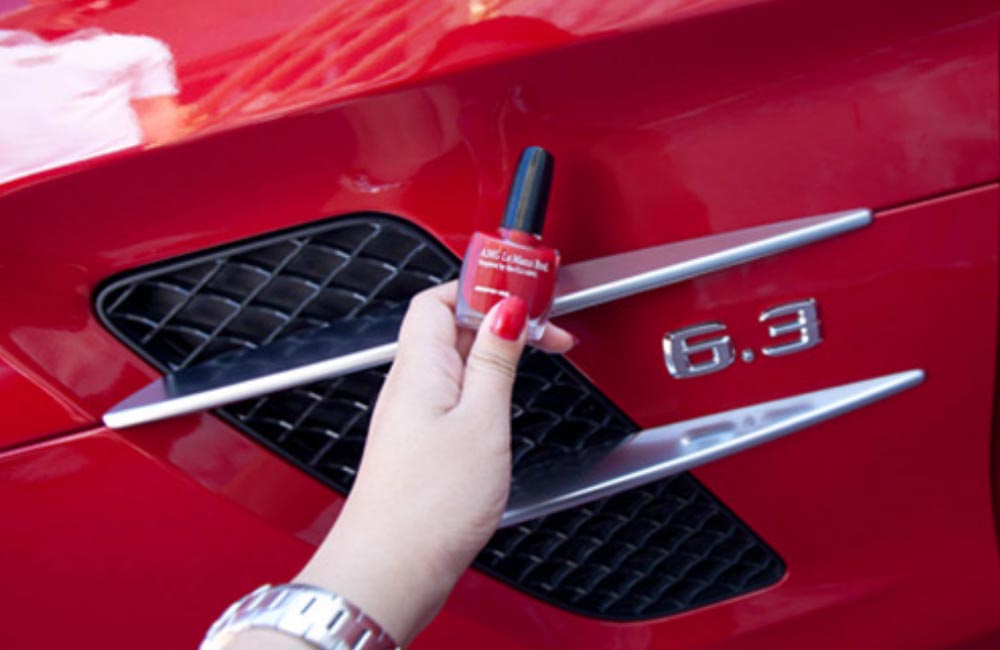
You may use toothpaste, shoe polish, glue, nail polish, or candle wax depending on the type and location of the scratch. These won’t always make damage disappear completely, but they can improve how the surface looks. If using nail polish, choose a shade that matches the paint as closely as possible. For toothpaste, rub gently with a soft cloth to minimize additional abrasion.
Expert note: If the scratch is deep enough to expose metal, a proper touch-up paint system is the safest option. DIY cover-ups are best for cosmetic improvement and short-term protection; not permanent repair.
21. Freedom from icy mirrors
Cold mornings are rough, but scraping ice off side mirrors can be especially frustrating. Mirrors are easy to scratch if you use the wrong tool, and poor visibility at the start of a drive is a real hazard. If you want an easy, preventive solution, this is one of the simplest.
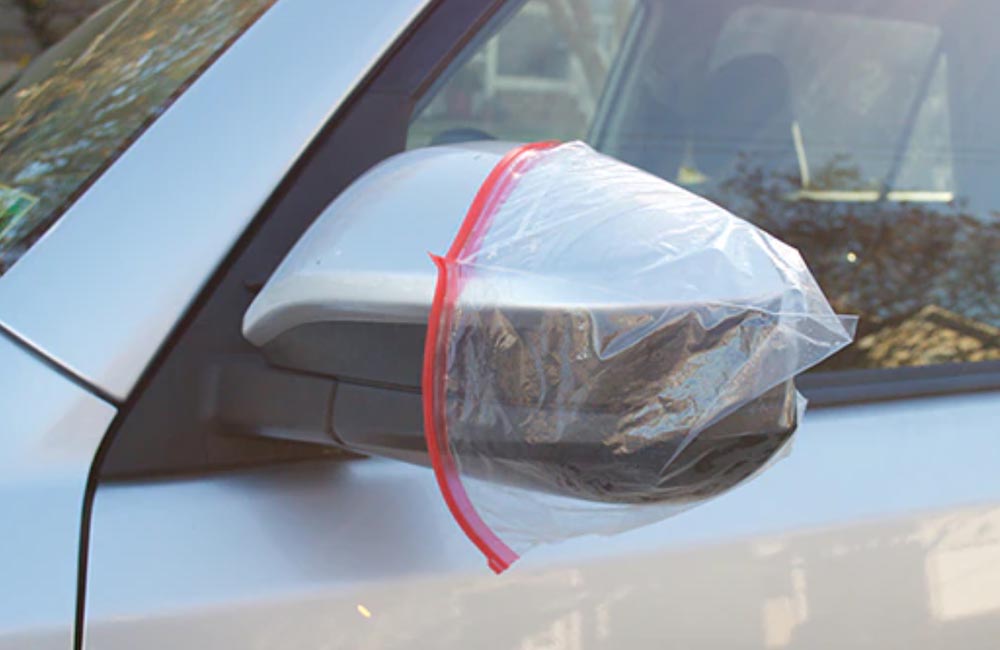
Use small sandwich bags to cover your side-view mirrors the night before. In the morning, remove them and you’ll often find reduced ice formation and less snow accumulation. It’s a low-cost trick that saves time and helps keep mirrors clear without aggressive scraping.
Expert note: This works best when the bags are secured so they don’t blow away. Be sure nothing is left dangling that could scratch the paint in windy weather.
22. Potatoes for defrosting glass
If you don’t want to buy specialized products, this kitchen-based hack is a classic: potatoes. Defrosting and defogging can feel slow when you’re in a hurry, and fog can compromise visibility even before ice becomes an issue. A simple film that reduces condensation can help buy you time.
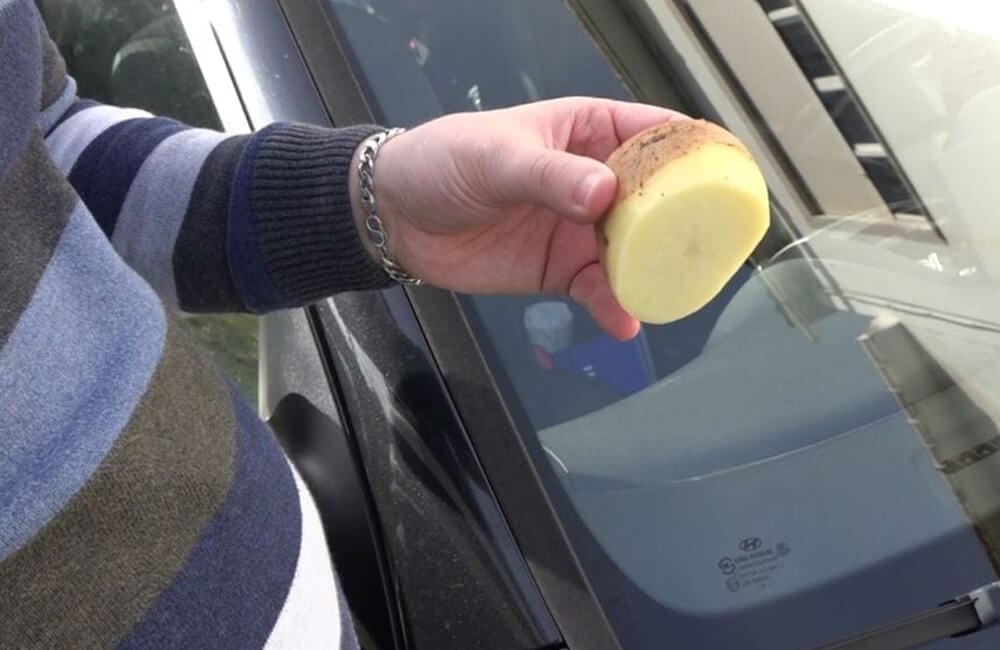
Cut an unpeeled potato and rub the freshly cut side across the glass. As you work, you’ll notice fog reduces; an indication the potato’s starch is leaving a light residue that can help prevent water from condensing as easily. This can provide a clearer view, especially in mild fogging conditions.
Expert note: This is not a replacement for proper defrost settings and climate control use. Also, avoid leaving streaks that could distort vision at night; wipe lightly if needed for clarity.
23. For the unreachable corners
Some car interiors are designed with tight seams and narrow gaps that look great; but they trap dirt. If you’ve ever tried to clean vents, steering wheel seams, or tiny button edges, you know that a big cloth simply can’t reach everything without frustration.
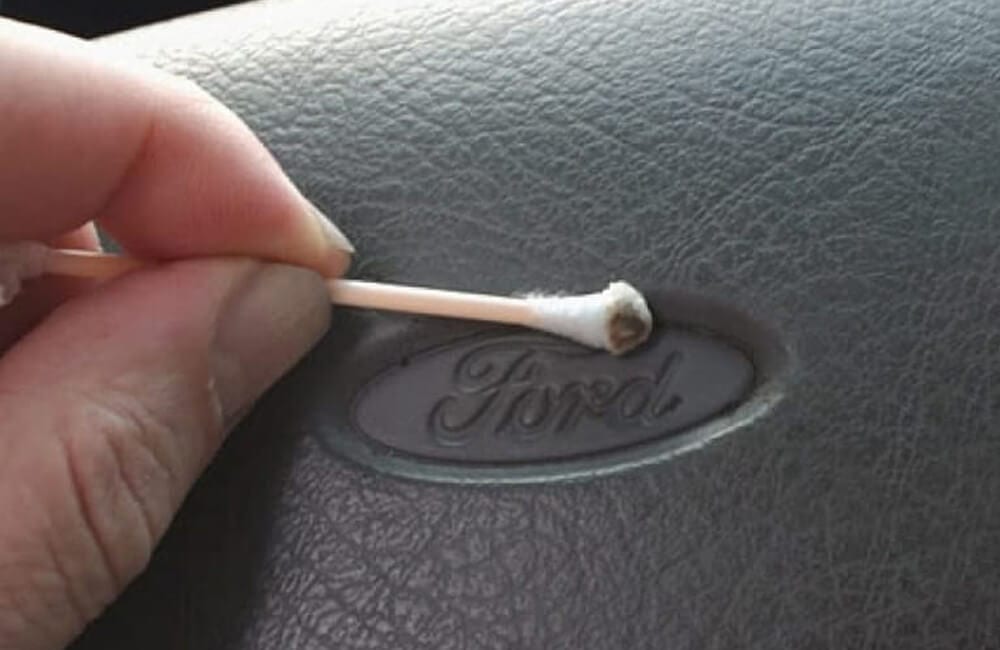
Cotton swabs (Q-tips) are small, precise, and soft enough for delicate surfaces. They work well for marks on steering wheels, the edges of switches, vents, and narrow gaps. Because they’re inexpensive, you can keep a few in the glove box for quick touch-ups, especially if you notice buildup forming in commonly touched areas.
Expert note: Use a lightly dampened swab rather than soaking it. Too much cleaner can drip into electronics or leave residue in vents and seams.
24. Quick hairdryer heat hack
A hairdryer is a surprisingly useful tool for automotive detailing because many adhesives soften with controlled heat. If you’ve got old stickers, decals, or stubborn labels on your car, pulling them off cold often leaves residue; or worse, pulls at the surface underneath.
Aim the hairdryer at the sticker and turn up the heat. The warmth loosens the glue, weakening the sticker’s grip on the surface. Within a few minutes, you should be able to peel away even older decals more cleanly. Done correctly, your car will look cleaner and “sober,” with fewer visual distractions on paint or glass.
Expert note: Don’t overheat one area for too long. Keep the dryer moving and avoid extreme heat on plastics, which can warp or discolor.
25. Spotless carpets
Floor mats and carpets absorb everything: mud, salt, spilled drinks, sand, and daily grit. When they look worn, the entire cabin feels dirtier; even if the rest of your car is tidy. The good news is that mats are one of the easiest interior components to restore because they’re removable.
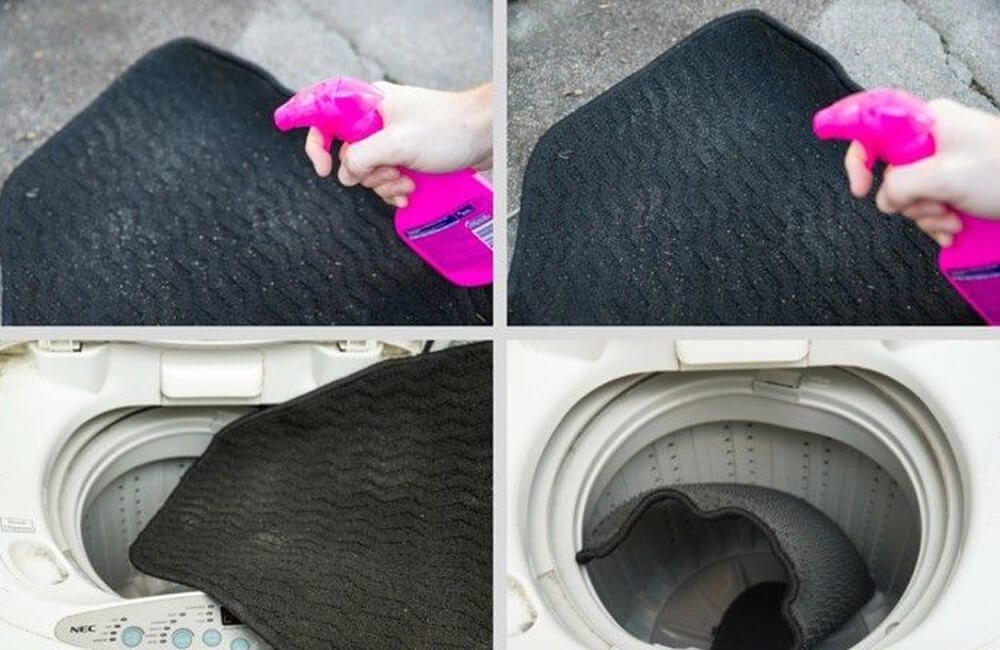
Apply a stain remover to the mats and let it work. Then place the mats in the washing machine with detergent and run a cycle appropriate for durable fabrics. After washing, dry the mats in the sun. Proper drying matters; wet mats can increase cabin humidity, create odors, and contribute to mildew.
Expert note: Check whether your mats are machine-wash safe. Some rubber-backed mats can degrade or warp in high heat; air drying is usually safest.
26. DIY tinted windows
The appeal of DIY tinting is obvious: window tint improves comfort, reduces glare, and can help keep interiors cooler. This particular DIY idea suggests using common household materials to create a darker finish; without visiting a tint shop. The process described is simple, but it should be approached carefully.
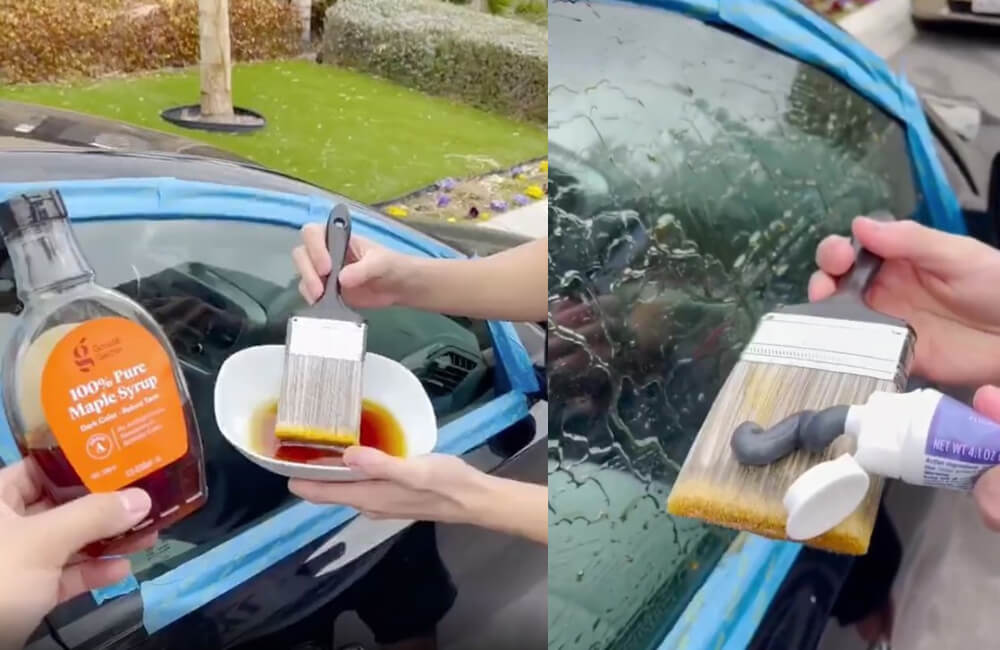
First, paint the windows using maple syrup, then add charcoal toothpaste for a darker tint effect. Cover the windows with plastic wrap and leave it on for about an hour. Afterward, remove the wrap and clean the windows. The idea is to achieve an “instant tinting service” effect at home, but apply the mixture carefully so the products do not damage your car.
Expert note: Be aware that this method may leave residue, attract dust, and could be difficult to remove completely. Also, tint laws vary by region; improper tinting can lead to citations. For a professional, durable result, real tint film is the correct approach; but this describes a DIY experiment some people try.
27. Stickers won’t be a problem anymore
If you don’t have a hairdryer handy, WD-40 is a common alternative for dealing with sticky labels and stubborn stickers. Adhesives can cling aggressively to glass and painted surfaces, and scraping them off can risk scratches if you use the wrong tool or too much pressure.
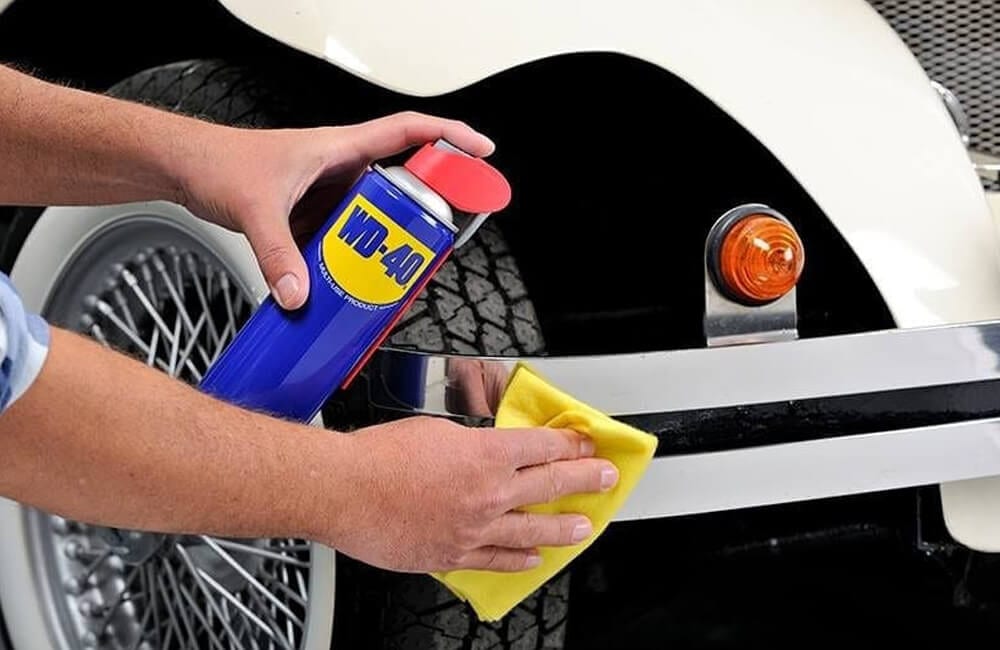
Apply WD-40 directly onto the sticker and let it soak for a while. The product helps break down the adhesive so the sticker lifts more easily. Once it releases, wash the area and wipe the surface with a soft cloth to remove any oily residue and restore a clean finish.
Expert note: WD-40 can strip wax and leave a film. After using it on exterior paint, wash the area thoroughly and consider reapplying wax/sealant for protection.
28. Dry mud removal
Mud on wheels and tires is common, especially after rain, construction zones, or unpaved roads. Cleaning mud while it’s still wet is easiest, but that’s not always possible. Once dry, mud hardens and clings to wheel textures, making it more stubborn to remove with plain water alone.
This hack recommends oven cleaner foam: spray a generous amount onto the muddy wheels, let the foam sit so it can work through the grime and debris, then rinse with warm water. When done properly, you’re left with cleaner, shinier wheels without heavy scrubbing.
Expert note: Oven cleaner can be harsh on finishes. Avoid using it on sensitive wheel coatings, and never let it dry on the surface. Test on a small area first and rinse thoroughly.
29. Pool noodles for the door rescue
Parking in a tight space can be stressful, especially in garages or narrow driveways where doors risk hitting walls. Repeated contact can scuff paint, chip edges, and create dents. Preventing damage is always cheaper than repairing it; and this solution is simple.
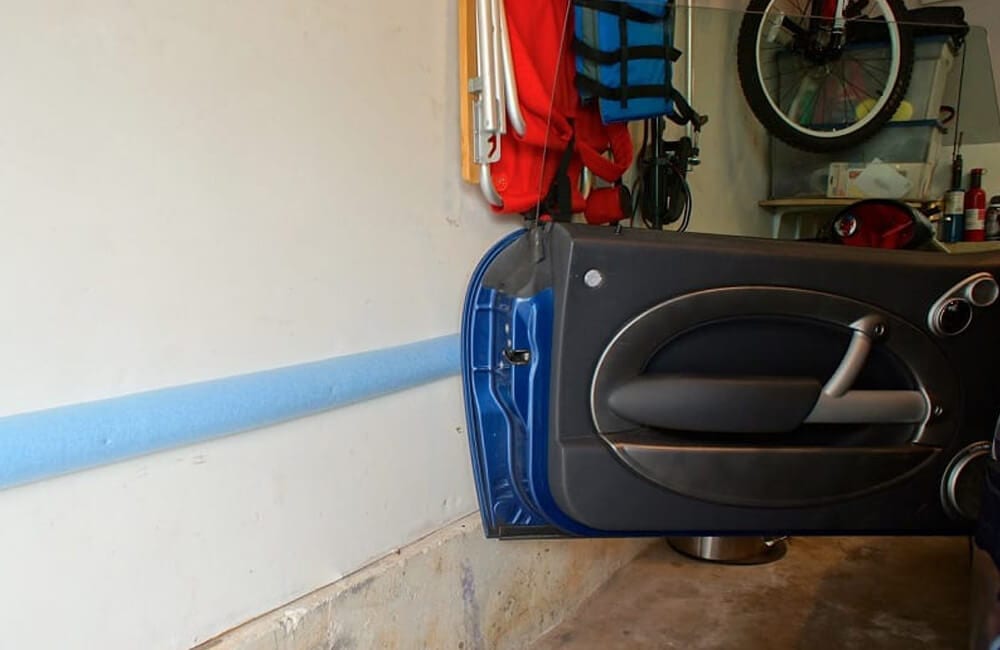
Screw two pool noodles onto the wall or near the edges where your car door typically swings. When you open the door, the foam acts as a soft barrier and prevents scratches. This also reduces the risk of waking up to new dents caused by a rushed parking job or a door pushed too far.
Expert note: Position the noodles at the correct height for your door edge, and ensure the mounting method is secure so the foam doesn’t fall and become a tripping hazard.
30. Keep the tissues handy
Tissues are one of those small essentials you don’t think about until you need them; spilled coffee, dusty hands, a sneeze, or foggy glasses. The problem is that if tissues are buried in a compartment, you’ll either forget they exist or you’ll be tempted to search while driving, which is unsafe.

Use a small tissue holder attached to your sun visor. This keeps tissues in arm’s reach, preventing unnecessary digging through compartments while driving. It’s a low-cost upgrade that improves convenience and reduces distraction risk.
Expert note: Ensure the holder doesn’t interfere with visor movement or block the mirror. Keep it secure so it doesn’t swing or fall during driving.
31. Easiest tar removal
Tar stains are stubborn, especially on lower body panels, wheel wells, or areas exposed to road work and fresh asphalt. They cling, attract dirt, and can become harder to remove the longer they remain. A gentle approach is ideal because aggressive scrubbing can damage fabrics, trim, or paint.
This trick uses mayonnaise. Apply a small amount onto fabric or leather; wherever the tar has affected the surface; and rub gently until the residue lifts. Let it rest for about five minutes, then wipe clean with a cloth and allow the area to dry. The oils in mayonnaise can help loosen sticky tar.
Expert note: Afterward, clean the area with a mild cleaner to remove oily residue. On exterior paint, dedicated tar removers are safer and more predictable, but this hack can help on certain interior surfaces when used carefully.
32. Peppermint gum for leaks
Leaks can be scary; especially if you’re far from a repair shop. While no DIY trick should replace proper mechanical repair, temporary measures can sometimes buy you enough time to reach safety. The important point is to treat this as an emergency stopgap, not a permanent fix.
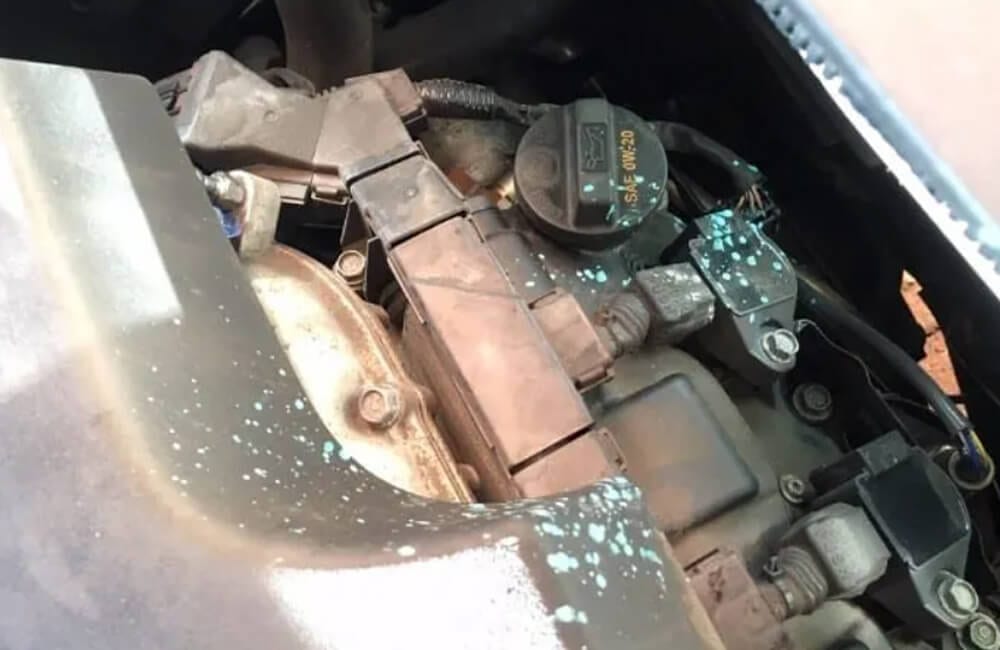
If a leak starts in the engine compartment and you identify a small hole, chew peppermint gum and press it into the opening. The gum can act as a temporary plug long enough to reduce further leaking and help you reach an auto shop. It’s not elegant, but it can be effective in a pinch.
Expert note: Use extreme caution. Leaks can involve hot coolant, fuel, or pressurized fluids. If you smell fuel, see spraying fluid, or notice overheating, do not continue driving; stop and seek professional help immediately.
33. Perfectly shiny interiors for days
You don’t always need expensive detailing products to improve interior appearance. Some DIY mixtures can add shine and reduce dust attraction; though they must be used carefully to avoid damaging surfaces. This hack recommends a homemade blend to wipe down interior trim.
Mix kerosene and water until you have enough to dampen one side of an old cloth. Use the wet cloth to wipe interior parts, polishing lightly and removing excess so only a subtle shine remains. The idea is to leave surfaces looking refreshed while also helping reduce dust buildup.
Expert note: Kerosene is a strong chemical and may not be safe for all plastics, coatings, or modern soft-touch materials. Test in an inconspicuous area first, keep the mixture minimal, and never use it on steering wheels, pedals, or touchscreens. Commercial interior protectants are safer, but this describes a budget technique some people use.
34. Organize the trunk storage
If your trunk becomes a chaotic storage zone, groceries and bags will slide around, spill, and create unnecessary mess and noise. Loose items can also become damaged, and in extreme braking, unsecured cargo can be a safety risk. A simple organizer setup can transform how usable your trunk feels.
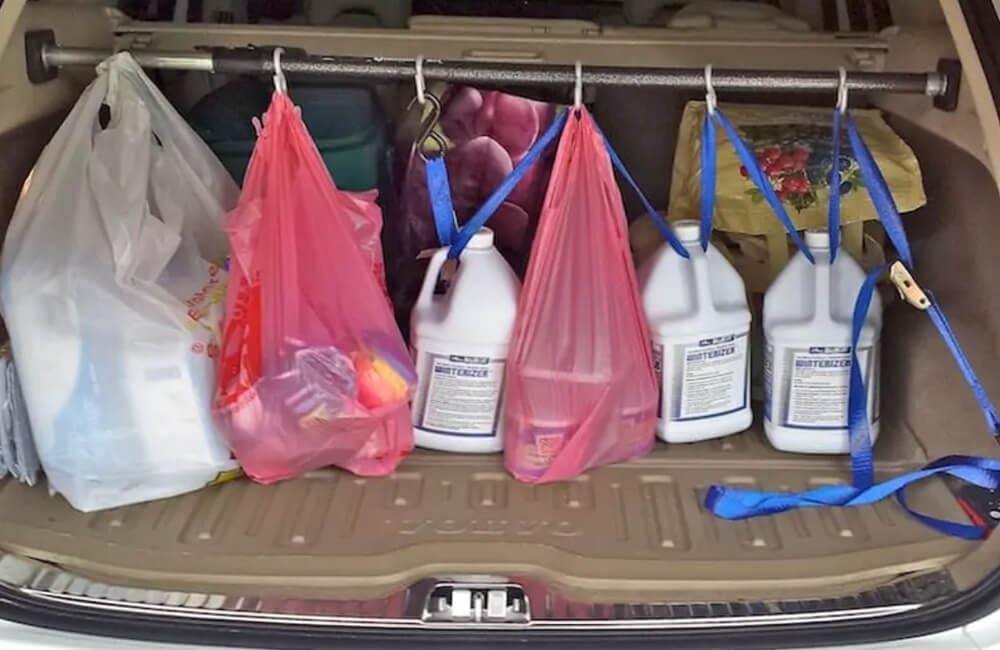
Install a simple bar and add S-hooks to hang items like grocery bags, toys, drinks, and other knick-knacks. This prevents sliding, reduces trunk noise, and keeps items accessible. The result is a cleaner trunk, less rattling, and fewer “why is everything spilled?” moments when you arrive home.
Expert note: Use strong mounting points and ensure the bar doesn’t interfere with trunk closing mechanisms or emergency release features.
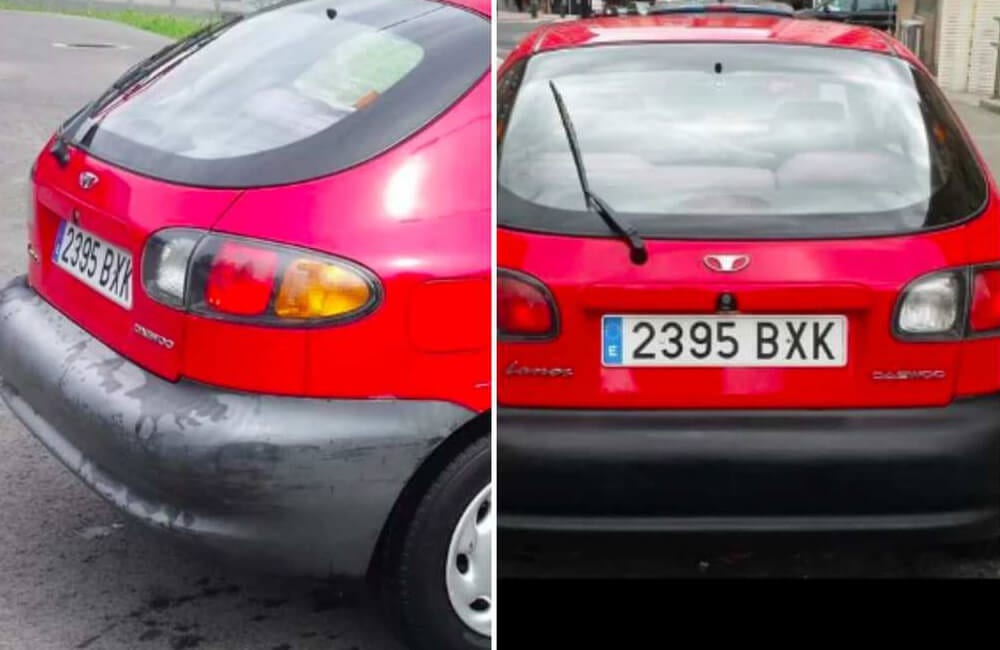
35. No more bird poop on the windshield
Bird droppings are more than unpleasant; they’re chemically aggressive and can stain glass and damage paint if left too long. Removing them quickly and gently is key. Scrubbing dry droppings can scratch surfaces, so dissolving them first is a smart strategy.
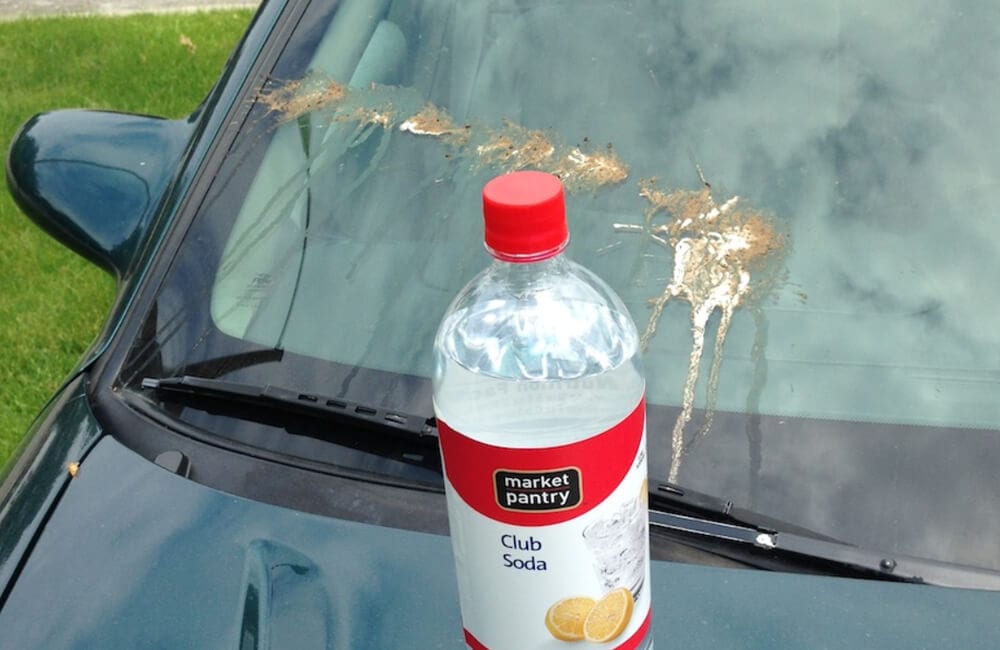
This hack suggests soda water: apply soda to the bird dropping and let the bubbles work. Be careful not to use too much soda, since it can damage paintwork on the hood. Place a towel below the windshield to catch drips, then wait as the soda helps loosen the stain. Once softened, wipe gently. You may notice the windshield stays cleaner longer and visibility improves.
Expert note: The safest method is still warm water and a dedicated glass cleaner, but the “bubble lift” effect can help soften stubborn droppings. Always rinse and wipe thoroughly afterward.
36. Defrost door handles
Frozen door handles are one of winter’s most irritating surprises. If you’re rushing, waiting for the car to warm up can feel like losing valuable time. The goal is to break the freeze without forcing the handle, which can damage mechanisms or seals.
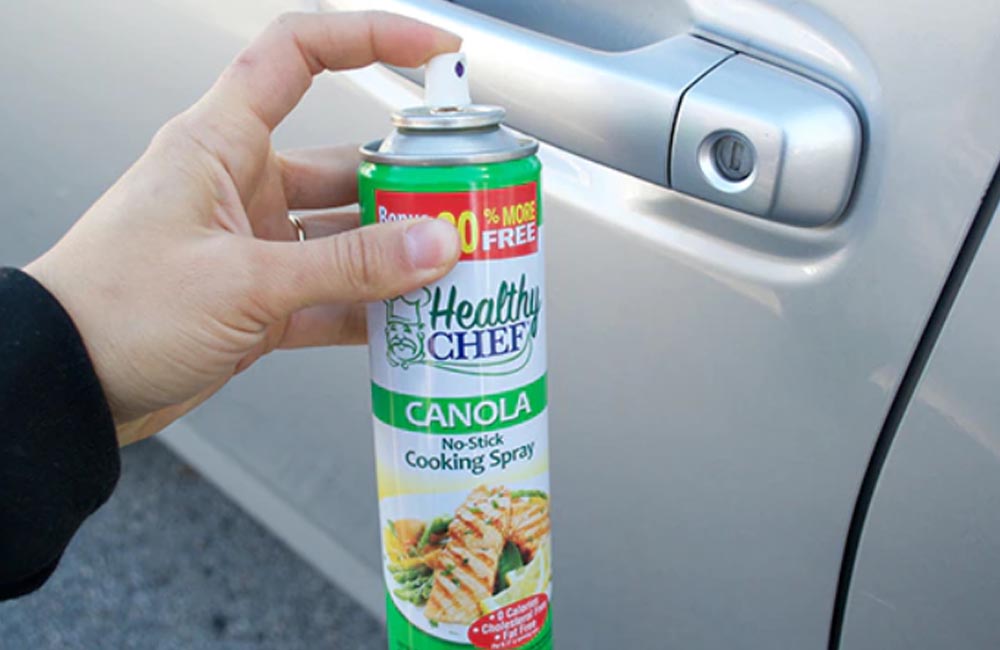
A quick fix can be cooking spray. Spray the cooking oil on hinges/handle areas to help loosen frozen parts and reduce sticking until you can open the door. Keeping cooking spray handy during the winter season can save time on especially cold mornings.
Expert note: Avoid overspraying onto paint or glass, and clean off excess residue later. Silicone spray designed for weather seals is often a more appropriate long-term solution.
37. DIY vacuum nozzle
Specialized vacuum attachments for cars can be pricey, and many people don’t want to buy tools that only serve one purpose. But tight interior gaps still need cleaning; between seats, around consoles, and in narrow storage bins where debris accumulates.
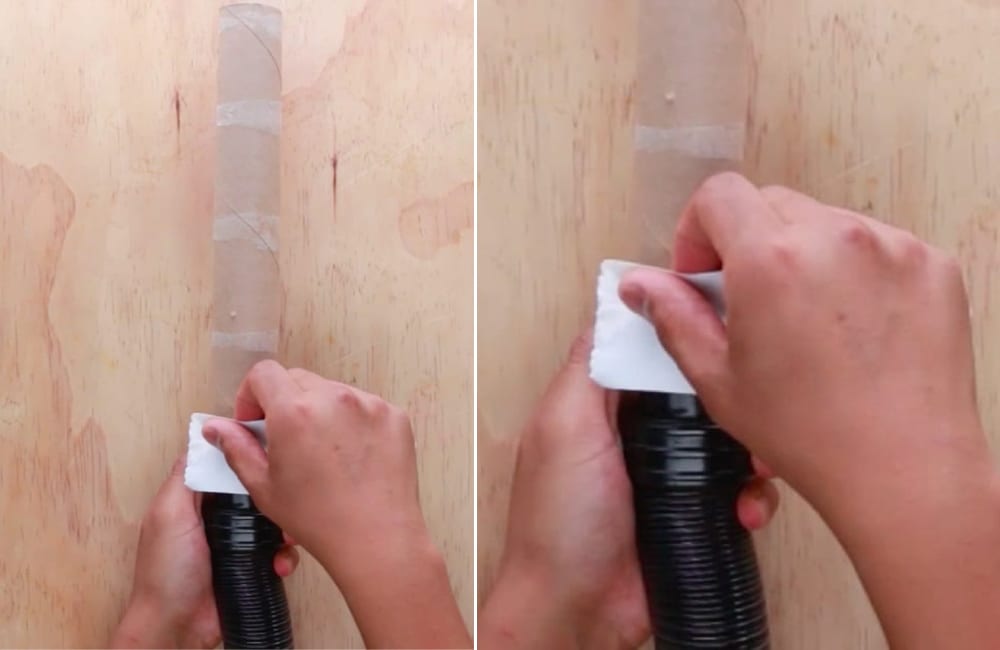
Use a cardboard tube as a DIY vacuum nozzle extension. Tape or glue it securely to the vacuum nozzle and flatten the end slightly so it can reach narrow spaces. This homemade attachment can perform surprisingly well, especially for quick cleanups without spending money on specialized kits.
Expert note: Don’t use this on wet messes. Cardboard loses strength when damp, and you don’t want pieces tearing off into your vacuum or interior.
38. Coffee filters to the rescue
Coffee filters are underrated cleaning tools. They’re lint-free, soft enough for many interior surfaces, and they don’t leave behind fibers like some paper towels. That makes them ideal for interior touchpoints where dust collects; dash trim, console edges, and small crevices.

Drizzle a few drops of olive oil onto a coffee filter and wipe interior surfaces. The filter lifts dust and grime while the oil can add a slight shine without leaving heavy greasiness; if you keep the amount minimal. It’s a simple way to reduce dust appearance between deeper cleanings.
Expert note: Use very little oil and avoid areas where glare could be dangerous (like the top of the dashboard near the windshield). Too much oil can attract dust and create a slippery film.
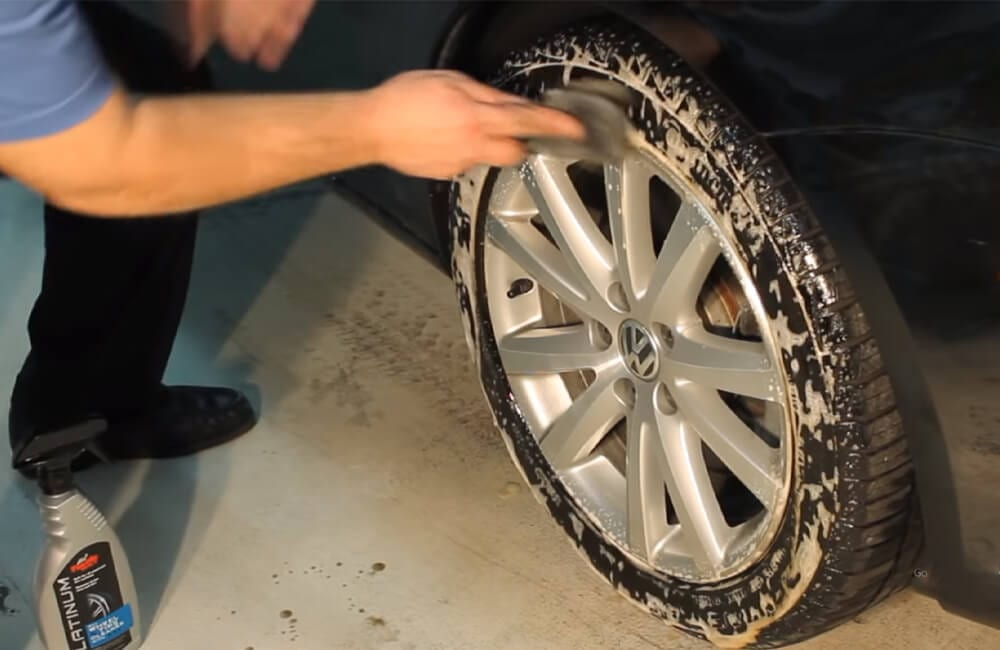
39. Enjoy the shiny wheels
Wheels take constant abuse; brake dust, road salt, mud, and grime. Wheel cleaners can be effective but sometimes expensive, and certain chemicals can be aggressive if used incorrectly. This hack suggests a low-cost alternative using household cleaning ingredients.
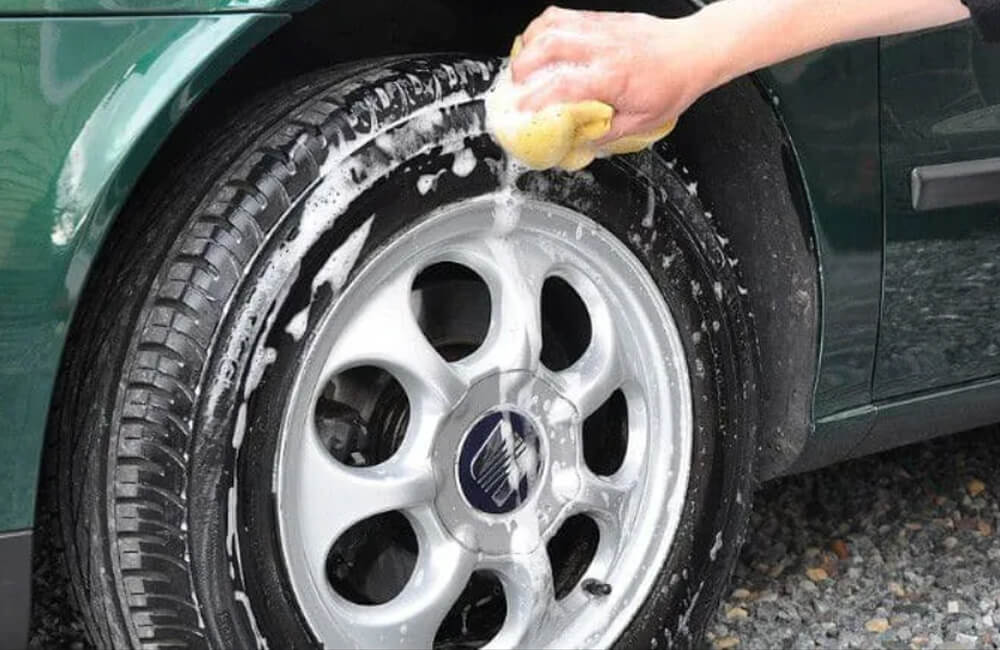
Mix detergent and bleach until they form a thick liquid, then add warm water. Apply the mixture to the wheels and let it sit for about three minutes before wiping off. The goal is to break down built-up grime and leave the wheels visibly cleaner.
Expert note: Bleach can be harsh and may damage certain wheel finishes and nearby paint. Avoid overspray, don’t use on hot wheels, and rinse thoroughly. A dedicated wheel cleaner is safer for frequent use, but this describes a budget method some people try for tough grime.
40. Restore the car’s bumper
Plastic bumpers and trim often fade from rich black to a dull gray due to UV exposure and weathering. This aging can make a car look older than it is. While professional trim restorers exist, a quick DIY option is shoe polish; used carefully.
Apply shoe polish to the bumper with a sponge, working over the surface until the desired black appearance returns. Use straight strokes and consistent pressure, especially along rough edges. Adjust how much polish you use depending on how faded the bumper is. Done patiently, this can improve appearance significantly.
Expert note: Shoe polish is not designed for automotive plastics and can rub off onto clothing or wash away. If you use this, treat it as a cosmetic refresh and consider a trim-specific restorer for longer-lasting protection.
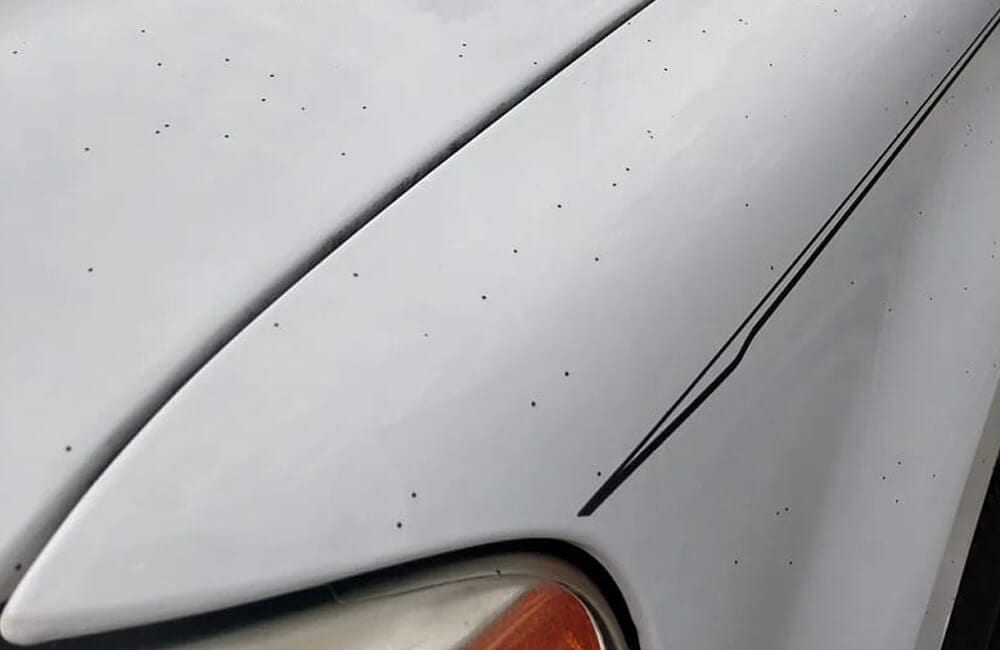
41. Get rid of insects with WD-40
Bugs stuck to windshields and bumpers are a common nuisance, especially after highway driving. Even small insect residue can reduce visibility and become harder to remove the longer it bakes in the sun. The trick is to soften the residue without aggressively scraping, which can damage paint or glass.
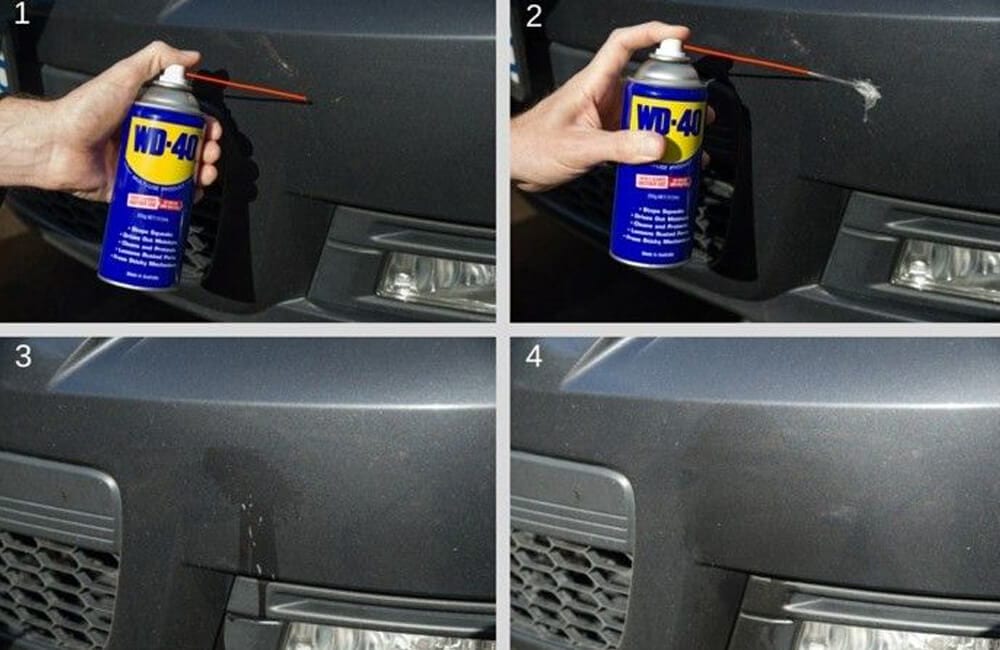
WD-40 is presented here as an answer: applied in time, it can help remove bugs more easily without damaging paint or windows. Spray and allow it to work briefly, then wipe with a soft cloth and wash the area afterward to remove oily residue.
Expert note: WD-40 can remove wax and leave a film. After cleaning bugs off paintwork, wash thoroughly and consider re-waxing the area for protection.
42. Handy paper towels on the go
Paper towels are one of the most practical “always useful” items for a car. They’re absorbent, lightweight, and flexible enough to clean spills, wipe hands, handle sudden messes, and support quick cleanups. The challenge is keeping the roll from turning into a rolling hazard in the trunk or cabin.
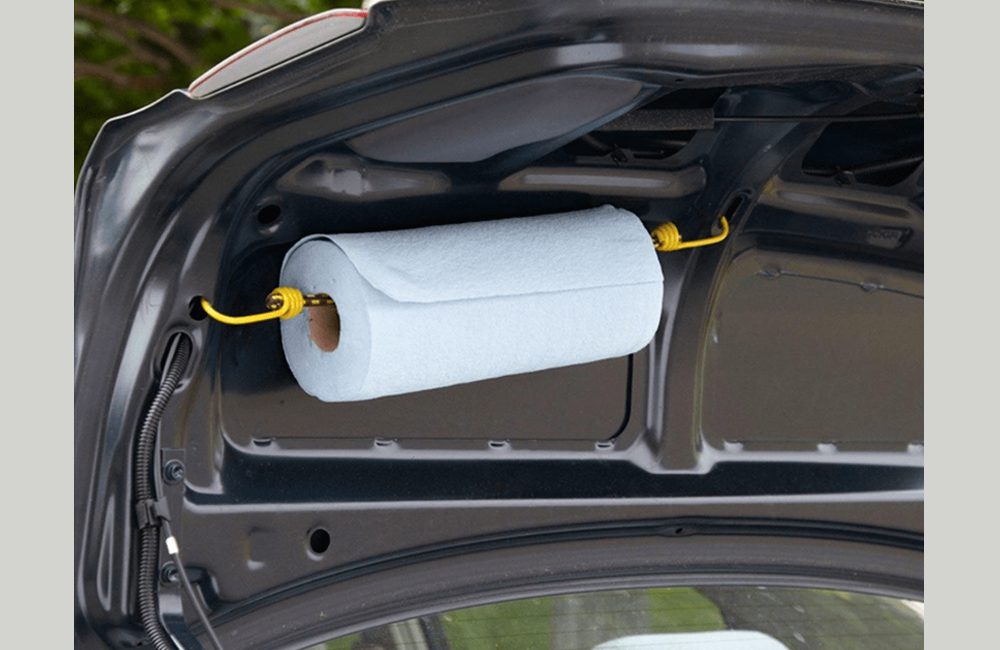
To store paper towels safely, use a short elastic cord inside the trunk lid. This keeps the roll from sliding around, getting crushed, or unraveling. It’s a simple organizer trick that prevents new messes and keeps supplies ready when you need them.
Expert note: Make sure the elastic doesn’t interfere with trunk hinges or wiring. A neat, secure mount prevents rattles and keeps the trunk functional.
43. All-purpose conditioner
Cleaning a car can feel like a never-ending cycle: wash, dry, then discover water spots and dust returning quickly. This tip focuses on improving results by adding a conditioner to your wash routine; aiming for more shine and fewer watermarks.
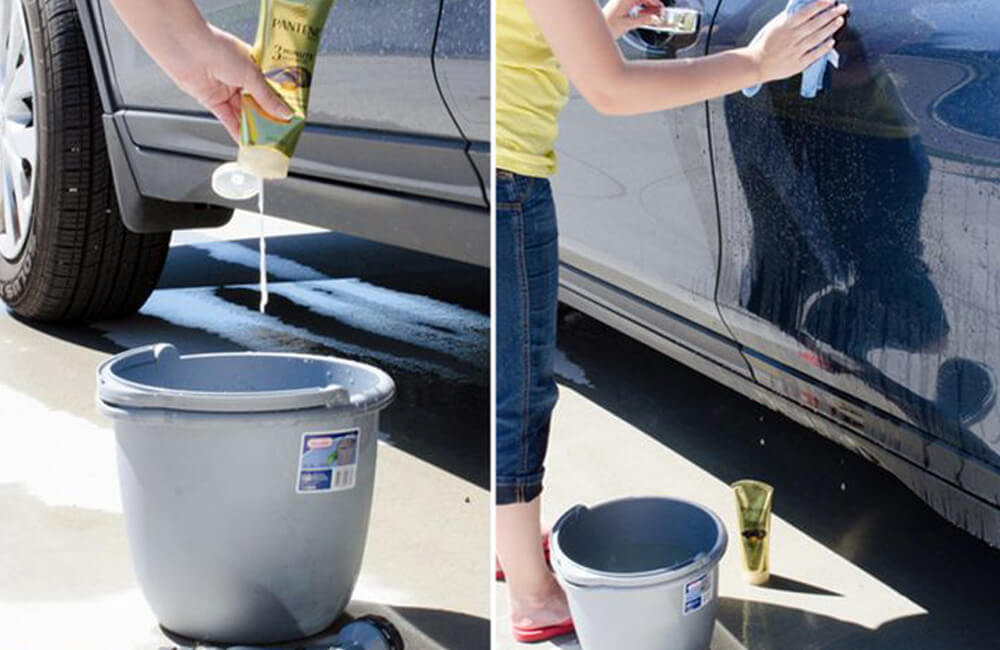
Add a silicone- or lanolin-based conditioner to your cleaning water before starting. Use about one tablespoon in a bucket of soapy water, then wash the car thoroughly. Pay special attention to areas that collect the most dust and grime. The goal is a cleaner finish with fewer spots and better shine.
Expert note: Use automotive-safe products when possible, and avoid making surfaces too slick (especially near tires, brakes, and any areas where grip matters). Rinse properly to prevent residue.
44. Clean cup holders
Cup holders are small, but they become grime magnets; spilled coffee, crumbs, sticky soda, dust, and napkins all gather there. Cleaning them can be annoying because the shapes are awkward and edges trap debris. A preventive approach makes this much easier.
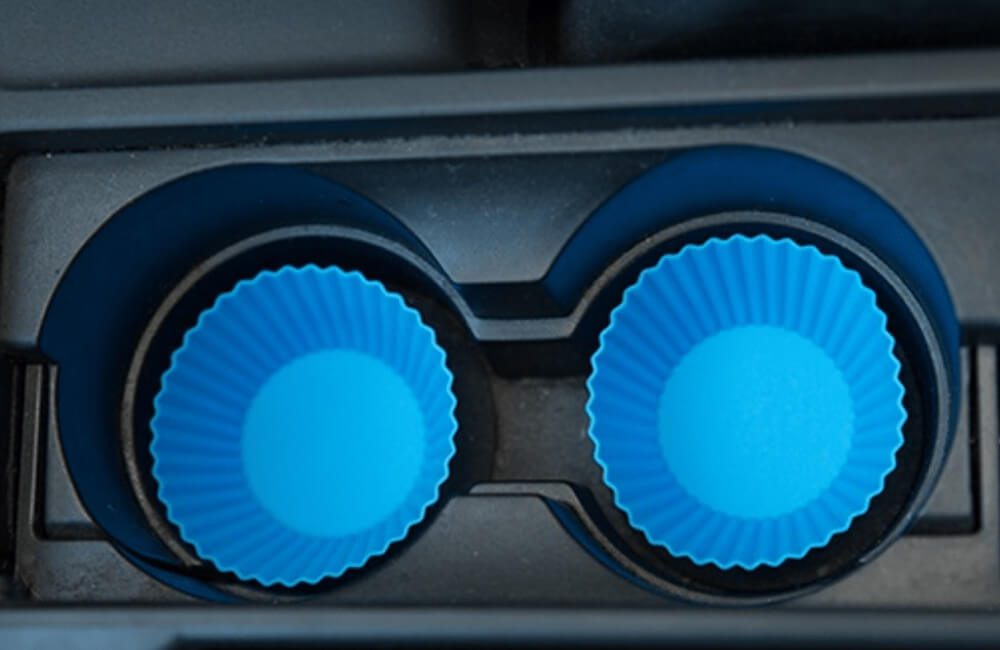
Cupcake liners fit nicely into many cup holders and catch crumbs and drips. They also help prevent oil or water buildup inside the holder. When they get dirty, simply remove and throw them away. They’re easy to store in the car and make cleanup effortless.
Expert note: Keep a small stack in the glove box. This hack is especially useful for families or anyone who frequently eats and drinks in the car.
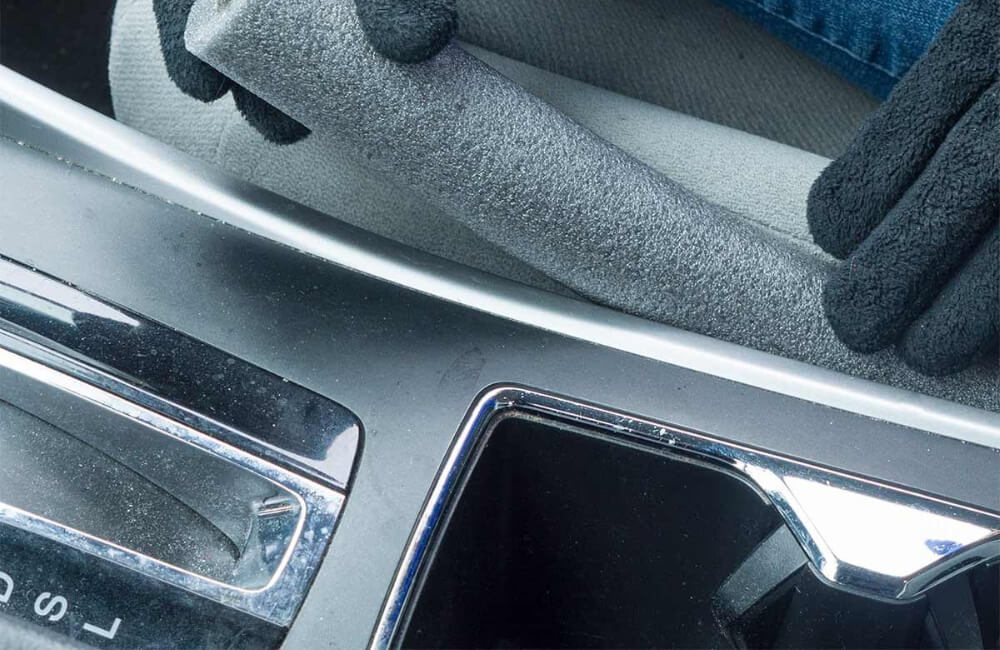
45. Insulation for your ride
Insulating your car can improve comfort and reduce noise. By sealing the gap between the dashboard and windshield, you can help maintain cabin temperature during winter months and reduce outside noise. It’s also a practical way to reduce drafts that make heating feel less effective.
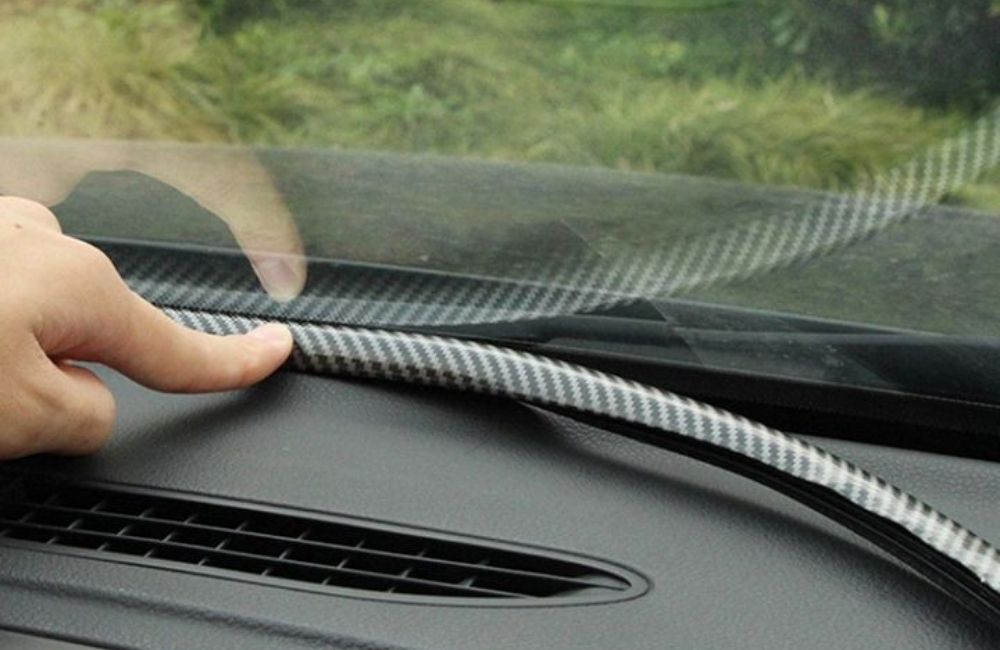
For this hack, you’ll need scissors, measuring tape, and pipe insulation. These supplies are budget-friendly, and the comfort benefits can pay off over time. Measure carefully so the insulation fits the dashboard gap precisely, then install it. Done correctly, it creates a simple buffer that improves cabin comfort and helps with noise cancellation.
Expert note: Make sure the insulation doesn’t interfere with airbags, defrost vents, or visibility. Any modification near the windshield should be installed thoughtfully and checked for safe operation.