Homelink is one of those vehicle features that seems simple until it stops working, and then it becomes genuinely frustrating. You press the button, nothing happens, no light, no response from the garage door or gate, and you are left sitting in the driveway trying to figure out whether the car is broken, the programming failed, or something else entirely went wrong.
The indicator light is the key piece of feedback the whole system depends on. Without it, you cannot confirm whether a command was sent, whether programming was successful, or whether the system is even functional. This guide breaks down what the Homelink indicator light is, what the symptoms of a failure look like, what causes it, and exactly how to fix each cause.
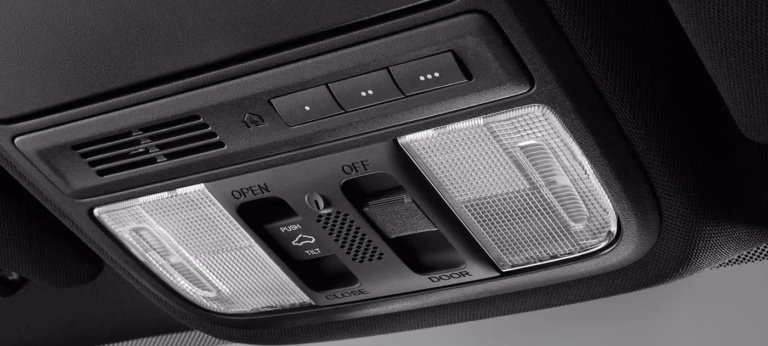
What Is the Homelink Indicator Light and Why Does It Matter?
Homelink is a wireless control system built into the majority of modern vehicles. It lets you operate home devices, including garage doors, front gates, and compatible security systems, directly from inside your car without a separate remote control.
The system has two main components working together. There is a transmitter built into the vehicle and a receiver that sits in or near whatever device you are controlling. Together they form what is sometimes called a transceiver setup. The transceiver uses radio frequency signals to carry commands from the vehicle to the programmed receiver, whether that is a garage door motor, a security system panel, or a gate controller.
The Homelink indicator light is a small light, typically built into the rearview mirror housing, that activates whenever you press one of the Homelink command buttons. It has a simple but important job: it confirms that the system is receiving your input and attempting to send a signal. Without that light, you have no way of knowing whether the system is alive, whether programming was successful, or whether the button press even registered.
When the indicator light fails or stops working, the problem usually goes beyond the light itself. In most cases, if the light is not activating, the system is not sending signals either. That means your Homelink commands are not reaching the garage door or any other paired device, which is when the real frustration begins.
Symptoms That Point to a Homelink Indicator Light Problem
The indicator light not illuminating is the most direct symptom, but it typically comes with other signs that confirm the system has stopped functioning. Recognizing these symptoms together helps you separate a Homelink failure from a separate issue with the garage door itself or the paired device.
Common symptoms include:
- The garage door does not respond when you press the Homelink button, even though the door and its motor are otherwise functioning normally
- Homelink cannot be synced to your garage door system despite following the programming steps correctly
- Homelink will not pair with the original remote control during the initial training process
- The indicator light does not flash or glow at any point during button presses or programming attempts
One important distinction worth making early: not all of these symptoms are exclusively caused by an indicator light problem. Some situations where Homelink cannot pair with a device are related to compatibility between the system and the garage door technology rather than any electrical fault in the vehicle. Understanding that difference before you start pulling fuses and inspecting wiring will save you considerable time and effort.
The Five Most Common Causes and How to Fix Each One
The root cause of a Homelink indicator light not working can usually be traced to one of five areas: the wiring connected to the system, a blown fuse, the vehicle battery, a compatibility mismatch, or a programming issue. Each has a different fix, and starting with the simplest and most accessible checks first is always the smarter approach.
1. Wiring Problems: When the Electrical Connection Fails
The Homelink indicator light depends on a clean and complete electrical connection to function. If the wiring that supplies power to the system is damaged, corroded, or disconnected, the current never reaches the indicator light or the transmitter. Nothing illuminates, nothing transmits, and the system goes quiet.
Wiring issues can develop for several reasons. Heat cycles in the cabin cause plastic connectors to expand and contract over time, which can loosen connections that were originally secure. Moisture intrusion can lead to corrosion at connector pins. In some cases, a previous repair or accessory installation disturbed the wiring without anyone realizing it at the time.
How to fix it:
Start by consulting your vehicle’s owner manual or a wiring diagram specific to your make and model. The Homelink system wiring typically runs through the rearview mirror assembly, and identifying the correct wires before you start poking around saves time and prevents accidental damage to unrelated circuits.
Once you have located the relevant wiring, inspect it visually. Look for any visible breaks in the insulation, green or white corrosion at connector pins, wires that have been pinched or chafed against metal edges, or connectors that appear loose or partially disconnected.
If the visual inspection does not reveal an obvious fault, use a multimeter to test the wiring. Set the multimeter to measure voltage, connect the leads appropriately, and check whether the circuit is receiving power. A reading significantly below the expected voltage, or no reading at all, confirms a wiring fault. Damaged wiring needs to be repaired or replaced, and corroded connectors should be cleaned with electrical contact cleaner before reconnecting.
2. Blown Fuse: The Quickest Check and Easiest Fix
Fuses exist to protect electrical components from current surges that would otherwise cause damage. When a circuit experiences too much current, the fuse element melts and breaks the circuit, stopping the flow before anything more expensive gets damaged. A blown fuse kills power to everything on that circuit, including the Homelink indicator light.
This is one of the first things worth checking because it takes only a few minutes and costs almost nothing to fix if it is the problem.
How to fix it:
Locate the fuse box in your vehicle. Depending on the make and model, there may be more than one fuse box: one under the hood near the battery and one inside the cabin near the steering column or in the footwell area. Your owner manual will show you exactly where each fuse box is and which fuse corresponds to the Homelink or mirror system.
Pull the relevant fuse using a fuse puller or a pair of needle-nose pliers. Hold it up to light and look at the metal element visible through the transparent housing. A blown fuse will have a clearly broken element, and in some cases, the housing will show visible discoloration or a dark smear from the heat of the break.
Replace a blown fuse with one of exactly the same amperage rating. The rating is printed on the top of the fuse and also listed in the fuse diagram in your owner manual. Using a higher-rated fuse is never acceptable as a quick fix. It removes the protection the fuse provides and creates the risk of a wiring fire or component damage if the underlying cause of the overcurrent has not been addressed.
If the replacement fuse blows again shortly after installation, the fuse is not the root problem. Something else in the circuit is drawing too much current, and that fault needs to be found and repaired before the circuit is used again.
3. Faulty or Weak Car Battery: An Overlooked but Common Cause
The Homelink system draws its power entirely from the vehicle battery. When the battery is weak, failing, or not holding a proper charge, the voltage available to accessories like Homelink drops below what the system needs to operate correctly. The indicator light may not illuminate, the transmitter may not fire, and programming attempts may fail even when the procedure is followed correctly.
Battery problems rarely affect only one system. If the Homelink indicator light is not working alongside other signs of electrical weakness, the battery is worth examining closely before anything else.
Signs that the battery may be the real cause include:
- Headlights that appear dimmer than normal, particularly at idle
- The engine cranking slowly or struggling to start
- Other accessories like the infotainment system, power windows, or interior lights behaving erratically
- The battery warning light appearing on the dashboard
How to fix it:
A basic voltage check with a multimeter at the battery terminals gives you a starting point. A healthy fully charged battery reads around 12.6 volts at rest with the engine off. Anything below 12.0 volts suggests the battery is not holding its charge properly.
A load test is more informative than a static voltage reading. Many auto parts stores offer free battery load testing, and it only takes a few minutes. A battery that reads acceptable at rest but drops sharply under load is failing and should be replaced rather than recharged and trusted.
If the battery is low but not failing, a full charge followed by a repeat test may reveal whether the battery can hold a proper charge. If it cannot, replacement is the correct fix. If the battery tests healthy, the charging system, meaning the alternator, is worth checking to confirm it is maintaining proper voltage while the engine runs.
4. Compatibility Issues: When the Technology Does Not Match
Homelink is designed to work with a broad range of garage door systems, gate controllers, and home security devices. However, it is not universal. Certain products, particularly older systems and some devices manufactured outside North America and Western Europe, use radio frequency standards or rolling code protocols that Homelink does not support.
Compatibility problems often look exactly like electrical failures from the driver’s seat. You follow the programming steps, the indicator light does not respond as expected, and the garage door does nothing. If the vehicle’s wiring, fuse, and battery all check out, compatibility is the next question to investigate.
This matters especially with rolling code garage door systems. These systems change the code after each use as a security measure. Homelink includes support for many rolling code systems, but the programming process is more involved than with fixed-code remotes. If the correct programming sequence for a rolling code system is not followed precisely, Homelink will not pair successfully.
How to address it:
Check the Homelink compatibility guide, which is available through the Homelink website and through most vehicle manufacturers’ support resources. Entering your garage door brand and model will confirm whether a pairing is supported and which programming method applies.
For rolling code systems, the programming process typically requires pressing a specific button on the garage door motor unit while completing the Homelink training sequence. Skipping or incorrectly timing this step is the most common reason programming fails for compatible rolling code systems.
If your garage door system is genuinely not compatible with Homelink, external bridge devices are available that translate between incompatible systems and allow Homelink to control devices it would not otherwise support. These are worth considering before giving up on the feature entirely.
5. Programming Issues: Starting Fresh Often Solves More Than Expected
Sometimes the indicator light was working and the system was programmed correctly at some point, but something interrupted or corrupted the stored settings. This can happen after a battery disconnect, after a vehicle software update, or simply because the programming sequence was not completed fully the first time.
A programming failure can look like an electrical failure because the indicator light may not respond the way you expect during a failed programming attempt. Working through a fresh programming sequence from the beginning, after clearing any previously stored data, often resolves these situations without any hardware repair needed.
How to address it:
Clear the existing programming from all Homelink buttons by pressing and holding the two outer buttons simultaneously until the indicator light flashes rapidly, which typically takes about twenty seconds. This erases all stored codes and returns the system to factory default.
Once cleared, follow your vehicle’s specific programming procedure from the beginning. The steps vary slightly between manufacturers, so using the instructions in your owner manual rather than a generic guide is important. Pay attention to the indicator light behavior during each step: slow flashing typically indicates the system is in learning mode and is ready to receive the signal from the remote, while rapid flashing usually confirms that training was successful.
If the programming sequence completes normally and the indicator light responds correctly during programming but the garage door still does not respond, the issue has moved from the Homelink system itself to the compatibility or receiver side of the problem.
A Quick Diagnostic Checklist to Work Through in Order
If you are not sure where to start, this sequence moves from the simplest and cheapest checks to the more involved ones.
| Step | What to Check | What to Look For |
|---|---|---|
| 1 | Vehicle battery | Load test the battery. Look for dim lights or slow starting as supporting clues. |
| 2 | Fuse box | Locate and inspect the Homelink or mirror fuse. Replace if visibly blown. |
| 3 | Wiring and connectors | Inspect wiring to the rearview mirror for damage, corrosion, or loose connections. |
| 4 | Programming | Clear stored data and repeat the programming sequence from the beginning. |
| 5 | Compatibility | Confirm your garage door system is on Homelink’s supported device list. |
When to Call in a Professional
Most Homelink indicator light problems are fixable through the steps above without specialist tools or dealer visits. But there are situations where professional help is the right call.
If the wiring inspection reveals internal damage to the rearview mirror assembly or the Homelink module itself, component replacement may be needed. The rearview mirror on many modern vehicles contains the Homelink module, the auto-dimming circuitry, the compass display, and sometimes camera or sensor connections. Disassembling or replacing this unit incorrectly can affect multiple systems at once.
If a replacement fuse keeps blowing, something in the circuit is drawing more current than it should. Diagnosing a persistent short circuit requires proper diagnostic equipment and wiring knowledge to do safely.
If every electrical check passes and the system simply will not program with a device that is listed as compatible, a dealer with Honda, Toyota, Ford, or whichever brand applies can access manufacturer-level diagnostic tools to confirm whether the Homelink module itself has failed and needs replacement.
Homelink is designed to work reliably with the majority of home automation and access control systems found in North America and Europe. When it stops working, the causes are almost always one of the five outlined above. Work through them methodically, and in most cases, the system comes back without a significant repair bill or dealer involvement.
If you have checked the battery, replaced the fuse, inspected the wiring, cleared and redone the programming, and confirmed your garage door system is compatible, and the indicator light still does not respond, that is your signal that the Homelink module itself needs professional attention. Everything up to that point, you can handle yourself.