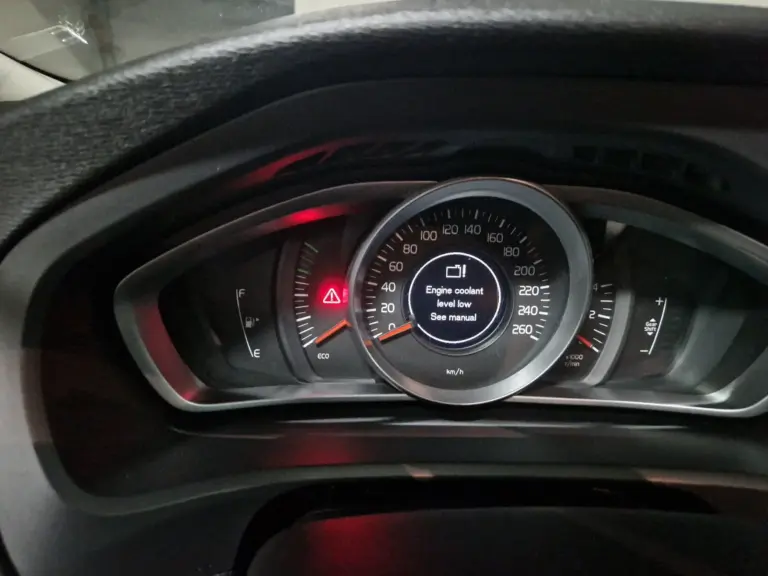
That moment when your Volvo’s dashboard lights up with “Coolant Level Low, Stop Engine” is not one you want to ignore. It is not a suggestion. It is your car telling you, in the clearest language it knows, that something needs your attention right now, before a minor inconvenience turns into a catastrophic repair bill.
A lot of drivers see this warning and make one of two mistakes. They either panic and pull over immediately without knowing what to do next, or they dismiss it and keep driving because the car “feels fine.” Neither response is the right one. What you need is a clear understanding of what is actually happening inside your engine, why the coolant level matters so much, and what to do about it in a calm, methodical way.
Table of Contents
This guide covers all of it. No jargon overload, no unnecessary complexity. Just the information you need to handle this correctly and protect your Volvo’s engine.
What Your Cooling System Actually Does (and Why Low Coolant Is Such a Big Deal)
Before getting into causes and fixes, it helps to understand what the cooling system is actually doing inside your engine. Because once you grasp that, the urgency of a low coolant warning makes complete sense.
Your engine generates an enormous amount of heat during normal operation. Combustion temperatures inside the cylinders can exceed 2,000 degrees Fahrenheit. Left unchecked, that heat would destroy the engine in minutes. The cooling system’s job is to continuously absorb that heat and carry it away from the engine before it can cause damage.
Coolant, which is also called antifreeze, is the fluid that does this work. It circulates through passages inside the engine block and cylinder head, absorbs heat, flows to the radiator where that heat is released into the outside air, and then returns to the engine to repeat the cycle. Over and over, thousands of times per hour while the engine is running.
When the coolant level drops, there is less fluid in the system to absorb and carry heat away. The engine temperature starts rising. If the level drops significantly, sections of the engine can run without adequate coolant coverage, causing localized overheating that damages metal components, warps cylinder heads, destroys head gaskets, and in serious cases causes complete engine failure.
That is not an exaggeration. An engine that has overheated severely due to coolant loss can require a complete rebuild or replacement. We are talking about repair costs that can easily run into several thousand dollars. So when the warning light comes on, the stakes are genuinely high.
Why Is Your Volvo Losing Coolant? The Real Causes to Know
Coolant does not disappear on its own under normal circumstances. If your level is low, there is a reason. Sometimes it is something minor and easy to fix. Other times it points to a more serious underlying problem. Here is how to think through the possibilities.
The Most Obvious Reason: The Level Is Just Low
Some coolant loss over an extended period is not unusual. Small amounts of coolant can be lost through normal system operation, particularly through the overflow and pressure relief mechanisms. If your Volvo has not had a coolant top-off in a very long time and the level has gradually crept below the minimum mark, that alone can trigger the warning.
But here is what separates a normal gradual decline from something more serious: the rate of loss. If you top up the coolant today and the warning comes back within a week, you have a leak or an internal consumption problem somewhere. Coolant that disappears quickly is coolant going somewhere it should not be.
Coolant Leaks: External and Internal
External coolant leaks are the easier ones to spot. You might notice a puddle of sweet-smelling, often bright green, orange, or pink fluid under the front of your car after it has been parked. You might see dried coolant residue around hose connections, the radiator, or the expansion tank. These are external leaks, meaning the coolant is escaping from the cooling system to the outside world.
Common external leak points on a Volvo include:
- Radiator hoses. Upper and lower radiator hoses are made of rubber and degrade over time. They can crack, split, or develop pinhole leaks at the connection points. Squeezing a cold hose should feel firm but slightly pliable. If it feels rock hard, spongy, or you can see cracking in the outer surface, the hose needs attention.
- The radiator itself. Plastic end tanks on modern radiators can crack, and the core can develop leaks from road debris impact or corrosion. A wet or crusty-looking radiator is a sign of a leak.
- The expansion tank. Volvos use a pressurized expansion tank as part of the cooling system. These tanks, particularly on older models, are known to develop cracks over time. Inspect the tank and its cap carefully.
- The radiator cap. A failing radiator cap that cannot hold pressure properly allows coolant to escape through the overflow. The cap looks fine visually but should be tested for proper pressure rating if you are troubleshooting unexplained coolant loss.
- Water pump. The water pump circulates coolant throughout the system. When its seal wears out or the housing cracks, coolant leaks from the weep hole or around the pump housing. You might see a trail of dried coolant on the front of the engine near the pump location.
- Heater core. The heater core is basically a small radiator inside your dashboard that provides cabin heat. When it leaks, you might notice a sweet smell inside the car, foggy windows from coolant misting into the cabin, or wet carpet on the passenger floor.
Internal coolant leaks are trickier because there is nothing to see under the car. The coolant is not going outside the engine. It is going inside the combustion chamber, where it gets burned along with the fuel and exits through the exhaust.
The most common cause of internal coolant loss is a failed head gasket. The head gasket seals the joint between the engine block and the cylinder head. When it fails, coolant can pass from the cooling passages into the combustion chamber. Signs of a blown head gasket include:
- White or sweet-smelling smoke from the exhaust, especially on startup
- Coolant level dropping with no visible external leak
- Engine oil that looks milky or has a foamy texture (coolant mixing with oil)
- Bubbles in the coolant reservoir when the engine is running
- Overheating that seems to happen randomly or under load
A head gasket failure is a serious repair. On a Volvo, it is not a cheap job. But catching it early, before the engine overheats repeatedly and causes additional damage, is significantly better than waiting until the engine is warped and the repair cost doubles.
The EGR Valve Connection Most Volvo Owners Do Not Know About
This one surprises a lot of people. The EGR (Exhaust Gas Recirculation) valve is an emissions control component that reduces combustion temperatures by routing a portion of exhaust gas back into the intake manifold. On many modern Volvos, the EGR system uses a coolant-cooled EGR cooler to bring down the temperature of those recirculated gases before they re-enter the intake.
When the EGR cooler develops an internal crack or leak, coolant from the cooling system can enter the EGR passages and either burn off through the intake or cause other issues. You might see white smoke from the exhaust, a drop in coolant level, and potentially carbon buildup in the intake system that contributes to other performance problems.
If you are experiencing coolant loss without an obvious external leak and your EGR system has not been inspected recently, it is worth asking a mechanic to look at the EGR cooler specifically. This is a known failure point on certain Volvo diesel and gasoline engine variants.
Overpressure in the Cylinder Head
When combustion gases find their way into the cooling system, typically due to a compromised head gasket, they pressurize the coolant. This overpressure can force coolant out through the path of least resistance, which might be the overflow, a weak hose connection, or a slightly weeping seal that would otherwise hold fine at normal pressure.
If you notice the coolant reservoir overflowing or the radiator cap releasing pressure frequently, overpressure in the cooling system is a possibility worth investigating. A combustion leak test, using a block tester that detects exhaust gases in the coolant, can confirm this without disassembling the engine.
What to Do When the Warning Comes On: A Step-by-Step Response
The warning light is on. The message is on your screen. Here is exactly what you should do, in order.
Step 1: Do Not Panic, But Do Take It Seriously
The warning gives you a window of time to respond safely. You do not need to slam the brakes immediately, but you do need to find a safe place to pull over within the next minute or two. Do not drive through traffic and figure you will deal with it at your destination. The engine needs to stop running.
Watch the temperature gauge as you pull over. If it is climbing toward the red zone, you need to stop sooner rather than later. If the temperature is still in the normal range, you have slightly more time to find a safe spot.
Step 2: Turn Off the Engine and Wait
Once you are safely stopped, turn off the engine. Do not open the hood immediately if steam is coming out. Do not attempt to open the coolant reservoir or radiator cap while the engine is hot. The cooling system operates under pressure, and releasing that pressure on a hot engine can send boiling coolant spraying out violently. Burns from pressurized coolant are serious injuries.
Wait at least 30 minutes for the engine to cool down before touching anything. If you have roadside assistance, now is a good time to call and let them know your situation while you wait.
Step 3: Check the Coolant Level in the Expansion Tank
Once the engine is cool, open the hood and locate the coolant expansion tank. On most Volvos, this is a translucent white or light-colored reservoir near the engine with MIN and MAX markings on the side. You can check the level visually without opening it.
If the level is at or below the MIN mark, the warning makes sense. You need to add coolant. If the level looks normal despite the warning, the coolant level sensor itself may be faulty, or there may be a different issue triggering the alert.
Step 4: Add Coolant the Right Way
If you need to top up, use the correct coolant for your Volvo. Do not grab whatever is on the shelf at the nearest gas station without checking the label. Using the wrong coolant type can cause corrosion inside the cooling system and potentially damage components over time.
Volvo recommends a 50/50 mixture of coolant and water. If you are using a coolant concentrate, mix it with distilled or demineralized water, not tap water. Tap water contains minerals, chlorides, and other dissolved solids that can promote corrosion inside the engine and reduce the effectiveness of the coolant’s anti-corrosion additives. If you only have pre-mixed (50/50) coolant available, you can use it directly without additional mixing.
Add coolant slowly to the expansion tank until the level reaches the MAX mark. Do not overfill. Close the cap securely.
Step 5: Look for Signs of a Leak
While the hood is open and the engine is cool, do a quick visual check. Look at the hoses, the radiator, the water pump area, and the expansion tank for any signs of wetness, dried coolant residue, or visible damage. Check the ground under the car for a puddle.
If you find an obvious leak, do not drive the vehicle further until it is repaired. Call for a tow. Driving with an active coolant leak risks overheating the engine and turning a relatively affordable leak repair into an engine rebuild.
Step 6: Monitor Closely After Topping Up
If the visual inspection looks clean and you have added coolant, you can cautiously restart the engine. Watch the temperature gauge carefully for the first several minutes of driving. If the temperature stays in the normal range and the warning does not reappear, you may be okay for now. But you still need to figure out why the level dropped in the first place.
Check the coolant level again after your next drive, and again a few days later. If it drops again, you have a leak or internal consumption issue that needs a proper diagnosis. Get it to a mechanic.
Choosing the Right Coolant for Your Volvo: What You Need to Know
Not all coolants are the same. Using the wrong type in a Volvo can cause problems that are not immediately obvious but build up over time, corroding the cooling system from the inside. Here is what you need to understand before buying a coolant.
Coolant Concentrate vs. Ready-Mixed: Which Should You Buy?
Coolant concentrate is the undiluted form. You mix it with water yourself at a 50/50 ratio. It gives you more control over the mixture and is often more economical per liter of finished coolant. But you need to mix it with the right water quality (distilled or demineralized, not tap water) to get the full benefit.
Ready-mixed or pre-mixed coolant comes already diluted to the correct 50/50 ratio. It is more convenient, especially in an emergency situation when you need to top off quickly and do not have distilled water on hand. Just verify that the product is compatible with your specific Volvo model before using it.
Either option works fine as long as the product meets Volvo’s specifications. The key is not mixing different coolant types. Different coolant formulations can be chemically incompatible, and mixing them can cause the additives to react with each other, potentially forming a gel-like substance that reduces cooling efficiency and can clog passages.
Why Water Quality Matters More Than You Think
If you are mixing concentrate, the water you use matters. Tap water seems harmless, but it contains dissolved minerals, chlorides, and other compounds that do not belong in your cooling system. Over time, these deposits can cause corrosion and scale buildup on metal surfaces inside the engine and radiator.
Distilled water has had those impurities removed. It is inexpensive, widely available, and the correct choice for mixing coolant. Demineralized water works equally well. If you are in an emergency situation and distilled water is not available, topping off with tap water is better than running out of coolant and overheating, but it should be temporary. Flush and refill with the proper mixture as soon as possible.
The Role of Anti-Corrosion Additives
Modern coolants contain a package of additives that protect the cooling system’s metal and rubber components. These include anti-corrosion inhibitors, anti-foaming agents, and pH stabilizers. They are what separates a quality coolant from a product that is just colored water with antifreeze properties.
These additives deplete over time. That is why coolant needs to be changed periodically rather than just topped up indefinitely. Old coolant with depleted inhibitors can actually become corrosive, damaging the very components it is supposed to protect. A coolant flush and refill at the appropriate interval is one of the most cost-effective maintenance items you can do for a Volvo’s long-term engine health.
Coolant Color: Does It Tell You Anything?
Coolant comes in several colors depending on the formulation: green, orange, pink, yellow, and blue are all common. The color is dye, not a functional component, and different manufacturers use different colors for the same type of coolant. So color alone does not reliably tell you what type of coolant is in your system.
What color can tell you is when something is wrong. Coolant that has turned brown, rusty, or murky is telling you the inhibitors are depleted and corrosion is occurring. Coolant that looks milky or foamy suggests oil or combustion gas contamination. Neither of those is a color you want to see in your expansion tank.
How and When to Flush and Change Your Volvo’s Coolant
Topping up the coolant level is not the same as maintaining the cooling system. The fluid itself needs to be replaced on a schedule, because as we noted, the protective additives break down over time regardless of how much you drive.
How Often Should You Change the Coolant?
Volvo’s recommended coolant change interval varies by model and engine. Check your specific vehicle’s owner’s manual for the exact recommendation. As a general guideline, most modern Volvos with OAT (Organic Acid Technology) coolants, which are the long-life formulations, have intervals of around 5 years or 150,000 km (approximately 93,000 miles), whichever comes first.
Older Volvos using conventional coolant formulations typically require changes every 2 to 3 years. If you do not know when the coolant was last changed and the car has significant mileage, it is safer to assume it is overdue and have it done.
What a Coolant Flush Actually Involves
A coolant flush is more thorough than simply draining and refilling. Here is the general process:
- Drain the old coolant. The cooling system has a drain plug on the radiator. Opening this allows the old fluid to drain into a collection container. It is important not to let coolant run onto the ground. It is toxic to animals and environmentally harmful. Dispose of it properly at a recycling center or auto parts store that accepts old coolant.
- Flush the system. After draining, a flushing agent or clean distilled water is run through the system to dislodge deposits, sediment, and residue from the old coolant. This ensures the new coolant goes into a clean system.
- Refill with the correct coolant mixture. The system is then filled with fresh coolant to the correct level and concentration.
- Bleed the system. Air trapped in the cooling system after a flush can cause air pockets that interfere with coolant circulation and cause localized overheating. Properly bleeding the system removes those air pockets. On many Volvos, this involves running the engine with the expansion tank cap off until the thermostat opens, then topping off the coolant level as air escapes.
- Check for leaks. After completing the flush and fill, run the engine up to operating temperature and inspect all connections, hoses, and the expansion tank cap area for any sign of leaks before calling the job done.
This is a job that many mechanically confident owners tackle themselves. But if you have never done a coolant flush before, or if your Volvo uses a more complex cooling system layout (some Volvo models have multiple coolant circuits and additional components), having a professional shop do it is a reasonable choice.
Understanding the Temperature Gauge and What It Is Telling You
The temperature gauge on your Volvo’s instrument cluster is one of the most important indicators in the car. Yet a lot of drivers barely glance at it after the initial warm-up period. That is a missed opportunity.
Under normal operation, the gauge needle should sit in the middle of the scale, roughly in the center position, once the engine has warmed up. It should stay there with minimal movement during normal driving. Small fluctuations when sitting in heavy stop-and-go traffic, where cooling airflow through the radiator is reduced, are normal and should come back down once the car is moving again.
Here is when the temperature gauge is trying to warn you:
- The needle climbs toward the red zone. This is the most obvious warning. If the temperature is rising above the normal range, the cooling system is not keeping up. Pull over safely, turn off the engine, and do not restart it until you understand why the temperature rose.
- The needle spikes suddenly then comes back down. This can indicate a stuck thermostat that is not opening at the right temperature, or an intermittent coolant circulation issue. Even if the gauge normalizes, the spike is worth investigating.
- The needle stays low even after a long warm-up period. A thermostat stuck in the open position keeps coolant flowing through the radiator constantly, preventing the engine from reaching operating temperature. This sounds harmless but actually reduces fuel efficiency, increases engine wear, and prevents the heating system from working properly in cold weather.
- The temperature gauge and the coolant warning light appear together. This combination means the coolant level is low AND the engine is running hot. This is an urgent situation requiring immediate action.
If your temperature gauge is misbehaving and you cannot identify an obvious cause, the coolant temperature sensor may need to be tested or replaced. A faulty sensor can cause the gauge to read incorrectly, which is dangerous because it removes one of your primary early warning mechanisms for cooling system problems.
How to Inspect Your Volvo’s Cooling System Yourself
You do not need to be a mechanic to perform a basic cooling system inspection. A visual check every few months, or any time you notice a warning sign, can catch developing problems before they become serious.
What to Look For During a Basic Inspection
- Coolant level in the expansion tank. Check with the engine cold. The level should be between the MIN and MAX marks. If it is consistently dropping between checks, investigate further.
- Coolant color and condition. Look through the expansion tank. The coolant should be clearly colored (green, orange, pink, etc.) and translucent. Brown, rusty, murky, or milky coolant needs attention.
- Hose condition. With the engine cold, squeeze the upper and lower radiator hoses. They should feel firm but pliable, not rock hard, spongy, or crumbly. Look for cracking, bulging, or softness at the ends where they connect to the radiator and engine.
- Expansion tank condition. Inspect the tank itself for cracks, especially around the neck and cap area. Look for dried coolant residue or staining on the outside of the tank, which indicates a past or current leak.
- Radiator condition. Look at the front of the radiator for bent or damaged fins, and check the sides and bottom for signs of wetness or dried coolant deposits.
- Under the car after parking. After the car has been parked for several hours, check the ground under the front of the vehicle. A puddle of sweet-smelling colored fluid is coolant. Clear water under the car on a hot day is normal condensation from the air conditioning system.
When to Call a Professional
Some cooling system issues are genuinely DIY-friendly: topping up the coolant, replacing a radiator hose, swapping out a thermostat, changing the expansion tank cap. Others require professional equipment and expertise.
Get a professional diagnosis if you notice:
- White smoke or a sweet smell from the exhaust
- Coolant dropping repeatedly with no visible external leak
- Oil that looks milky or has a foamy consistency
- Bubbles or gurgling in the expansion tank with the engine running
- Overheating that does not resolve after topping up the coolant
- Any situation where the temperature gauge has reached the red zone
These symptoms can indicate a head gasket failure, a cracked cylinder head, or internal engine damage. These are not problems you can nurse along. They need proper diagnosis and repair before they turn into complete engine failures.
The Real Cost of Ignoring the Coolant Warning
Let’s put some numbers to this, because sometimes the abstract risk of “engine damage” does not feel as real as a concrete comparison.
| Problem | If Caught Early | If Ignored Until Failure |
|---|---|---|
| Low coolant from a leaking hose | $50 to $200 hose replacement | $2,000 to $5,000+ overheated engine repair |
| Leaking water pump | $300 to $600 pump replacement | $3,000+ if overheating warps the cylinder head |
| Failing head gasket (early stage) | $800 to $1,500 head gasket repair | $4,000 to $8,000+ for a warped head and full rebuild |
| Cracked expansion tank | $100 to $250 tank replacement | $2,000+ if coolant loss causes overheating |
| Depleted coolant (routine flush overdue) | $100 to $200 coolant flush and fill | $500 to $1,500 for internal corrosion damage over time |
Every single one of those “if ignored” numbers dwarfs the early intervention cost. The cooling system is not complicated, and the warning signs are not subtle. Your Volvo is quite literally telling you something is wrong before the damage happens. Acting on that warning is the cheapest thing you can do.
Volvo-Specific Cooling System Notes Worth Knowing
Volvos have some characteristics that are worth being aware of if you are troubleshooting cooling system issues or just trying to stay on top of maintenance.
The Expansion Tank Is Part of the Pressurized System
On many vehicles, the coolant reservoir is just an overflow catch tank that operates at atmospheric pressure. On most Volvos, the expansion tank is part of the pressurized cooling system. The cap on the expansion tank is the pressure cap, not just a simple cover. This means the expansion tank and its cap are structural components of the cooling system, and a cracked tank or failing cap directly compromises the system’s ability to operate at the correct pressure.
This is worth knowing because it means you should never remove the expansion tank cap on a hot Volvo. The system is under significant pressure when hot, and releasing it suddenly can cause serious burns. Always wait for the engine to cool completely first.
Volvo’s Specific Coolant Recommendations
Volvo specifies its own coolant formulation, sometimes branded as Volvo Coolant or meeting the Volvo Coolant Standard. For most modern Volvos, the specification calls for an OAT (Organic Acid Technology) formulation that is free from silicates, phosphates, nitrites, and amines. Using a conventional green coolant that contains silicates in a Volvo that requires an OAT formula can cause chemical incompatibility and actually accelerate corrosion rather than prevent it.
When in doubt about what coolant to use, check the owner’s manual or ask at a Volvo dealership. The few minutes it takes to confirm the right product is far less costly than dealing with a corroded cooling system later.
Air Bleeding After Any Cooling System Work
Volvos can be particular about air in the cooling system. After any repair or service that involves opening the cooling system, proper bleeding is essential. Air pockets in the system can prevent coolant from circulating through certain engine passages, causing localized overheating even when the overall coolant level is correct. If your temperature gauge is behaving erratically after a cooling system repair, an air pocket is one of the first things to investigate.
The bottom line on all of this is straightforward. Your Volvo’s cooling system warning is not a suggestion and it is not a false alarm designed to frustrate you. It is a precisely calibrated alert built into the vehicle to protect an engine that costs far more to replace than any repair the warning is trying to help you avoid. When that warning appears, respond quickly, respond correctly, and then find out why it happened in the first place. Because a Volvo that is properly cooled and maintained will last for decades. One that is ignored when it asks for help will not.