Your brakes are one of the most safety-critical systems on your vehicle, and the fluid running through them is what makes everything work. Without brake fluid, pressing the pedal does nothing. The hydraulic pressure created by that fluid is what forces the brake pads against the rotors and brings your car to a stop. So when something is off with the fluid, the entire braking system suffers.
One of the things that confuses a lot of car owners is brake fluid color. Pop the hood on different cars and you might notice the fluid in the reservoir looks slightly different from one vehicle to the next. Some are nearly clear, some look yellowish, some are darker, and older fluid can look almost brown or black. What does that mean? Does the color actually matter?
Table of Contents
The short answer is yes, it does. Brake fluid color tells you a lot about the type of fluid, its condition, and whether it is still doing its job properly. Here is everything you need to know.
What Brake Fluid Actually Does (And Why It Matters So Much)
Before getting into colors, it helps to understand what brake fluid is actually doing inside your braking system. When you press the brake pedal, that force is transferred through the brake lines via hydraulic fluid to the calipers, which then clamp the brake pads against the rotors to slow your wheels down.
Brake fluid needs to handle extreme conditions. It gets hot, sometimes very hot, especially during heavy braking or when descending long hills. It also needs to resist absorbing water because water lowers the boiling point of the fluid dramatically. If the fluid boils, it turns into vapor, and vapor is compressible, which means pressing the brake pedal feels soft or goes to the floor with little stopping response. That is known as brake fade, and it is a serious safety hazard.
Using the wrong fluid, or running degraded fluid for too long, can cause the fluid to boil, lose effectiveness, or in extreme neglect scenarios, damage the seals and internal components of your braking system. This is why choosing the right fluid and knowing when to replace it is not just a maintenance checkbox. It is a genuine safety issue.
Common Brake Fluid Colors and What They Mean
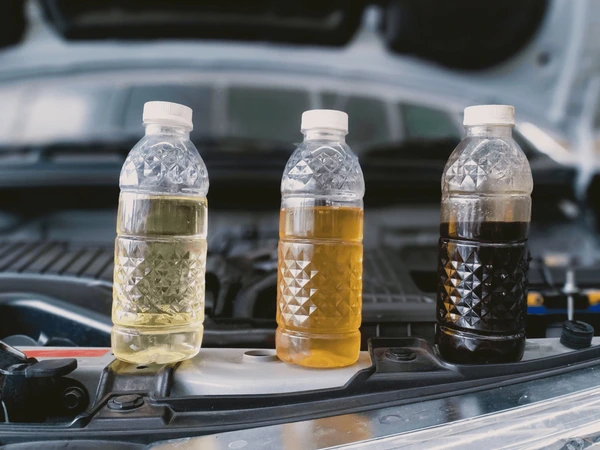
Brake fluid is not one-size-fits-all. Different formulations exist for different vehicles and applications, and manufacturers sometimes add pigment to their fluids to make identification easier. Here are the colors you are most likely to encounter:
- Yellow
- Amber
- Blue
- Brown
- Purple
- Black
Each color is associated with a specific DOT (Department of Transportation) fluid grade, and understanding those grades is where this gets really useful for car owners.
Does Brake Fluid Color Actually Affect Braking Performance?
Here is something worth clearing up right away. The color itself is not what determines braking performance. The chemical composition of the fluid is what matters. Color is simply a visual identifier, sometimes added by manufacturers with pigment so technicians and car owners can quickly distinguish between fluid types.
That said, the pigment concentration does have one indirect effect. Heavily pigmented fluids are slightly harder to dilute, which can affect how they mix with other fluids. This is why mixing different DOT grades is generally not recommended without first understanding their compatibility.
What does influence braking performance is the chemical additives blended into each fluid type. Some formulations include additives that improve response time at the brake pad, enhance friction coefficients, or extend heat resistance. This is why car manufacturers specify a particular fluid type for each vehicle. The wrong fluid may not react at the right speed, may not tolerate the heat generated by your specific braking system, or may degrade your brake components over time.
Think of it this way: running DOT 3 fluid in a high-performance vehicle designed for DOT 4 or DOT 5.1 is like putting regular fuel in a car that requires premium. It will technically run, but not the way it is supposed to.
A Complete Breakdown of Every DOT Brake Fluid Type and Color
Let’s go through each DOT rating one by one. Understanding the differences will help you make sense of what is in your reservoir and what should be in there.
DOT 3 Brake Fluid: The Blue One
DOT 3 is the oldest and most basic brake fluid classification. When fresh and new, it has a blue color. You will mainly find this type in older vehicles, particularly those manufactured before modern braking systems became standard.
DOT 3 is glycol-based, which means it absorbs moisture over time. Its dry boiling point sits around 401°F (205°C), which drops significantly as it absorbs water. For low-demand, older vehicles that are not driven hard, it gets the job done. But it is not suitable for modern vehicles with advanced braking systems, and it offers the least heat resistance of all the DOT grades.
If you are restoring a classic car, DOT 3 might be what the manufacturer originally specified. Always check the owner’s manual before choosing a fluid type.
DOT 4 Brake Fluid: The Yellow One
DOT 4 came along as an upgrade to DOT 3, and it is now one of the most commonly used brake fluids across a wide range of modern vehicles. It has a yellowish color when new and is also glycol-based.
The key improvement over DOT 3 is a higher boiling point. DOT 4 has a dry boiling point of around 446°F (230°C), making it better suited for vehicles that generate more heat during braking. It also has improved water resistance compared to DOT 3.
But here is the trade-off: DOT 4 is more corrosive to metal components than DOT 3, and it does not handle extreme temperatures as well as the higher-grade options. It also degrades faster, which means more frequent replacement intervals depending on your driving style and conditions.
DOT 4 is compatible with DOT 3 systems, meaning you can top up a DOT 3 system with DOT 4 if needed, though the reverse is not recommended as it dilutes the performance characteristics of the higher-grade fluid.
DOT 5 Brake Fluid: The Purple One
DOT 5 is where things get notably different. It is purple in color, and unlike DOT 3 and DOT 4, it is silicone-based rather than glycol-based. This one distinction changes almost everything about how it behaves.
Because it is silicone-based, DOT 5 does not absorb water at all. That sounds like a good thing, and in some ways it is. It has a very high dry boiling point, typically around 500°F (260°C), and it is far less corrosive to metal components. This makes it appealing for heavy vehicles, military vehicles, and machines that sit in storage for extended periods without regular fluid changes.
But there is a significant catch. Because DOT 5 does not absorb water, any moisture that gets into the system pools in low points rather than distributing evenly. That pooled water can cause localized corrosion inside the brake lines and calipers. DOT 5 is also not compatible with ABS systems in most cases, and it should never be mixed with glycol-based fluids like DOT 3 or DOT 4. Mixing them causes a thick, gel-like reaction that can block brake lines entirely.
Bottom line: DOT 5 is a specialized fluid. Unless your vehicle specifically calls for it, do not use it.
DOT 5.1 Brake Fluid: The Darker Yellow (Amber) One
Despite the name, DOT 5.1 is not a variation of DOT 5. It is actually a glycol-based fluid like DOT 3 and DOT 4, just with significantly better performance characteristics. The color is similar to DOT 4 but with a darker, more amber shade.
DOT 5.1 has the highest boiling point of all the glycol-based brake fluids, around 500°F (260°C) dry, which puts it on par with DOT 5 for heat resistance. It was developed specifically to replace both DOT 3 and DOT 4 in high-performance and demanding applications. It is compatible with ABS and non-ABS systems, and it can be mixed with DOT 3 and DOT 4 in a pinch, though you should always do a full flush rather than just topping up with a different grade.
Most modern high-performance vehicles and many European cars specify DOT 5.1 as the factory-recommended fluid. If your car demands superior braking performance and heat tolerance, this is likely the fluid for you.
DOT 6 Brake Fluid: The Deep Purple One
DOT 6 is not a universally standardized grade in the same way as the others, but it does exist and is used in specific heavy-duty applications. It shares a similar purple color to DOT 5 but with improved chemical stability at extreme temperatures.
You will typically find DOT 6 in heavy trucks and commercial vehicles equipped with ABS systems that are regularly exposed to prolonged high-heat braking conditions, like long highway hauls with heavy loads or mountain driving. This is not something you will encounter in everyday passenger vehicles, and unless your vehicle specifically requires it, you will not need to think much about DOT 6.
Quick Reference: DOT Brake Fluid Comparison
| DOT Grade | Color (New) | Base Type | Dry Boiling Point | Best For |
|---|---|---|---|---|
| DOT 3 | Blue | Glycol | 401°F (205°C) | Older vehicles, light-duty use |
| DOT 4 | Yellow | Glycol | 446°F (230°C) | Most modern everyday vehicles |
| DOT 5 | Purple | Silicone | 500°F (260°C) | Heavy vehicles, storage, no ABS |
| DOT 5.1 | Amber (dark yellow) | Glycol | 500°F (260°C) | High-performance vehicles, ABS systems |
| DOT 6 | Deep purple | Varies | Above 500°F | Heavy trucks, extreme-duty applications |
What Color Should Your Brake Fluid Be Right Now?
Fresh, healthy brake fluid is typically light in color. Depending on the type, it could be pale yellow, amber, or clear with a slight tint. The key word here is light. If you look into your brake fluid reservoir and the fluid looks dark brown or black, that is a problem.
Brake fluid darkens over time as it degrades and absorbs moisture, and the color change is a visual indicator of its condition. Here is how to read what you are seeing:
Light Yellow or Amber: Good
This is what healthy brake fluid looks like. It is still doing its job properly. You do not need to take any action unless the vehicle’s service interval calls for a flush regardless.
Dark Yellow to Light Brown: Pay Attention
The fluid is aging. This is what happens as the glycol base and additives break down and the fluid absorbs moisture over time. The fluid may still be within a usable range, but it is worth testing. A brake fluid tester, which you can buy inexpensively at any auto parts store, measures the moisture content percentage. Most manufacturers recommend replacing the fluid when water content exceeds about 2 to 3 percent.
Dark Brown: Replace Soon
At this stage, the fluid has deteriorated significantly. It has lost much of its heat resistance and lubricating ability, and the additive package that protects your brake components is largely depleted. Schedule a brake fluid flush.
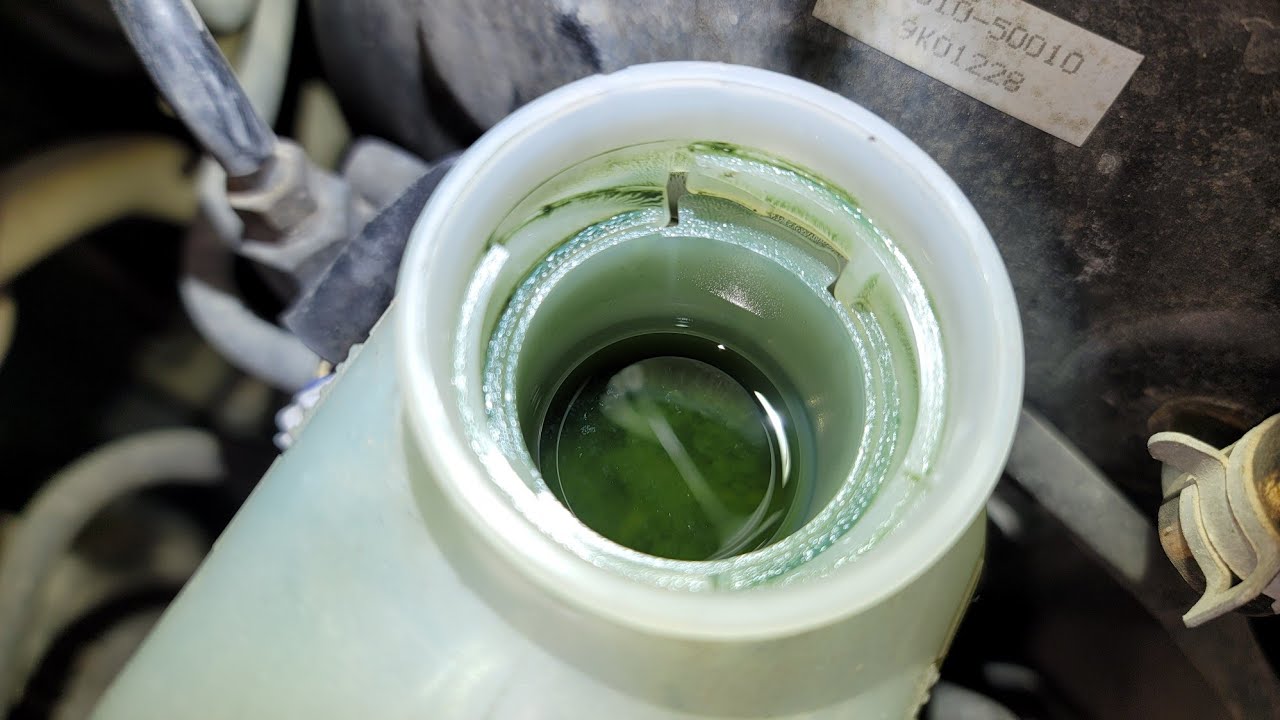
Black or Nearly Opaque: Replace Immediately
If the fluid is black, thick-looking, or has visible particles and sediment floating in it, the system is overdue for a full flush. This level of contamination can damage brake seals, corrode internal components, and compromise your stopping ability. Do not drive on this fluid any longer than necessary.
Here is a real-world example of what can go wrong: imagine buying a used car that was well-maintained mechanically but had never had a brake fluid change. The previous owner put 80,000 miles on it over six years. The fluid in the reservoir looks almost black. Even if the pads and rotors are fine, that degraded fluid means the braking system is operating at a fraction of its designed effectiveness. A full brake fluid flush in that scenario is not optional. It is overdue.
The Two Key Signs That Tell You Brake Fluid Needs Replacing
You do not need expensive diagnostic equipment to get a general read on your brake fluid condition. There are two things you can check visually right now without any tools at all.
Sign 1: Darkening Without Loss of Transparency
If your fluid has darkened but is still relatively clear when you hold the reservoir up to the light, the fluid is aging but may not be at the end of its life yet. The darkening indicates that the base compounds and additives are breaking down, and moisture absorption is underway. At this point, testing with a brake fluid tester is the smart move. It will give you an actual moisture percentage reading so you can decide whether a flush is needed now or can wait until the next service interval.
Sign 2: Loss of Transparency and Visible Particles
This one is not ambiguous. If the fluid is murky, has visible flecks or sediment floating in it, or looks like old motor oil, it needs to be replaced right away. Cloudy or particulate-laden fluid means the additive package has broken down, the base fluid is contaminated, and internal components may already be suffering the effects. A tester reading within normal range at this point is almost irrelevant. The physical condition of the fluid tells you everything you need to know.
How Often Should You Replace Brake Fluid?
This varies by fluid type and manufacturer recommendation, but here are the general guidelines most mechanics follow:
- Glycol-based fluids (DOT 3, DOT 4, DOT 5.1): Every 2 to 3 years, regardless of mileage. Even if the fluid looks fine, glycol-based fluids absorb moisture continuously from the air through microscopic permeation of brake hoses and seals. After three years, the moisture content is typically high enough to noticeably lower the boiling point.
- Silicone-based fluids (DOT 5): Every 5 years or as specified by the vehicle manufacturer. Because DOT 5 does not absorb moisture, it degrades more slowly, but it still needs to be replaced eventually as the chemical additives break down.
- High-performance and track use: If you regularly push your brakes hard at track days or drive aggressively in mountainous terrain, flush the brake fluid more frequently. Some track-focused drivers replace their brake fluid every season.
Even if the fluid still looks okay visually, do not skip the replacement once the service interval has passed. A glycol-based fluid that has been in the system for over three years has almost certainly absorbed enough moisture to meaningfully reduce its boiling point, even if the color has not changed dramatically yet.
Can You Mix Different Brake Fluid Colors or Types?
This is a question that comes up a lot, and the answer depends entirely on which fluids you are talking about mixing.
As a general rule:
- DOT 3, DOT 4, and DOT 5.1 can be mixed in an emergency because they are all glycol-based. However, mixing them will dilute the performance of the higher-grade fluid, so a full flush should follow as soon as possible.
- DOT 5 should never be mixed with any glycol-based fluid. The silicone and glycol bases are chemically incompatible and will create a thick, gel-like substance that can block your brake lines. This is a serious brake failure risk.
- Topping off instead of flushing is a temporary measure only. If you need to top up your fluid reservoir because the level is low, that is fine as a short-term fix. But low fluid level usually indicates either a leak or heavily worn brake pads pushing fluid back into the reservoir. The root cause needs to be addressed.
If you are ever unsure what fluid is currently in the system, the safest move is to do a complete brake fluid flush before adding anything new. This ensures you are starting with a clean, consistent fluid throughout the system.
How to Check Your Brake Fluid at Home
Checking your brake fluid takes about two minutes and requires no tools. Here is how to do it:
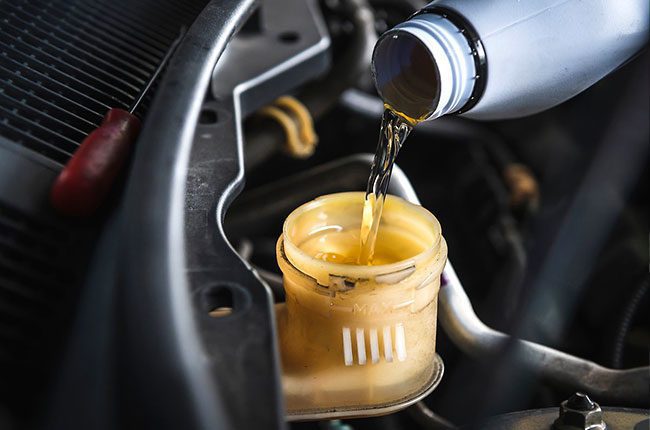
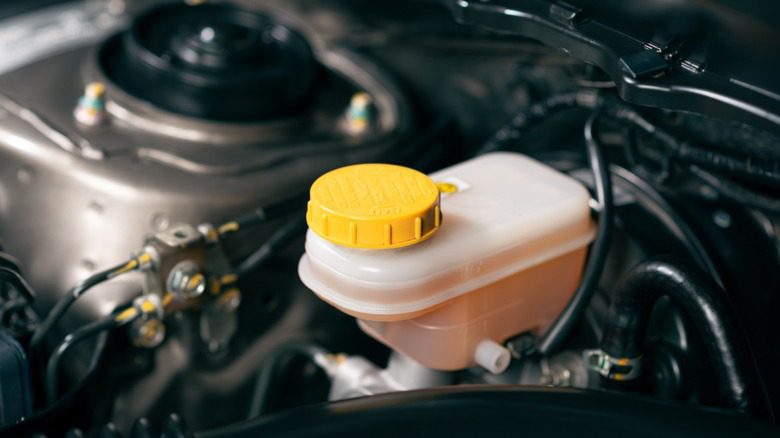
- Open the hood and locate the brake fluid reservoir. It is typically a small, translucent plastic reservoir near the back of the engine bay on the driver’s side. It will have a cap labeled with the DOT fluid type that should be used.
- Check the fluid level without removing the cap. Most reservoirs are translucent enough to see the fluid level through the side. There will be minimum and maximum markers on the outside. The level should be between these two lines.
- Check the color. Look at the fluid through the reservoir. Healthy fluid will be light in color. Dark brown or black fluid is a sign it needs replacing.
- If needed, use a brake fluid tester. These inexpensive tools measure moisture content with a few LED indicators. Insert the probe into the reservoir, and within seconds you get a reading. If the moisture content is above the acceptable level, schedule a flush.
Do not open the reservoir cap unnecessarily. Brake fluid absorbs moisture from the air rapidly, and every time you crack the cap, you are exposing the fluid to humidity. Check visually through the reservoir walls first, and only open it if you actually need to top up or test the fluid.
Warning Signs That Your Brake Fluid System Has a Bigger Problem
Sometimes degraded or contaminated brake fluid is just one piece of a larger issue. Here are signs that the braking system needs more than just a fluid flush:
- Soft or spongy brake pedal: This often means air has entered the brake lines, or the fluid is so degraded that it has partially vaporized under heat. Both require immediate attention.
- Brake pedal sinking to the floor: This can indicate a master cylinder failure, a severe fluid leak, or complete loss of hydraulic pressure. Pull over safely and do not drive the vehicle until it has been inspected.
- Fluid level dropping consistently: If you keep topping up the reservoir and the level keeps dropping, there is a leak somewhere in the system. This could be at the master cylinder, a brake line, or a caliper seal. Find the source before it fails completely.
- Burning smell after braking: This is overheated brake fluid. If the fluid is old and moisture-laden, it will boil at a lower temperature. A burning smell is a sign the fluid is at or past its limit. Do not continue driving hard until the system has cooled and the fluid has been inspected.
- ABS light on the dashboard: Contaminated fluid with particulate matter can affect ABS sensor readings and system performance. If your ABS light comes on around the same time you notice dark, murky fluid, a full brake fluid flush is a logical first step before more extensive diagnosis.
Choosing the Right Brake Fluid: What to Look for and What to Avoid
The most important rule when selecting brake fluid is simple: use what your vehicle manufacturer specifies. This information is in your owner’s manual and is often printed directly on the brake fluid reservoir cap. Do not guess, and do not assume that a higher DOT number is always better for your vehicle.
Beyond the DOT rating, here are a few other things to keep in mind:
- Buy from reputable brands. There are low-quality brake fluids on the market from unknown manufacturers that do not meet the actual DOT specification despite what the label says. Stick to well-known brands like Bosch, Castrol, Motul, Prestone, or your vehicle manufacturer’s own branded fluid.
- Check the manufacture date. Brake fluid has a shelf life. Even an unopened bottle of glycol-based brake fluid can absorb moisture from the air over time through the seal. Check the date before buying, and do not use old stock that has been sitting on a shelf for years.
- Never reuse old brake fluid. Fluid drained from the system during a flush should be disposed of properly, not put back in. Contaminated fluid defeats the entire purpose of the flush.
- Store unused fluid properly. If you have a partial bottle left over after a top-up, seal it tightly and store it in a cool, dry place away from direct sunlight. Use it up within a year rather than letting it sit indefinitely.
What Happens During a Professional Brake Fluid Flush?
If you take your car to a mechanic for a brake fluid flush, here is a quick rundown of what should happen so you know the job was done properly:
- The technician opens the brake fluid reservoir and removes as much of the old fluid as possible using a suction tool or turkey baster.
- Fresh fluid is added to the reservoir.
- Working from the brake caliper or wheel cylinder furthest from the master cylinder (typically the rear passenger side), the technician opens the bleeder valve and pumps old fluid through until fresh fluid starts coming out.
- This process is repeated at each wheel in sequence until all old fluid has been purged from the system and only fresh fluid remains.
- The reservoir is topped up to the correct level, and the cap is reinstalled.
- The brake pedal is tested for firmness before the vehicle is returned.
Some shops use a pressure bleeding system or a vacuum bleeder to speed up this process, but the outcome should be the same: clean, fresh fluid throughout the entire braking circuit.
A brake fluid flush typically costs between $70 and $150 at most independent shops, depending on your location and vehicle type. Given that it protects one of the most safety-critical systems on your vehicle, that is genuinely money well spent.
The Fluid in Your Reservoir Is Telling You Something Right Now
Brake fluid is one of those maintenance items that rarely gets attention until something goes wrong. It does not make noise when it is degrading. There is no warning light in most vehicles until the situation is already serious. The only way to stay ahead of it is to check it regularly and replace it on schedule.
If your fluid is dark, murky, or you genuinely cannot remember the last time it was changed, do not let it slide any longer. A brake fluid flush is one of the cheapest, easiest, and most impactful maintenance services you can have done on your vehicle. The consequences of ignoring it can range from reduced stopping power to complete brake failure in a worst-case scenario.
Check your owner’s manual for the correct fluid type, take a look in that reservoir the next time you open your hood, and if the color has gone from pale yellow to anything resembling dark tea or coffee, get it flushed. Your brakes work hard every single time you drive. Give the fluid inside them the attention it deserves.