Brake pads are one of those car parts that most people never think about until something goes wrong. The good news is they’re relatively affordable compared to other repairs, and they last a decent amount of time. Most brake pads will see you through somewhere between 18,000 and 31,000 miles, though that number can swing quite a bit depending on the quality of the pads you’re running and how you drive.
If you’re someone who drives aggressively in city traffic, braking hard and often, expect to be on the lower end of that range. Drive mostly on highways at steady speeds? Your pads will probably last much longer. It really comes down to how much friction and heat your braking system is dealing with on a daily basis.
Table of Contents
Once you’ve inspected your pads and spotted the warning signs of wear, or you’ve already heard those unpleasant squealing or grinding sounds, it’s time to get them changed. The question most people ask at that point is simple: how long is this actually going to take?
The short answer is roughly 30 minutes to 1 hour for a full brake pad replacement on a standard vehicle. But like most things in the automotive world, the real answer is “it depends.” Let’s break down everything you need to know about brake pad replacement, from how long it takes to what happens during the process, the tools involved, and what you need to check afterward.
Why Brake Pad Replacement Time Varies More Than You Think
Not every brake job is created equal. A skilled mechanic working on a common family sedan is going to finish much faster than someone tackling a modified sports car or a performance vehicle with aftermarket brake components. The type of vehicle, the brake system design, the mechanic’s experience level, and even the condition of surrounding components all play a role in how long the job actually takes.
Here’s a quick breakdown of the factors that affect the time it takes to replace brake pads:
- Vehicle type: A standard sedan or SUV is straightforward. Race cars, heavily modified vehicles, and performance cars often use high-performance brake components made from stronger, more exotic materials that are harder to work with.
- Brake system type: Disc brakes are generally faster to work on than drum brakes. Disc brakes are more common on modern vehicles, especially on the front axle, and they allow for quicker pad swaps.
- Mechanic’s experience: A seasoned mechanic who has replaced hundreds of sets of brake pads will finish in half the time of someone doing it for the first or second time.
- Condition of brake components: If the rotors are worn, corroded, or damaged, the mechanic will need extra time to address those issues as well. Seized caliper bolts can also slow things down significantly.
- DIY vs. professional shop: If you’re doing this yourself in your driveway, budget more time. Not because the job is harder, but because you may not have the same tools, workspace, or familiarity with your specific vehicle.
For a regular car with disc brakes and no complications, 30 minutes per axle is a reasonable estimate at a professional shop. If you’re doing all four corners, budget around 1 to 1.5 hours total.
Should You Do It Yourself or Leave It to a Mechanic?
This is a fair question, and the honest answer depends on your comfort level with car repairs. Brake pad replacement is considered one of the more beginner-friendly DIY car jobs, and plenty of people do it successfully at home with basic tools. But here’s the thing: brakes are not something you want to get wrong.
If even one brake pad is not seated correctly or one caliper is not functioning as it should, your stopping power is compromised. That is not a minor inconvenience. That is a safety issue. If you are new to car repairs, or if your vehicle is showing signs of more advanced brake wear like deep grooves in the rotors or a spongy brake pedal, take it to a professional.
That said, if you are reasonably handy with tools and have done some basic car maintenance before, replacing brake pads is absolutely something you can tackle at home. The process is logical and repeatable, and we will walk through it in detail below.
Understanding the Two Main Brake Systems Before You Start
Before jumping into the process, it helps to understand the difference between the two brake systems you will likely encounter, because the replacement process is slightly different for each.
Disc Brakes

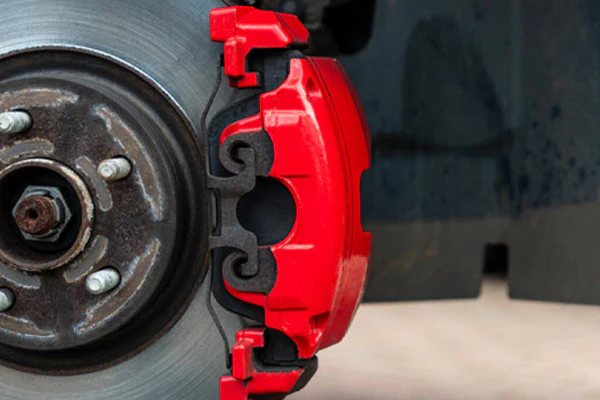
Disc brakes are the most common type found on modern vehicles, especially on the front wheels. They use a rotor (a flat metal disc that spins with the wheel) and a caliper that houses the brake pads. When you press the brake pedal, hydraulic pressure pushes the pads against the rotor, creating friction that slows the car down.
Disc brakes are efficient, easy to inspect, and relatively straightforward to service. Most mechanics can knock out a disc brake pad replacement quickly once the wheel is off.
Drum Brakes
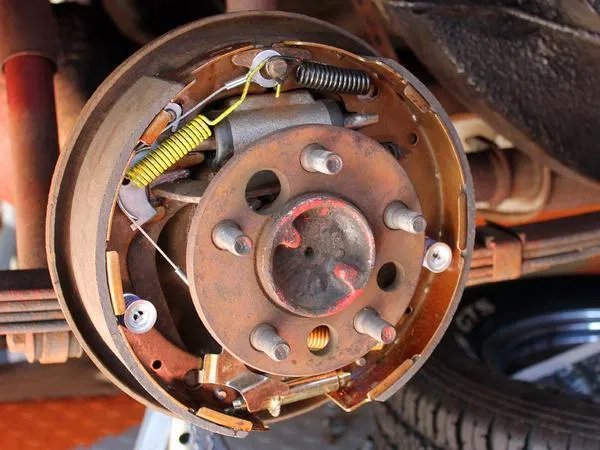
Drum brakes are older technology but still found on the rear wheels of many budget-friendly and older vehicles. Instead of a rotor, they use a hollow drum that rotates with the wheel. Curved brake shoes press outward against the inside of the drum to slow the vehicle.
Drum brakes take a bit more time to service because of how they are assembled. There are more springs, clips, and adjustment mechanisms involved. If you are doing a rear drum brake job for the first time, give yourself extra time and keep a diagram or video reference nearby.
A Step-by-Step Look at How Brake Pads Are Changed
You do not need to memorize every technical detail here, but having a solid understanding of what happens during a brake pad change will help you communicate better with your mechanic and know if something has been skipped or done incorrectly.
Step 1: Lift the Vehicle and Remove the Wheel
The first thing that happens is getting the car safely off the ground. A hydraulic floor jack is used to raise the vehicle, and jack stands are placed under the frame to support it safely. Never work under a car supported only by a floor jack.
Once the car is secure and at a working height, the lug nuts are loosened and the wheel is removed. Pro tip: if you are doing this yourself, loosen the lug nuts slightly before raising the car so the wheel does not spin while you are trying to break them loose.
Step 2: Locate and Inspect the Brake Caliper
With the wheel off, you now have a clear view of the brake assembly. The caliper is the component that clamps around the rotor and holds the brake pads. Before removing anything, take a moment to look at the overall condition of the rotor surface. If it looks deeply grooved, scored, or uneven, the rotors may need replacing at the same time as the pads.
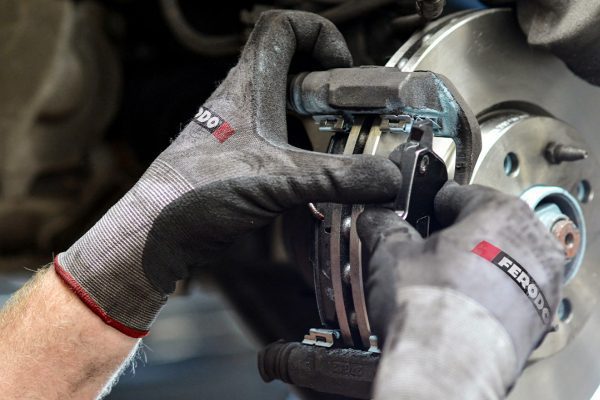
Step 3: Remove the Caliper Bolts and Slide Out the Caliper
The caliper is held in place by two bolts, typically at the top and bottom. These are removed using the appropriate sized socket or wrench. Once the bolts are out, the caliper slides off the rotor. Do not let it hang by the brake line as this can damage the hydraulic hose. Use a piece of wire or a bungee cord to hang it from the spring or another solid part of the suspension.
Step 4: Remove the Old Brake Pads
The old pads usually slide or clip out of the caliper bracket. Some may have retaining clips or pins that need to be removed first. Note how they are positioned before pulling them out so you can install the new ones the same way.
Step 5: Compress the Caliper Piston
New brake pads are thicker than worn ones, so you need to push the caliper piston back into its housing to make room. This is done using a C-clamp or a dedicated brake caliper piston tool. Place an old brake pad or a flat piece of wood against the piston face and slowly compress it back in.
Here is something a lot of beginners miss: before you compress the piston, remove some brake fluid from the reservoir under the hood. As you push the piston back in, it will displace fluid upward, and if the reservoir is full, it can overflow and damage your paint or surrounding components.
Step 6: Install the New Brake Pads
Slide the new pads into the caliper bracket in the same orientation as the old ones. Most new pads come with new hardware like clips and shims, and it is worth using them. These small pieces help reduce noise and vibration, and skipping them can lead to that annoying brake squeal you were probably trying to get rid of in the first place.
Apply a thin layer of brake lubricant or anti-squeal compound to the back of the pads (never on the friction material itself) and to the caliper slide pins to ensure smooth movement.
Step 7: Reinstall the Caliper and Wheel
Slide the caliper back over the rotor and thread the caliper bolts back in by hand first to avoid cross-threading, then torque them to the manufacturer’s specification. Reinstall the wheel and torque the lug nuts in a star pattern to ensure even seating.
Step 8: Pump the Brake Pedal Before Moving the Car
This step is non-negotiable. After everything is back together, pump the brake pedal several times while the car is still parked. The pedal will feel soft or may go all the way to the floor at first. That is normal. The piston needs to be pushed back out against the new pads to establish contact. Keep pumping until the pedal feels firm. Only then is the car safe to move.
For Drum Brakes: The Process Is a Little Different
With drum brakes, the wheel and drum are removed together (or the drum comes off separately, depending on the design). Inside, you will find the brake shoes held in place by springs and retaining hardware. The shoes are removed, new ones are installed, and everything is reassembled carefully.
One side at a time is recommended here, especially if you are doing this for the first time. Keeping one side intact gives you a visual reference for how the springs and clips should be arranged on the side you are working on.
What Tools Do You Actually Need for This Job?
You do not need a professional shop’s worth of equipment to change brake pads, but you do need the right tools. Using the wrong ones can strip bolts, damage components, and turn a one-hour job into a full-day headache.
Here is a practical list of what you will need:
| Tool | Purpose |
|---|---|
| Floor jack and jack stands | To safely lift and support the vehicle |
| Lug wrench or impact wrench | To remove and reinstall the wheels |
| Socket set (metric and standard) | To remove caliper bolts and other fasteners |
| C-clamp or caliper piston tool | To compress the caliper piston |
| Brake cleaner spray | To clean the rotor and surrounding area |
| Brake lubricant or anti-squeal compound | To prevent brake noise and ensure smooth operation |
| Turkey baster or syringe | To remove excess brake fluid from the reservoir |
| Wire brush | To clean caliper bracket sliding surfaces |
| Torque wrench | To tighten bolts to the correct specification |
| Flathead screwdriver or trim tool | To help remove retaining clips and old hardware |
A good set of mechanic’s gloves is also a smart addition. Brake dust is not something you want working into your skin, and the components can have sharp edges that catch you off guard.
How to Know When Your Brake Pads Actually Need Replacing
Before you commit to a brake job, it helps to confirm that the pads are actually the problem. Sometimes brake noise or a spongy pedal can point to other issues like air in the brake lines, a failing master cylinder, or worn rotors. But in most cases, worn pads are the primary culprit.
Here are the clearest signs that your brake pads are due for replacement:
- Squealing or high-pitched screeching when braking: Most brake pads have a small metal wear indicator built in. When the pad wears down to a certain level, this indicator makes contact with the rotor and produces that signature squealing noise. It is designed to get your attention. Do not ignore it.
- Grinding or growling sound: If the squeal has progressed to a grinding noise, the pad friction material has likely worn away completely and metal is now grinding against the rotor. At this point you are damaging the rotor as well, which significantly increases the cost of your repair.
- Longer stopping distances: If your car does not feel like it stops as crisply or quickly as it used to, worn pads could be reducing your braking efficiency. This is one you really should not ignore.
- Brake warning light: Many modern vehicles have sensors that trigger a dashboard warning light when brake pads reach a critical wear level. If this light comes on, get the pads checked right away.
- Visible pad thickness: You can often see the brake pad through the wheel spokes. If the pad material looks thin, under about 3mm, it is time to replace them.
- Vehicle pulling to one side under braking: If your car drifts left or right when you apply the brakes, one pad may be wearing faster than the other, or a caliper may be sticking.
- Vibration or pulsing through the brake pedal: This can indicate warped rotors but is often tied to uneven pad wear as well.
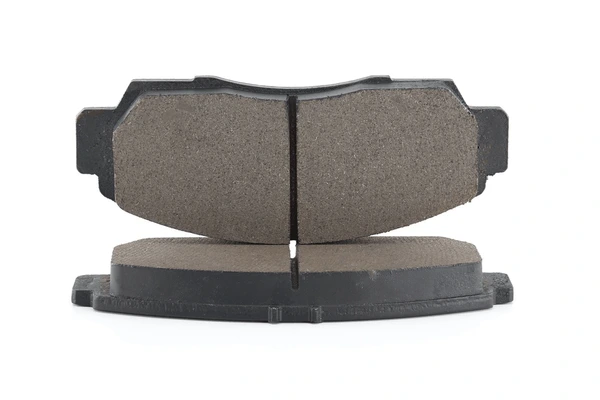
Types of Brake Pads and How They Affect the Job
Not all brake pads are the same, and the type you choose can affect both the replacement process and how long your new pads will last. Here is a quick rundown of the main types:
Organic (Non-Asbestos Organic or NAO) Brake Pads
Made from materials like rubber, glass, and resins, organic pads are soft and quiet. They are easy on rotors and work well at normal temperatures. The downside is they wear faster and produce more brake dust. These are common on economy vehicles and everyday commuter cars.
Semi-Metallic Brake Pads
These contain metal fibers mixed into the friction material, usually copper, steel, or iron. They handle heat well, last longer than organic pads, and offer good overall stopping performance. They can be slightly noisier and a little harder on rotors, but they are the most popular choice for everyday driving because of their balance between performance and durability.
Ceramic Brake Pads
Ceramic pads are made from dense ceramic fibers and are known for being quiet, producing minimal dust, and lasting a long time. They are typically the most expensive option but offer excellent performance and a cleaner appearance on your wheels. They are a popular upgrade for drivers who want quieter, cleaner, longer-lasting brakes.
High-Performance and Racing Brake Pads
These are designed for track use or performance driving applications where brakes are pushed to extreme temperatures. They are made from materials that can handle incredible heat but often do not work well when cold. On a race car or heavily modified vehicle, replacing these pads takes more time simply because the components are larger, heavier, and more specialized.
When selecting replacement pads, always match the pad type to your driving needs. Putting track pads on a daily driver is overkill. Putting economy pads on a vehicle that tows heavy loads is a recipe for brake fade and premature wear.
Essential Checks to Run After Installing New Brake Pads
Replacing the pads is only part of the job. What you do after the installation is just as important as the replacement itself. Skipping the post-installation checks is how people end up with brakes that squeal, pull, or underperform right out of the gate.
Run through every one of these checks before considering the job done:
- Confirm the pads are seated correctly. They should sit flush and even in the caliper bracket with no rocking or movement. If a pad feels loose or is not properly clipped in, remove it and refit it. An improperly seated pad will wear unevenly and will not provide consistent stopping power.
- Check the caliper piston position. Make sure the piston is not over-compressed and is not interfering with the new pads. It should be sitting evenly and fully retracted so the pads can make proper contact with the rotor when the brakes are applied.
- Inspect for fluid leaks. After doing any brake work, scan around the caliper, brake lines, and master cylinder reservoir for any signs of brake fluid leaking. Even a small leak can lead to brake failure over time. Fix any leaks immediately before driving the vehicle.
- Clean off any dust or debris. Use brake cleaner spray to remove any dust, grease, or debris from the rotor surface and surrounding area. Contamination on the rotor can cause uneven braking and noise.
- Pump the brake pedal before moving. As mentioned earlier, pump the pedal several times while stationary until it feels firm. This is not optional. If you skip this and try to drive, the pedal will go straight to the floor and the car will not stop properly.
- Check the brake fluid level. After compressing the piston and completing the job, check the reservoir under the hood. The fluid level should be between the minimum and maximum markers. Top it up with the correct fluid type if needed (usually DOT 3 or DOT 4, as specified in your owner’s manual).
- Check lug nut torque. If your brakes squeak after installation, it could be vibration from loose lug nuts. Make sure all lug nuts are torqued to spec using a torque wrench. Finger-tight is not enough.
- Listen for grinding during initial test drive. Drive slowly in a safe area and apply the brakes gently a few times. A low-speed grinding sound can indicate the rotor surface is in poor condition and may need resurfacing or replacement.
- Test at low speed before committing to full speed. Do a few slow, gentle stops first. Then gradually work up to firmer braking. This gives you a chance to feel how the new pads respond and catch any problems before you are at highway speed.
- Adjust the handbrake if needed. If your vehicle has a cable-operated handbrake connected to the rear brakes, installing new pads may require adjusting the cable tension. The handbrake should engage firmly within a few clicks. If it takes more than that to hold the car on a slope, the cable needs adjustment.
The Brake Bedding Process: Why New Pads Need a Break-In Period
This is something most people are never told about, and it makes a real difference in how well your new brake pads perform and how long they last.
Bedding in new brake pads refers to the process of gradually heating the pads and rotors to transfer a thin, even layer of friction material onto the rotor surface. This layer is what actually does the work when you brake. Without it, your braking performance will be inconsistent and the pads may wear unevenly.
Here is a simple bedding procedure you can do after installation:
- Find a quiet, straight road with minimal traffic.
- Accelerate to around 30 mph and apply moderate brake pressure to slow down to about 5 mph. Do not come to a complete stop.
- Let the brakes cool for about a minute while driving slowly.
- Repeat this 5 to 8 times.
- Then accelerate to about 45 mph and apply firm but not panic-level brake pressure down to around 5 mph. Again, do not fully stop.
- Repeat this 5 to 8 times with cooling time between each stop.
- Allow the brakes to cool completely by driving at low speed for several minutes before parking.
After this process, your pads and rotors are ready for normal driving. You should notice noticeably better braking feel and response compared to the first few stops you made right after installation.
How Much Does It Cost to Replace Brake Pads?
Cost is always part of the conversation, so let’s put some real numbers on it. Prices vary depending on your location, vehicle type, and where you take it, but here is a general range to work with:
| Service Type | Estimated Cost Range |
|---|---|
| DIY brake pad replacement (parts only) | $25 to $80 per axle |
| Professional shop (pads + labor, per axle) | $100 to $300 per axle |
| Adding rotor resurfacing or replacement | Additional $50 to $150 per rotor |
| Full four-wheel brake job at a shop | $300 to $700 or more |
Dealerships tend to charge more than independent shops. If cost is a concern, get a quote from two or three local mechanics before committing. But do not choose a shop purely based on the lowest price. Brake work is safety-critical, and a shop that cuts corners on a brake job is not worth the savings.
How to Make Your New Brake Pads Last as Long as Possible
Once you have gone through the effort and expense of replacing your pads, it makes sense to protect that investment. Your driving habits have a massive impact on how quickly your brake pads wear out.
Here are a few habits that will extend brake pad life significantly:
- Increase your following distance. The more space you leave between you and the car ahead, the less you need to brake suddenly. Gradual slowing uses far less pad material than hard, sudden stops.
- Engine braking on hills and descents. On a long downhill stretch, downshifting to a lower gear lets the engine help slow the car, reducing the load on your brakes. This is especially important on steep mountain roads.
- Avoid riding the brakes. Keeping light pressure on the brake pedal constantly, especially on descents, generates heat and wears pads quickly. Brake firmly when needed and then release completely.
- Reduce unnecessary weight. Heavier vehicles require more braking force. If your trunk is a rolling storage unit full of stuff you never use, clearing it out reduces the load your brakes have to manage.
- Anticipate traffic flow. Watching further ahead and anticipating slowdowns lets you ease off the accelerator early rather than braking hard at the last second. This single habit alone can dramatically extend pad life.
- Get regular brake inspections. Have your brakes inspected at least once a year or every time you get a tire rotation. Catching uneven wear or a sticking caliper early prevents accelerated pad wear and more expensive damage later.
Common Mistakes People Make During Brake Pad Replacement
Even experienced DIYers can fall into some of these traps. If you are doing this job yourself, keep these common mistakes in mind so you can avoid them.
- Not replacing brake hardware. Most brake pad sets come with new clips, shims, and anti-rattle hardware. Reusing the old, worn hardware is a leading cause of brake noise and vibration after installation. Always use the new hardware included with your pads.
- Forgetting to pump the pedal before driving. Already mentioned, but worth repeating. Failing to pump the pedal after installing new pads means the caliper piston has not engaged the pads yet. Drive off without doing this and you will have no braking response.
- Getting grease or oil on the rotor or pad friction surface. Even a small amount of contamination here can significantly reduce braking performance. Handle pads by the edges and clean rotors with brake cleaner before installation.
- Ignoring the rotors. If your rotors are worn beyond the minimum thickness specification or have deep scoring, new pads will not fix your braking problem. They will just wear unevenly against the damaged surface. Measure your rotors or have a mechanic check them before spending money on pads alone.
- Overtightening caliper bolts. These bolts have specific torque values for a reason. Over-tightening can distort the caliper or snap a bolt, and under-tightening can cause the caliper to shift during braking. Use a torque wrench and look up the spec for your vehicle.
- Replacing only one side. Brake pads should always be replaced in axle pairs, meaning both fronts together or both rears together. Replacing only one side causes uneven braking force, which can pull the vehicle to one side during stops.
- Not lubricating the slide pins. Caliper slide pins need to move freely for the caliper to clamp and release correctly. If they are dry, corroded, or gummed up, the caliper can stick. This causes uneven wear and overheating. Always clean and re-lubricate them during a brake job.
What Happens If You Keep Driving on Worn Brake Pads?
Let’s be direct about this. Driving on worn brake pads is dangerous and expensive. The longer you wait, the worse the damage and the higher the bill.
When the friction material wears away completely, the metal backing plate contacts the rotor directly. This metal-on-metal contact destroys the rotor surface rapidly, turning what would have been a simple pad replacement into a much more costly rotor replacement job as well. In extreme cases, the caliper itself can be damaged.
Even before the pads are fully worn, degraded pads increase stopping distances. In a sudden emergency stop situation, a few extra feet of stopping distance is the difference between a near miss and a collision. This is not a repair to delay.
If your brakes are making noise, your pedal feels soft, or your stopping distances have gotten noticeably longer, get them checked this week. Not next month.
Front vs. Rear Brake Pads: Do They Wear at the Same Rate?
No, they do not, and this surprises a lot of people. Front brake pads almost always wear faster than rear ones. The reason comes down to physics. When you brake, the weight of the car shifts forward. This means the front wheels are handling the majority of the stopping load. On most vehicles, the front brakes are responsible for 60 to 70 percent of the total braking force.
Because of this, it is completely normal to replace your front pads more frequently than the rears. Some vehicles go through two or three sets of front pads before the rear pads need replacing. Always check all four corners during inspections and do not assume that because the fronts are worn, the rears must be too, or vice versa.
When to Replace the Rotors Along With the Pads
This comes up in almost every brake job conversation. Sometimes you can get away with just replacing the pads and leaving the existing rotors in place. Other times, the rotors need to come off too.
Replace the rotors when:
- The rotor has worn below the minimum thickness specification (this is stamped or cast into the rotor itself)
- There are deep grooves or scoring on the rotor surface that cannot be machined away
- The rotor shows signs of heat cracking or warping
- You feel a pulsing or vibrating sensation through the pedal during normal braking
- The rotor has significant rust or corrosion that goes beyond surface level
In many cases, especially on higher-mileage vehicles, it makes practical and financial sense to replace the rotors at the same time as the pads. Rotors are relatively affordable, and you save on labor costs since everything is already apart. A fresh pad on a fresh rotor also means optimal braking performance from day one.
Skipping necessary rotor replacement to save money upfront will result in faster pad wear and a return trip to the shop sooner than expected. That ends up costing more in the long run.
The Bottom Line on Brake Pad Replacement Time and What You Should Do Next
Brake pad replacement is not complicated, but it does require attention to detail and respect for the process. Whether you are having a shop handle it or tackling it in your own driveway, understanding what is involved puts you in a better position to make smart decisions and avoid getting taken advantage of.
For a standard vehicle at a professional shop, expect the job to take 30 minutes to an hour per axle. A full four-wheel brake job might run 1.5 to 2 hours with no complications. If problems are found along the way like seized calipers, damaged rotors, or corroded hardware, add time from there.
Your brakes are not the place to gamble on cheap parts or deferred maintenance. If you have been ignoring that squeal for the past few weeks, take it as your sign. Get them inspected, get them replaced, and drive with confidence knowing your car can stop the way it is supposed to.
When was the last time you had your brake pads properly inspected? If you cannot remember, that is probably your answer.