
A warning light popping up on your Mini Cooper dashboard is never a welcome sight. When that warning happens to be a parking lamp malfunction, many owners immediately assume the worst. The good news is that this particular problem is one of the more manageable electrical issues you will encounter on a Mini. It is common across multiple model years, and in many cases, the fix is straightforward.
That said, ignoring it is not an option. Parking lamps are a legal requirement in most regions, and a malfunctioning light system can create genuine safety problems, especially at night or in low-visibility conditions. Whether you are a hands-on DIY type or someone who prefers to hand it off to a professional, understanding what is actually happening inside your car’s lighting system will help you make a smarter, faster decision.
Table of Contents
Let us walk through exactly what this malfunction means, what causes it, and how to fix it properly.
What Is the Mini Cooper Parking Lamp Malfunction Warning?
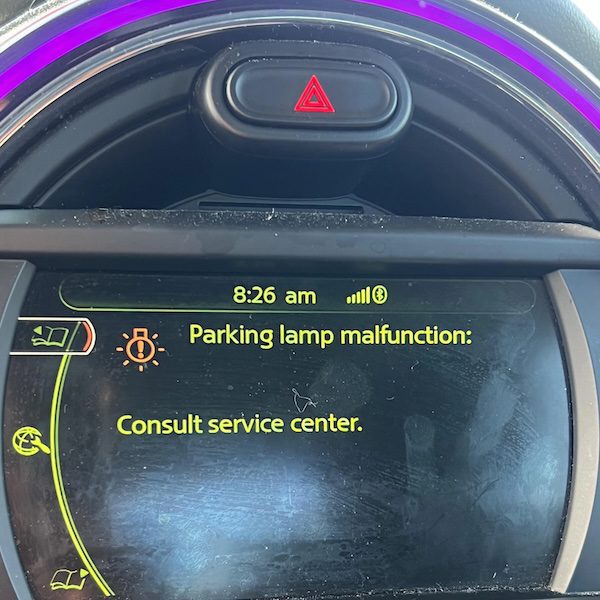
The parking lamp malfunction warning on a Mini Cooper is the vehicle’s onboard diagnostic system telling you that something in the parking light circuit is not behaving the way it should. This warning typically appears as a light bulb symbol with an exclamation mark on your instrument cluster. Some models display a text message alongside the symbol.
The system constantly monitors electrical current flowing through each light circuit. When the current reading falls outside the expected range, whether too low because a bulb has failed or too high because something is drawing excess amperage, the warning triggers. So the warning itself is not the problem. It is the messenger telling you something downstream needs your attention.
This malfunction has been reported across a wide range of Mini Cooper model years, from the early 2000s all the way through more recent F-series models. The specific cause varies depending on the year and trim level, but the diagnostic process follows a similar path regardless of which generation you own.
One thing worth understanding right away is that the warning does not always mean a bulb has completely failed. In some reported cases, the connectors behind the headlight assembly melted, which caused abnormally high current draw. In other cases, the LED daytime running lights situated between the main xenon headlights and the fog lights were staying illuminated when they should have been off. The warning covered all of these situations under the same general alert.
The Most Common Causes of a Mini Cooper Parking Lamp Malfunction
A Failed or Incorrectly Seated Bulb
This is the first thing you should check, and it is often the culprit. Bulbs fail. It is a normal part of vehicle ownership, and the parking light bulb in a Mini Cooper is no exception. However, the Mini Cooper’s diagnostic system is sensitive enough that even a bulb that is not fully seated in its socket will trigger the malfunction warning. The car expects a specific resistance reading from that circuit, and a loose or partially installed bulb changes that reading.
Owners of 2011 through 2016 Mini Cooper models have reported this specific issue more frequently than other model years. Before assuming anything is seriously wrong, check whether the bulb is properly seated. Sometimes simply pressing the bulb firmly back into its socket clears the warning entirely.
For a clear visual walkthrough of how to replace a Mini Cooper parking light bulb, this tutorial covers the process step by step:
Electrical Connection Problems
If the bulb checks out, the next suspect is the wiring and connector behind the lamp assembly. Loose connections, corroded terminals, and in more serious cases, melted connector housings, have all been documented causes of parking lamp malfunction warnings on Mini Coopers.
Owners of the 2015 Mini Cooper F56 have specifically reported intermittent parking light failure linked to loose connections inside the headlight housing. One telling sign of a connection issue is when the light comes back on after you tap or lightly kick the front bumper. If that physical vibration restores the circuit temporarily, the connection is your problem, not the bulb itself.
Melted connectors are a more serious version of this issue and typically result from a bulb pulling more current than the connector was designed to handle. This can happen when an incorrect replacement bulb is installed, or when a bulb fails in a way that causes a momentary current spike. If you open the housing and find any discoloration, deformed plastic, or a burnt smell near the connector, that connector needs to be replaced before you install any new bulb.
A Blown Fuse
A blown fuse in the parking light circuit will cut power to the entire circuit and trigger the malfunction warning immediately. This is one of the easiest things to check and one of the cheapest to fix if it turns out to be the problem.
Pull out your owner’s manual and locate the fuse diagram. Find the fuse that corresponds to your parking lights or exterior lighting circuit. Pull that fuse using a fuse puller or a pair of needle-nose pliers, hold it up to the light, and look at the wire inside. If the wire is broken or if there is visible burn damage, the fuse has blown. Replace it with a new fuse of the exact same amperage rating. Never install a higher-rated fuse thinking it will fix the problem more permanently. That is how wiring fires start.
If the new fuse blows immediately after installation, stop. Something in the circuit is drawing too much current, and a deeper electrical inspection is needed. This is the point where a qualified mechanic or an authorized Mini service center should take over.
Battery and Voltage Issues
A weak or failing battery can cause all sorts of strange warning lights to appear on a Mini Cooper dashboard, including parking lamp malfunction alerts. When battery voltage drops below the level the control modules expect, the system can misread sensor data and trigger warnings that have nothing to do with the actual lights themselves.
If you are chasing a parking lamp malfunction warning and everything in the lighting circuit looks physically fine, check your battery voltage. A fully charged and healthy battery should read approximately 12.6 volts with the engine off. Anything below 12.2 volts indicates a battery that is struggling. You can check this with an inexpensive digital multimeter from any auto parts store, or you can ask a shop to load-test the battery for you.
LED Side Light Issues
On Mini Cooper models equipped with LED daytime running lights positioned between the main headlight units and the fog lights, there is a specific failure mode worth knowing about. These LED strips can develop faults that cause them to remain illuminated when the car should have turned them off, or conversely, fail to illuminate when the system expects them to be on.
Both scenarios register as a parking lamp malfunction because the control module measures the light output and current draw of the entire circuit. If the LEDs are misbehaving, the circuit readings fall outside the acceptable range. Depending on the severity of the fault, this may require replacing the LED light strip assembly itself rather than a simple bulb swap.
Step-by-Step: How to Start Diagnosing and Repairing the Problem
Step 1: Open the Hood Safely
Start by locating the hood release lever inside your Mini Cooper. It is usually positioned on the lower left side of the dashboard near the driver’s door. Pull the lever upward to release the primary hood latch. Walk around to the front of the car, slide your hand under the hood lip to locate the secondary safety latch, press or lift it, and raise the hood fully. Use the prop rod to hold it open securely.
Put on a pair of work gloves before you start touching anything inside the engine bay. This protects your hands from sharp edges and also prevents skin oils from contaminating the bulb glass if you are handling replacement halogen bulbs. Skin oils create hot spots on halogen glass and significantly shorten bulb life.
Step 2: Locate and Remove the Parking Light Bulb
The parking light housing sits on the side of the main headlight assembly. Look for a small socket that you can grip and twist counterclockwise. Once the socket is loose, pull it straight back out of the housing. The W5W bulb will be attached to the end of the socket.
Grip the bulb gently with your gloved hand or wrap it in a folded paper towel, then wiggle it slightly while pulling it straight out of the socket. Do not yank or twist aggressively. The socket contacts are fragile, and forcing the bulb can damage them.
Inspect the bulb closely. A burnt-out filament is often visible to the naked eye as a broken wire inside the glass envelope. Also check the inside of the socket itself for any black residue, corrosion on the contacts, or deformation of the plastic housing.
Step 3: Check the Brake Light and Turn Signal While You Are There
Since you already have the headlight housing area accessible, take a few extra minutes to inspect the brake light and turn signal bulbs in the same assembly. These bulbs are accessed through their own sockets using the same twist-and-pull method. If any of them are showing early signs of failure, replace them at the same time. It saves you from doing this job again in three months.
This is also the right moment to visually inspect the wiring harness connectors attached to each socket. Look for any melted plastic, cracked insulation on the wires, or corroded metal terminals. If the connector looks compromised in any way, it needs to be repaired or replaced before a new bulb is installed.
Replacement Options: Choosing the Right Bulb for Your Mini Cooper
Upgrading to LED Bulbs
LED bulbs are the upgrade most Mini Cooper owners choose when the time comes to replace a parking light. The advantages are real and measurable. LEDs produce significantly more light output than the standard halogen bulbs the factory installs. They draw far less electrical current, which is easier on your wiring and your battery. They also last substantially longer, often outlasting the vehicle itself under normal use conditions.
The installation process for an LED replacement is identical to replacing a standard bulb. Remove the old W5W halogen bulb from the socket, insert the LED replacement, and twist the socket back into the housing. One important note: some Mini Cooper models use a canbus monitoring system that is sensitive to the lower current draw of LED bulbs. If your car’s system detects that the LED draws less current than the factory specification, it may interpret this as a failed bulb and trigger a malfunction warning even though the light is working perfectly.
If this happens, you need a canbus-compatible LED bulb that includes a small resistor to bring its current draw in line with what the system expects. These are widely available and inexpensive. Make sure the LED replacement you buy is specifically listed as canbus-compatible for Mini Cooper applications.
Here is a helpful video showing the LED replacement process in detail:
High-Intensity Discharge (HID) Bulbs
HID bulbs are another upgrade option worth understanding. They produce a bright, cool-toned white light that many drivers find significantly easier on the eyes during nighttime driving. HID lighting is noticeably brighter than standard halogen output and provides a wider, more even spread of illumination across the road surface.
However, HID retrofitting into a parking light circuit is considerably more complex than a simple LED swap. HID systems require a ballast component to regulate the high voltage needed to strike and maintain the arc that produces the light. Installing a proper HID kit in a housing that was not designed for it also raises beam alignment concerns. A poorly aimed HID light can blind oncoming drivers, which is both dangerous and illegal in many areas.
Before pursuing an HID upgrade for your parking lights specifically, confirm your vehicle’s compatibility and understand that additional wiring work may be required. For the parking lamp circuit in particular, an LED upgrade is the more practical and cost-effective solution for most owners.
When to Stop DIYing and Call a Professional
There is a clear line between what a confident home mechanic can handle on this repair and what genuinely requires professional tools and expertise. Here is how to know which side of that line you are on.
- If the warning clears after a bulb replacement: You solved it. Check the light operation one more time after a drive and move on.
- If a new fuse blows immediately: Stop. There is a short circuit somewhere in the system that needs a professional to trace with proper diagnostic equipment.
- If you find melted connectors or burnt wiring: This is beyond a simple bulb job. Electrical repairs involving damaged wiring harnesses need to be done correctly the first time. Poorly repaired wiring can cause fires.
- If the warning persists after replacing the bulb and checking the fuse: The issue may require a diagnostic scan tool that can communicate with the body control module to read specific fault codes. Many auto parts stores will plug in a basic OBD scanner for free, but a Mini-specific diagnostic tool at an authorized service center will give you more precise information.
- If your battery checks out fine but the warning keeps returning: There may be an underlying control module issue that needs professional diagnosis.
An ASE-certified technician or an authorized Mini service center will have the equipment to read the exact fault code stored in your vehicle’s system, identify the precise circuit that is reporting the fault, and fix it correctly. The cost of a proper diagnosis is almost always less than the cost of replacing parts randomly and hoping one of them was the problem.
Quick Reference: Parking Lamp Malfunction Diagnosis Checklist
| Step | What to Check | What to Do If Found |
|---|---|---|
| 1 | Parking light bulb condition and seating | Re-seat or replace the W5W bulb. Use canbus-compatible LED if upgrading. |
| 2 | Connector and wiring condition | Replace damaged connectors. Do not install a new bulb into a melted socket. |
| 3 | Parking light fuse in the fuse box | Replace blown fuse with identical amperage rating only. |
| 4 | Battery voltage | Test with a multimeter. Replace if below 12.2 volts under load. |
| 5 | LED daytime running light strips | Inspect for faults. Replace the LED strip assembly if malfunctioning. |
| 6 | Persistent warning after all checks | Take the vehicle to an authorized Mini service center for a full diagnostic scan. |
A parking lamp malfunction warning on your Mini Cooper is rarely a catastrophic problem, but it does demand your attention. Work through the checklist systematically, start with the simplest and cheapest possible cause, and only escalate to professional help once you have ruled out the basics. Most owners who go through this process end up solving the problem with a new bulb or a fresh fuse. A small number need a connector repair or a battery replacement. Very few need anything more serious than that.
The one thing you should never do is cover the warning light with tape and keep driving. Your parking lamps serve a legal and safety function. If you are parked on a dark road at night with a failed parking light, you are invisible to approaching traffic. Fix it now, while it is still a minor repair.