Your vehicle’s fuel system is one of the hardest-working systems under the hood. Most drivers never think about it until something goes wrong, and when it does, it can go wrong fast. One of the problems that catches car owners completely off guard is something called an OL-Fault, specifically a Fuel System 1 OL-Fault.
It sounds technical. It looks confusing on an OBD2 scanner. But once you understand what is actually happening inside your engine when this fault shows up, the whole thing starts to make a lot more sense. And more importantly, you will know exactly what to do about it.
Table of Contents
This guide breaks it all down in plain language. No engineering degree required.
What Is a Fuel System 1 OL-Fault? (And Why Your Engine Hates It)
Let’s start from the beginning, because this is one of those topics where the background context makes everything else click.
Modern fuel-injected engines do not just dump fuel into the engine randomly. They operate in one of two modes: open loop or closed loop. Think of these as two different driving personalities your engine switches between depending on the situation.
Open Loop vs. Closed Loop: The Difference That Actually Matters
Closed loop is the smart, efficient mode. In this mode, the engine uses a feedback system, pulling real-time data from multiple sensors to constantly fine-tune how much fuel gets injected. It is constantly reading, adjusting, and optimizing. Your engine runs at its best in closed loop because it is responding to what is actually happening, not just following a preset script.
Open loop is different. In open loop, the engine ignores that feedback and instead follows a pre-programmed fuel map stored in the Engine Control Module (ECM). There is no real-time adjustment happening. The ECM says, “according to my map, at this throttle position and engine temperature, inject this much fuel,” and that is exactly what happens, whether it is the right amount or not.
Open loop is not inherently bad. Your engine legitimately needs to run in open loop during certain situations, like when you first start it on a cold morning, during hard acceleration, or during deceleration. Those are normal, temporary open loop conditions.
But here is the thing: the engine is supposed to transition out of open loop and back into closed loop once those conditions pass. When it does not, that is your OL-Fault. The system is stuck open when it should have closed, and that is where the real trouble begins.
So What Exactly Is a Fuel System 1 OL-Fault?
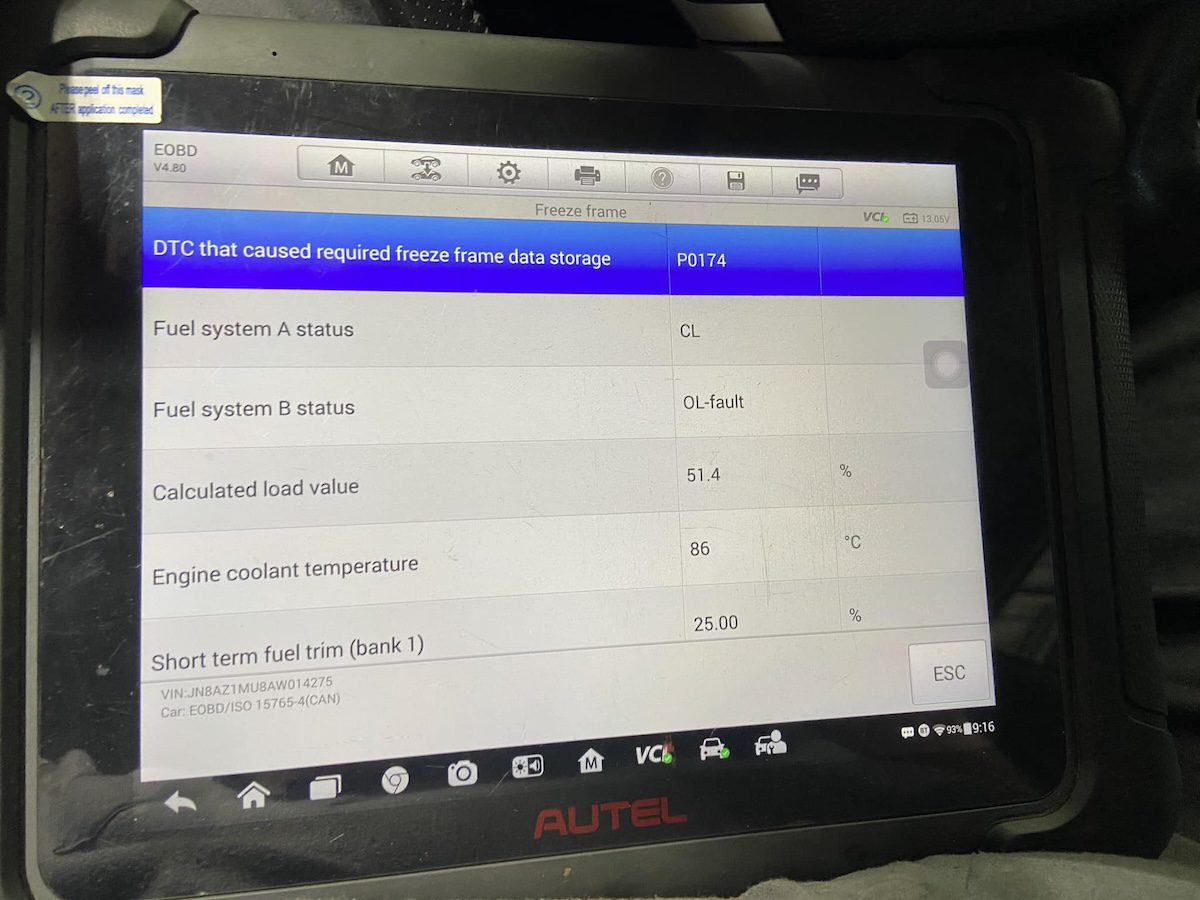
A Fuel System 1 OL-Fault is a diagnostic status indicating that Bank 1 of your fuel system is stuck in open loop mode due to a fault or failure. “Fuel System 1” refers to Bank 1, which is the side of the engine that contains cylinder number one. On a four-cylinder engine, there is only one bank, so this fault affects the whole engine.
The “OL” stands for Open Loop. The “Fault” part tells you it is not a normal open loop condition. Something broke, something failed, something is sending bad data, and because of that, the ECM cannot complete the transition back to closed loop.
At its core, this is an electrical problem. Either a circuit has broken, a sensor has failed, or there is an interruption somewhere in the electrical communication chain that the ECM depends on to make the open-to-closed-loop switch.
What the ECM Actually Needs to Make the Switch
The ECM does not flip from open loop to closed loop randomly. It waits for specific data inputs from sensors around the engine. It is constantly asking questions like:
- How much air is flowing into the intake manifold?
- What is the throttle position right now?
- What is the engine block temperature?
- How fast is the engine spinning (RPMs)?
- What is the ambient air temperature outside?
When all those answers come back clean and within expected ranges, the ECM confidently switches to closed loop and lets the feedback system take over. But if one of those sensors is sending garbage data, or sending no data at all, the ECM does not get the confirmation it needs. So it stays in open loop. And it keeps pumping fuel based on that pre-programmed map, regardless of what the engine actually needs.
The result? Your engine runs rich, burns more fuel than necessary, and over time, that excess fuel can wash down cylinder walls, contaminate oil, and cause serious long-term damage.
That is why this is not something to park on the back burner and deal with “eventually.” It needs attention now.
What Does It Feel Like When You Have a Fuel System 1 OL-Fault?
Before we get into causes and fixes, it is worth talking about what you might actually experience behind the wheel. Because a lot of drivers feel something is off long before they plug in an OBD2 scanner.
Here are the most common symptoms:
- Noticeably worse fuel economy. When the engine is stuck in open loop and running rich, it is burning more fuel than it should. If you are filling up more often than usual, that is a red flag.
- Rough idle. The engine may feel unstable or shaky when you are sitting still at a light. A rich-running engine does not idle smoothly.
- Strong fuel smell from the exhaust. Unburned fuel has to go somewhere. A lot of it ends up going out the tailpipe, and you or the driver behind you will smell it.
- Black smoke from the exhaust. This is a classic sign of a rich-running engine. Too much fuel, not enough air to burn it cleanly.
- Sluggish or hesitant acceleration. Counterintuitively, too much fuel does not always mean more power. A rich mixture can actually make throttle response feel sluggish.
- Check engine light is on. This one is almost guaranteed. The ECM knows something is wrong and it will tell you.
- Failed emissions test. Rich-running engines produce significantly higher hydrocarbon and CO emissions. If your state requires emissions testing, this fault will almost certainly cause a failure.
Any one of these symptoms alone could point to several different problems. But if you are seeing two or three of them together, and your OBD2 scanner is showing a Fuel System 1 OL-Fault, you know exactly what you are dealing with.
The Real Causes of a Fuel System 1 OL-Fault (Explained Simply)
There is rarely just one single cause for this fault. It can come from several different directions. Understanding each one helps you narrow down the diagnosis instead of throwing parts at the problem and hoping something sticks.
1. Faulty Wiring or Damaged Electrical Connections
Because the open loop and closed loop systems are fundamentally electrical in nature, wiring problems are one of the most common culprits. Wires fray. Connectors corrode. Rodents chew through harnesses (yes, this happens more than you would think, especially if your car sits parked outdoors). Improper previous repairs can leave wiring installed incorrectly.
When a wire in the sensor communication chain is damaged or broken, the ECM either gets no signal or gets a corrupted one. From the ECM’s perspective, it cannot trust the data, so it cannot safely switch to closed loop. The result is a stuck open loop and an OL-Fault on your scanner.
This is sometimes the most frustrating cause to track down because a damaged wire can hide almost anywhere along a long and complex harness. But it is also sometimes the cheapest fix, assuming you catch it early.
2. A Failed Oxygen (O2) Sensor
The oxygen sensor is arguably the single most important sensor when it comes to the open-to-closed-loop transition. Here is why.
In closed loop mode, the ECM uses the O2 sensor’s readings to constantly adjust the air-to-fuel ratio. The O2 sensor sits in the exhaust stream and measures how much oxygen is in the exhaust gases. Too much oxygen means the mixture is lean (too much air, not enough fuel). Too little oxygen means the mixture is rich (too much fuel). The ECM uses that data to keep everything balanced.
But to switch into closed loop in the first place, the ECM needs the O2 sensor to be warmed up and producing a reliable voltage signal. If the sensor is dead, lazy (meaning it responds too slowly), or contaminated, the ECM never gets the “all clear” signal it needs. It stays in open loop, and you get the OL-Fault.
O2 sensors have a typical lifespan of around 60,000 to 100,000 miles. If your vehicle is older and has never had the O2 sensor replaced, this should be one of the first things you check.
3. A Dirty or Failing Mass Air Flow (MAF) Sensor
The MAF sensor sits between the air filter and the engine’s intake manifold. Its job is simple but vital: measure how much air is flowing into the engine so the ECM knows how much fuel to inject to match it.
When the MAF sensor is dirty or failing, it sends inaccurate air mass readings to the ECM. The ECM then calculates the wrong fuel amount, and the entire calibration process that enables the closed loop transition gets thrown off.
Interestingly, MAF sensors can sometimes be cleaned rather than replaced. A can of MAF sensor cleaner (not regular electronics cleaner, it has to be specifically for MAF sensors) and a careful hand can sometimes bring a dirty sensor back to life. But if the sensor itself is failing electrically, cleaning will not fix it and replacement is the only answer.
4. A Bad Engine Coolant Temperature (ECT) Sensor
This one surprises a lot of people. The ECT sensor measures the temperature of your engine coolant, which serves as a proxy for engine temperature in general. The ECM uses this data to determine whether the engine is warmed up enough to switch from open loop to closed loop.
Think about it this way. When you start a cold engine, it needs to run rich temporarily to compensate for the fuel that condenses on cold cylinder walls. That is normal open loop behavior. But once the engine reaches operating temperature, typically around 195 to 220 degrees Fahrenheit depending on the vehicle, the ECM should see that temperature reading and say, “okay, the engine is warm, time to switch to closed loop.”
If the ECT sensor is faulty and sending incorrect temperature readings, say it is telling the ECM the engine is still cold when it has actually been running for 20 minutes, the ECM will never initiate the closed loop transition. The open loop stays open. The OL-Fault appears.
A failed ECT sensor can also cause other symptoms, like the temperature gauge reading incorrectly, the cooling fan not activating at the right time, or the engine running rich all the time. These additional symptoms can help you identify the ECT sensor as the likely culprit.
5. High Voltage Spikes or Electrical Overload
Voltage spikes are not something most car owners think about, but they happen. A failing alternator that produces inconsistent voltage, a bad ground connection, or even a jump-start done incorrectly can send a surge of electricity through the vehicle’s electrical system.
When that happens, the surge can blow fuses that protect key sensors or electrical components. It can also damage the components themselves. Any sensor involved in the fuel loop transition, whether the O2 sensor, ECT, or MAF, could be damaged by a significant voltage spike.
If you recently had a jump-start or battery replacement and the OL-Fault appeared shortly after, high voltage damage is worth investigating. Check the fuse box first. Blown fuses are easy to spot and cheap to replace, and they can sometimes be the entire story.
6. A Faulty Engine Control Module (ECM)
The ECM is essentially the brain of your vehicle. It is a computer, and like any computer, it can develop problems, whether from physical damage, software corruption, or electrical failure.
When the ECM itself is the problem, the symptoms can be wide-ranging and confusing, because the ECM controls so many systems simultaneously. An OL-Fault caused by a failing ECM might also come with other unrelated codes, erratic behavior from multiple systems, or symptoms that seem completely disconnected from each other.
Here is the important nuance: not all ECM problems require a full replacement. Sometimes the ECM just needs to be reprogrammed or reflashed with updated software. This is actually more common than most people realize. Manufacturers release software updates for ECMs all the time, and a dealership or qualified shop can often reprogram the existing unit for a fraction of the cost of a replacement.
But if the ECM has suffered physical damage, water intrusion, or a catastrophic electrical failure, reprogramming will not help. At that point, replacement is the only path forward.
ECM replacement is not cheap. Depending on the vehicle, a new or remanufactured ECM can run anywhere from a few hundred to over a thousand dollars, plus labor for installation and programming. That is why it is always worth ruling out every other possible cause before pointing the finger at the ECM.
A Quick Reference: Causes and What to Expect
| Cause | Common Symptoms Alongside OL-Fault | DIY Friendly? | Typical Cost Range |
|---|---|---|---|
| Faulty Wiring | Intermittent faults, multiple error codes | Partially | $50 to $300+ |
| Failed O2 Sensor | Rich running, poor MPG, failed emissions | Yes | $50 to $250 |
| Dirty/Bad MAF Sensor | Hesitation, rough idle, lean/rich codes | Yes | $25 to $300 |
| Faulty ECT Sensor | Wrong temp gauge reading, rich running | Yes | $20 to $150 |
| Voltage Spike Damage | Blown fuses, multiple system faults | Partially | $10 to $500+ |
| Faulty ECM | Multiple unrelated codes, erratic behavior | No | $300 to $1,500+ |
How to Properly Diagnose a Fuel System 1 OL-Fault (Step by Step)
Diagnosis is everything here. Jump to a fix without knowing the actual cause and you will waste money and possibly still have the same problem after spending it. Do the diagnosis right, and you save yourself a lot of frustration.
Step 1: Get an OBD2 Scanner and Pull the Codes
You need an OBD2 scanner. Basic models cost as little as $20 and plug into the diagnostic port under your dashboard (usually on the driver’s side, below the steering wheel). More advanced scanners can show you live sensor data, which is incredibly useful for this particular fault.
Plug it in, turn the key to the “on” position without starting the engine, and let the scanner read all stored codes. Write down every single code you see, not just the OL-Fault. The other codes will help you narrow down which sensor or system is causing the problem.
For example, if you see a P0131 (O2 sensor low voltage, Bank 1 Sensor 1) alongside the OL-Fault, that tells you the O2 sensor is almost certainly your culprit. If you see a P0102 (MAF sensor low input), that points you toward the MAF. The codes work together to tell a story.
Step 2: Check the Live Data
If your scanner supports live data streaming (many mid-range models do), use it. Start the engine and watch the following readings in real time:
- Fuel System 1 Status: Watch for when it switches from “OL” (open loop) to “CL” (closed loop). On a healthy engine, this switch typically happens within two to five minutes of startup as the engine warms up. If it never switches, you have confirmed the fault is active.
- O2 Sensor Voltage: On a working engine in closed loop, the O2 sensor voltage should be fluctuating rapidly between roughly 0.1 and 0.9 volts. A sensor stuck at a fixed voltage or showing no signal at all is a dead giveaway.
- Coolant Temperature: Watch the coolant temp climb as the engine warms up. If it climbs on the gauge but the scanner shows a suspiciously low temperature reading, the ECT sensor may be giving the ECM bad data.
- MAF Reading: Compare the MAF’s air mass reading to expected values for your engine. A quick search for your specific vehicle will give you the baseline numbers to compare against.
Step 3: Visual Inspection of Wiring and Connectors
Before replacing anything, do a visual inspection. Pop the hood and look at the wiring harnesses connected to the O2 sensor, MAF sensor, and ECT sensor. Look for:
- Frayed or cracked insulation
- Corroded connector pins (green or white buildup on the metal contacts)
- Wires that have been pinched against hot engine components
- Signs of rodent damage (chew marks on the insulation)
- Connectors that are not fully seated or have come partially loose
Sometimes the fix is as simple as cleaning a corroded connector with electrical contact cleaner and reseating it firmly. Do not skip this step just because it seems too simple. Simple fixes are the best kind.
Step 4: Test Individual Sensors with a Multimeter
If the visual inspection does not reveal an obvious problem, the next step is testing the sensors with a multimeter. This goes slightly beyond basic DIY territory, but it is absolutely doable if you have a basic understanding of how to use a multimeter and you follow your vehicle’s repair manual for the correct test values.
Each sensor has a specified resistance range and voltage output. Testing against those specifications will tell you definitively whether the sensor is within acceptable operating parameters or whether it has failed.
If you are not comfortable doing this yourself, this is a reasonable point to take the vehicle to a trusted mechanic. The diagnosis work you have already done (pulling codes, noting symptoms, doing the visual inspection) will save you time and money at the shop because you are walking in with useful information rather than just a complaint that “something feels off.”
How to Fix a Fuel System 1 OL-Fault: The Real Solutions
Once you have diagnosed the specific cause, the fix becomes much more straightforward. Here is how to approach each one.
Fixing Faulty Wiring
Wiring repairs require patience more than skill. Your vehicle’s service manual or a wiring diagram specific to your make and model is your best friend here. Most automakers’ wiring diagrams are available through factory service manuals, and many can be found through online forums or services like AllData or Mitchell1.
Once you have traced the damaged wire:
- Cut out the damaged section completely. Do not try to patch a frayed wire with tape and call it a day.
- Splice in a new wire of the same gauge using proper butt connectors or solder joints.
- Cover all splices with adhesive-lined heat shrink tubing, not electrical tape. Electrical tape dries out and fails over time.
- Secure the repaired section of harness away from heat sources and sharp edges using wire loom and cable ties.
- Test the repair before buttoning everything back up.
If the wiring damage is extensive or in a hard-to-reach area, buying a replacement wiring harness section may be more practical than doing individual wire splices throughout a damaged section.
Replacing a Faulty O2 Sensor
This is one of the more accessible DIY repairs on this list. The upstream O2 sensor (Bank 1, Sensor 1) is the one most directly involved in the closed loop transition and the most likely to be flagged alongside an OL-Fault.
To replace it:
- Locate the sensor on the exhaust manifold or in the downpipe just before the catalytic converter. It looks like a spark plug with a wire attached.
- If the vehicle has been driven recently, let the exhaust cool down before you start. Hot exhaust components can cause serious burns.
- Disconnect the wiring harness from the sensor.
- Use an O2 sensor socket (a specialty socket with a slot for the wire) to unscrew the sensor. Penetrating oil applied beforehand helps significantly if the sensor has been in there for years.
- Thread the new sensor in by hand first to avoid cross-threading, then tighten to the manufacturer’s specification.
- Reconnect the wiring harness.
- Clear the fault codes with your OBD2 scanner and test drive the vehicle to confirm the fix.
Use an OEM or OEM-equivalent sensor, not the cheapest part on the shelf. Oxygen sensors from quality brands like Bosch, Denso, or NTK will give you reliable, accurate readings. A bargain-bin sensor may technically fit but provide inaccurate readings that cause new problems.
Cleaning or Replacing the MAF Sensor
Start with cleaning before assuming replacement is necessary. Here is how:
- Locate the MAF sensor in the intake tube between the air filter box and the throttle body.
- Disconnect the electrical connector.
- Remove the sensor (usually held in place by two screws).
- Spray the sensing element (the tiny wire or film inside the sensor) with MAF sensor cleaner specifically. Hold the can about six inches away and use short bursts. Do not touch the sensing element with anything. It is extremely delicate.
- Let it dry completely, at least 10 to 15 minutes, before reinstalling.
- Reinstall, reconnect, clear codes, and test.
If cleaning does not resolve the issue and the MAF readings are still out of range, replacement is the next step. Replacement MAF sensors range from around $50 for aftermarket units to $300 or more for OEM units on certain vehicles. For accuracy-sensitive components like this, OEM or a trusted brand is worth the extra cost.
Replacing a Faulty Engine Coolant Temperature Sensor
The ECT sensor is usually a straightforward replacement and one of the cheaper fixes on this list. It typically threads into the engine block or intake manifold near the thermostat housing.
- Let the engine cool completely before starting. You will be dealing with the cooling system and you do not want to be burned by pressurized coolant.
- Place a drain pan under the work area to catch any coolant that spills when you remove the sensor.
- Disconnect the electrical connector from the sensor.
- Unscrew the sensor. Some use a standard wrench, others require a specific socket size.
- Apply thread sealant to the new sensor’s threads (unless the sensor comes with a pre-applied sealant).
- Install the new sensor and tighten to spec.
- Reconnect the electrical connector, top off the coolant if needed, and start the engine.
- Check for leaks around the new sensor before clearing codes and doing a test drive.
Addressing Voltage Spike or Electrical Damage
Start with the fuse box. Your vehicle has at least one fuse box (often two, one under the hood and one inside the cabin). Pull up your owner’s manual and identify which fuses correspond to the fuel system, sensors, and ECM. Pull each relevant fuse and inspect it. A blown fuse will have a visible break in the metal strip inside. Replace blown fuses with the exact same amperage rating and retest.
If the fuses are fine but you suspect voltage irregularity, have the alternator and battery tested. Many auto parts stores will do this for free. A failing alternator that produces inconsistent voltage is a common cause of widespread electrical gremlins, and it is worth checking before you start replacing sensors.
Also check your battery’s ground connection. A loose or corroded ground strap can cause all sorts of confusing electrical faults. Clean the ground connection at the battery and at the chassis ground point (where the negative cable attaches to the body or engine block).
Dealing With a Faulty ECM
This is the one situation where you really do want professional help. Diagnosing a bad ECM requires ruling out every other possible cause first, because a misdiagnosed ECM replacement is an expensive mistake.
A good diagnostic procedure at a reputable shop will verify the ECM is actually the problem before recommending a replacement. Ask specifically whether reprogramming has been explored before agreeing to a full replacement. If the ECM is a known failure item for your specific vehicle (some vehicles have well-documented ECM failure patterns), online owner communities and forums will often have this information and can tell you whether you are dealing with a common known issue.
If replacement is unavoidable, you have a few options:
- New OEM ECM from the dealer: Most expensive, but guaranteed to be correct for your vehicle.
- Remanufactured ECM: Rebuilt units from reputable remanufacturers can be a solid, more affordable option. Make sure it comes with a warranty.
- Used ECM from a salvage yard: The cheapest option, but it comes with risks. The unit must be programmed to your specific vehicle, and you have no way of knowing the condition or history of a used module.
In all cases, the ECM will need to be programmed to your vehicle’s VIN after installation. This requires a dealer-level scan tool or a shop with access to factory programming software. It is not something you can skip.
What Happens If You Ignore a Fuel System 1 OL-Fault?
Some check engine light situations can be monitored and dealt with at your own pace. This is not one of them. A Fuel System 1 OL-Fault that is left unresolved causes a cascade of problems that get progressively more expensive to fix.
Here is what you are looking at if you let this ride:
- Catalytic converter damage. A rich-running engine sends unburned fuel into the exhaust system. That excess fuel burns inside the catalytic converter, which overheats and destroys the internal substrate. A new catalytic converter can cost anywhere from $500 to over $2,000 depending on the vehicle. That is a significantly more expensive repair than fixing the original fault.
- Spark plug fouling. Carbon deposits from the rich mixture build up on spark plug electrodes, degrading ignition performance and eventually causing misfires.
- Oil contamination. Excess fuel can make its way past the piston rings and into the engine oil, thinning it out and reducing its ability to lubricate engine components. This accelerates engine wear and, in severe cases, can cause catastrophic engine failure.
- Ongoing poor fuel economy. Every mile you drive with this fault is costing you more at the pump. It adds up faster than you might expect.
- Possible failure to pass emissions testing. If your state requires periodic emissions inspections, a vehicle stuck in open loop mode will likely fail.
The repair that costs $150 today can easily become the repair that costs $2,000 six months from now. That is not an exaggeration. That is exactly how deferred maintenance works on fuel system faults.
Can You Drive With a Fuel System 1 OL-Fault?
Technically, yes. The engine will run in open loop mode. It will not just die on you. But “can you” and “should you” are two very different questions.
Short trips around town while you are waiting for a diagnosis appointment? Probably fine for a day or two. Long highway drives day after day while you put off dealing with it? That is where the damage accumulates.
The smart move is to get the diagnosis done as quickly as possible. Many auto parts stores will pull your codes for free. That takes maybe 15 minutes and gives you the information you need to understand the scope of the problem. From there, you can make an informed decision about how urgently to act.
Preventing This From Happening Again
Once you have fixed the OL-Fault, a few simple habits will dramatically reduce the chances of it coming back.
- Change your air filter on schedule. A clogged air filter starves the MAF sensor of clean airflow and causes inaccurate readings. This is one of the cheapest maintenance items on your vehicle. Do not skip it.
- Replace your O2 sensor proactively. Most manufacturers recommend replacing oxygen sensors every 60,000 to 100,000 miles. If yours has never been changed and your car has high mileage, do not wait for it to fail and cause problems. Replace it preventively.
- Keep your cooling system maintained. A healthy cooling system protects the ECT sensor from the effects of overheating and ensures the engine reaches operating temperature correctly. Flush and fill your coolant according to your manufacturer’s schedule.
- Keep your battery and charging system healthy. Have the battery and alternator tested at least once a year, especially before winter. Electrical instability is one of the sneakier causes of sensor and ECM problems.
- Do not ignore early symptoms. If your fuel economy drops noticeably, if the engine starts idling rough, or if you smell fuel from the exhaust, do not wait for the check engine light to make it official. Get it scanned right away.
Catching problems early, when they are still isolated and relatively inexpensive, is always the better path. Your vehicle is constantly communicating with you through its performance, its smells, its sounds, and its behavior. Learning to pay attention to those signals is one of the best things any car owner can do.
When to Call a Professional
Some of the repairs in this article are genuinely DIY-friendly, like replacing an O2 sensor, cleaning a MAF sensor, or swapping out an ECT sensor. Others are better left to a professional, especially anything involving the ECM or complex wiring harnesses.
A good rule of thumb: if you are not 100 percent confident in your diagnosis, and you are looking at a repair that costs several hundred dollars or more in parts alone, pay for a professional diagnosis first. A shop that charges $100 to $150 for a thorough diagnostic inspection will often save you from spending $400 on the wrong part.
Ask questions. Ask the shop to explain what they found and why they are recommending a specific repair. A trustworthy mechanic will always be able to explain the diagnosis clearly. If they cannot, or if they are recommending a major repair without a clear explanation, get a second opinion before authorizing anything.
A Fuel System 1 OL-Fault is one of those problems that rewards early action and punishes procrastination. The longer it runs, the more it costs. Get the diagnosis done now, fix the actual cause, and your engine will reward you with the efficient, properly running performance it was designed to deliver. Every mile you drive with an unresolved OL-Fault is a mile that is working against you. So what is stopping you from picking up that OBD2 scanner today?