

There you are, cruising down the highway on a scorching July afternoon. The sun is beating down through the panoramic sunroof, traffic is crawling, and you reach for the temperature dial expecting that familiar blast of arctic air. Instead, you get a warm, lazy breeze that feels like it came straight from a hair dryer. Frustrating, right?
If your Mini Cooper AC is blowing hot air, you are not alone. This is one of the most common complaints among Mini owners, and it spans nearly every generation, from the R53 to the F56. The good news? Most of the time, the fix is simpler and cheaper than you might think. The bad news? Ignoring it will only make the repair bill bigger down the road.
In this guide, we are going to break down the top five reasons your Mini Cooper AC is not working, how to diagnose each one, and exactly what it takes to get that cold air flowing again. Whether you are a weekend wrench-turner or someone who would rather hand the keys to a pro, this article has you covered.
Why Does the Mini Cooper AC System Fail So Often?
Before we jump into the fixes, it helps to understand why these little British-built hatchbacks have such a reputation for weak air conditioning. The Mini Cooper engine bay is incredibly tight. Everything is packed in there like sardines, which means the AC components run hotter and work harder than they would in a larger vehicle. Heat is the enemy of any AC system. It breaks down refrigerant, stresses seals, and cooks electrical connections.
Add in the fact that many Mini owners drive aggressively (it is a go-kart, after all), and you have a recipe for premature AC wear. The good news is that the system itself is fairly straightforward. Once you know what to look for, you can usually pinpoint the problem in under an hour.
Symptoms of Mini Cooper AC Malfunction
Your car will almost always give you hints before the AC completely gives up. Learning to read those signs can save you a ton of time and money. Here is what to watch for:
1. Warm Air Instead of Cold
This is the most obvious symptom. You crank the dial to LO, the fan is on full blast, but the air coming out of the vents is just… warm. This usually points to a refrigerant issue or a compressor that is not engaging. If the air is only slightly cool, you might have a minor leak. If it is hot, you likely have a major one or a dead compressor.
2. Strange Noises When the AC is On
Listen carefully when you press the AC button. Do you hear a clicking sound? That is the compressor clutch trying to engage. A rapid click-click-click usually means the clutch is failing or the gap is too wide. A grinding or rattling noise could mean the compressor bearing is shot, and that is a much bigger problem.
3. Unpleasant Odors From the Vents
That musty, sour smell that hits you when you first turn on the AC? That is mold and bacteria growing on the evaporator coil. It is not just unpleasant; it can trigger allergies and even affect your breathing. This happens when moisture sits on the coil for too long, usually because the cabin air filter is clogged and airflow is restricted.
4. Visible Leaks or Puddles
If you see a puddle of water under your Mini after running the AC, that is actually normal. That is condensation from the evaporator drain. But if you see an oily, greasy spot that feels slick between your fingers, that is refrigerant oil mixed with compressor oil. That is a bad sign. It means you have a leak somewhere in the system.
5. Dimming Lights or Weak Airflow
If your headlights dim when the AC kicks on, the compressor might be seizing up and drawing too much power. Weak airflow, on the other hand, usually points to a clogged cabin filter or a failing blower motor. These are two very different issues, so pay attention to which one you are experiencing.
The Top 5 Causes of Mini Cooper AC Failure (And How to Fix Them)
Now, let us get to the meat of the matter. Here are the five most common culprits behind a Mini Cooper AC not working, ranked from most common to least. We will give you the symptoms, the diagnosis, and the fix for each one.
Cause #1: Low or Leaking Refrigerant (The #1 Culprit)
This is the big one. In my years turning wrenches, I would say that roughly 70% of all Mini Cooper AC complaints come down to refrigerant. The system is sealed, so the refrigerant should last for years. But in a Mini, those seals get hot, they dry out, and they start to weep. The result is a slow leak that you might not notice until the AC stops blowing cold entirely.
How to diagnose it: Look at the sight glass on the receiver-drier if your model has one. If you see bubbles, you are low. A more accurate way is to hook up a manifold gauge set. Low pressure on the low side and high pressure on the high side indicates a leak. You can also use a UV dye kit. Add the dye, run the AC for a few days, then shine a UV light over the engine bay. The leak will glow like a neon sign.
The fix: You have two options here. The quick and dirty option is to recharge the system with a can of refrigerant from the auto parts store. This works, but it is a temporary band-aid. The refrigerant will leak out again, usually within a few weeks. The right way is to find the leak, replace the faulty seal or hose, pull a vacuum on the system to remove moisture, and then recharge it with the correct amount of R134a or R1234yf, depending on your Mini’s model year.
Real-world example: A customer brought in a 2013 Mini Cooper S with warm air. I hooked up the gauges and found the system was completely empty. I added UV dye and traced the leak to the high-pressure service port valve. The Schrader valve was leaking. A $5 valve core tool and a new valve later, the system held a vacuum, and I charged it up. Cost to the customer: about $150. Had they just recharged it at home, they would have been back in a month with the same problem.
Cause #2: Failing AC Compressor or Magnetic Clutch
The compressor is the heart of your AC system. It pumps the refrigerant through the loop and raises its pressure so it can release heat. When the compressor dies, the system dies with it. But here is the thing: in Minis, it is often not the compressor itself that fails, but the magnetic clutch that engages it.
How to diagnose it: Open the hood and watch the compressor pulley while someone turns on the AC. If the pulley spins but the center hub does not, your clutch is not engaging. If you hear a loud screeching or grinding noise, the clutch bearing is gone. If the compressor is seized, you will often see a snapped serpentine belt or a belt that is smoking.
The fix: If the clutch is the issue, you can sometimes replace just the clutch plate and hub assembly. This is a much cheaper fix than a full compressor replacement. However, if the compressor itself is seized or has internal damage, you need to replace the whole unit. This is not a beginner-level job. It requires evacuating the refrigerant, removing the old compressor, flushing the system to remove metal shavings, and replacing the receiver-drier. Do not skip the flush. Metal debris from a failed compressor will destroy the new one in a matter of days.
Pro tip: If you are replacing the compressor, spend the extra money on a new expansion valve and receiver-drier. They are cheap parts, and replacing them while the system is open is just smart practice.
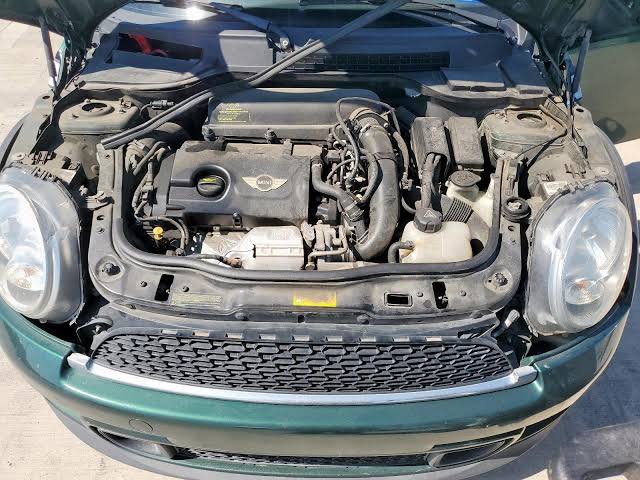
Cause #3: Clogged or Dirty Condenser
The condenser sits right in front of the radiator, and it looks like a smaller version of it. Its job is to cool the hot, high-pressure refrigerant gas and turn it back into a liquid. The problem is that the condenser is the first thing to catch bugs, road grime, and small stones. Over time, the fins can get clogged or bent, which restricts airflow and prevents the refrigerant from cooling properly.
How to diagnose it: Feel the lines going into and out of the condenser. The inlet line should be hot, and the outlet line should be warm. If both are hot, or if the outlet is not getting any cooler, you have a restriction. Also, visually inspect the front of the condenser. If it looks like it is covered in a layer of fuzz and dead bugs, that is your problem.
The fix: Sometimes, a simple fix is all you need. Use a garden hose with a spray nozzle to gently wash the condenser fins from the inside out. Be careful not to bend the fins. You can buy a fin comb to straighten any bent ones. If the condenser is leaking or has a large hole from a rock strike, it needs to be replaced. This is a relatively straightforward job, but it does require evacuating the refrigerant first.
Cause #4: Bad Cabin Air Filter Restricting Airflow
This one is so simple that most people overlook it. The cabin air filter is located behind the glovebox, and it is supposed to be changed every 15,000 to 20,000 miles. In reality, most Mini owners forget about it completely. When this filter gets clogged with pollen, dust, and leaves, it does two things: it reduces the amount of air that blows into the cabin, and it restricts airflow over the evaporator coil. That restriction can cause the evaporator to freeze up, which completely blocks airflow.
How to diagnose it: Turn the blower motor to full speed. If you hear the fan working hard but very little air comes out of the vents, the filter is clogged. Pull the filter out and hold it up to the light. If you cannot see light through it, it is time for a new one.
The fix: Replacing the cabin air filter in a Mini Cooper is a 10-minute job. It is located behind the glovebox. Remove the two screws or clips, drop the glovebox down, and slide the old filter out. Pay attention to the direction of airflow indicated by the arrow on the filter. Slide the new one in, and you are done. This is the cheapest fix on this list, and it can make a night-and-day difference in both airflow and cooling performance.
Cause #5: Electrical Faults and Sensor Issues
Minis are notorious for electrical gremlins. The AC system relies on a network of sensors, relays, and control modules to function. A single bad ground or a frayed wire can stop the whole system in its tracks. The most common electrical issues include a blown fuse, a faulty AC pressure switch, or a failing blower motor resistor.
How to diagnose it: Start with the basics. Locate the fuse box (there is one under the hood and one in the passenger footwell) and check the fuse labeled AC or HVAC. If the fuse is blown, replace it and see if it blows again. If it does, you have a short somewhere. Check the relays as well. You can swap the AC relay with an identical one from another system (like the horn) to test it. If the AC starts working, the relay was bad.
The fix: If the fuse and relay are fine, the next step is to check the pressure switch. This switch tells the computer if the system has enough refrigerant to safely engage the compressor. If the switch is faulty, it might read low pressure even when the system is full, preventing the compressor from engaging. Testing this requires a multimeter and some basic knowledge of electrical circuits. If you are not comfortable with that, it is worth the shop diagnostic fee to have a professional sort it out.
Step-by-Step DIY Diagnosis Guide
If you want to save some money and do the diagnosis yourself, here is a simple step-by-step process that will help you narrow down the issue. Grab a notepad and a flashlight. You are going to be an AC detective for the next hour.
- Check the obvious: Is the AC button lit up? Is the blower fan spinning? If the fan does not work at all, start with the fuse and the blower motor resistor.
- Feel the vent air: Turn the AC to max cold and let it run for five minutes. Is the air cold, cool, warm, or hot? This tells you whether you have a refrigerant issue or a mechanical issue.
- Listen to the compressor: Open the hood and have a friend turn the AC on and off. You should hear a distinct click when the clutch engages. If you do not hear it, check the fuse, relay, and pressure switch.
- Inspect the condenser: Look at the front of your car. Is the condenser covered in debris? If yes, clean it with a hose.
- Check the cabin filter: Pull it out and inspect it. If it is dirty, replace it.
- Feel the lines: With the AC running, feel the aluminum lines going into the firewall. One should be cold, and one should be warm. If neither is cold, you are likely low on refrigerant.
If you have gone through all these steps and still cannot find the problem, it is time to bring in the pros. There is no shame in admitting when a job is above your skill level. AC work requires specialized tools like a vacuum pump and a manifold gauge set, not to mention the knowledge of how to handle refrigerant safely.
Mini Cooper AC Repair Cost Breakdown
Money matters. Here is a realistic look at what you can expect to pay for each of these repairs. Keep in mind these are average estimates. Prices vary depending on your location and whether you go to a dealership or an independent shop.
| Repair Type | DIY Cost (Parts Only) | Professional Cost (Parts + Labor) |
|---|---|---|
| Refrigerant Recharge | $50 – $100 | $150 – $300 |
| Refrigerant Leak Repair + Recharge | $100 – $200 | $400 – $800 |
| Compressor Clutch Replacement | $100 – $150 | $400 – $600 |
| Full Compressor Replacement | $300 – $500 | $900 – $1,500 |
| Condenser Replacement | $150 – $250 | $500 – $800 |
| Cabin Air Filter Replacement | $20 – $40 | $60 – $100 |
| Electrical Diagnosis and Repair | $50 (parts) | $200 – $500 |
As you can see, catching the problem early can save you a bundle. A simple cabin filter replacement costs a fraction of what a full compressor job runs.
Preventive Maintenance to Avoid Future AC Failures
An ounce of prevention is worth a pound of cure. Here are the habits that will keep your Mini Cooper AC blowing cold for years to come.
- Run the AC every week, even in winter: The seals in the AC system need lubrication. Running the system for 10 minutes a week keeps the seals from drying out and prevents refrigerant leaks.
- Change the cabin filter annually: Do not wait for the smell or the weak airflow. Just replace it every spring. It is a $20 part that protects a $1,000 evaporator.
- Keep the condenser clean: Every time you wash your car, spend 30 seconds spraying the condenser from the front. This prevents debris from building up.
- Watch for warning signs: If you notice the AC is not as cold as it used to be, do not ignore it. Small issues become big ones. A tiny leak today is a dead compressor six months from now.
- Use the recirculation mode: On the hottest days, use the recirculation button. This cools the air that is already in the cabin instead of trying to cool the hot, humid outside air. It takes a massive load off the system.
When to Call a Professional vs. DIY
Let us be honest with each other. Some of these fixes are perfect for a weekend DIY project. Others are better left to someone with a certification and a lift. Here is a quick breakdown:
Definitely DIY: Replacing the cabin air filter, replacing a blown fuse, cleaning the condenser, and checking the belt for wear. These require basic hand tools and a little common sense.
Borderline DIY: Recharging the refrigerant with a can from the auto parts store. This is fine if you are just topping off a system that is slightly low. But if you are adding refrigerant more than once a year, you have a leak, and you need to find it.
Call a professional: Compressor replacement, any repair that requires opening the sealed system, electrical diagnosis, and anything involving the evaporator core. The evaporator is buried behind the dashboard, and replacing it is a 10-hour job for a professional. Do not attempt this in your driveway unless you have a week of free time and a very understanding spouse.
The Bottom Line on Your Mini Cooper AC
Dealing with a Mini Cooper AC not working is frustrating, but it is almost never a mystery. In the vast majority of cases, the problem is low refrigerant, a bad compressor clutch, or a clogged filter. All three are fixable, and two of the three are relatively cheap.
The worst thing you can do is let the problem linger. That warm air is not just uncomfortable, it is a sign that your AC system is operating under stress. A small leak today will eventually pull in moisture, which turns into acid inside the system. That acid will eat the compressor from the inside out. What started as a $100 fix becomes a $1,500 replacement.
So, take action this weekend. Pop the hood, check the basics, and see what you can find. You might just discover that the fix is as simple as a $20 filter and a can of refrigerant. And when that cold air hits your face on the next 95-degree day, you will be glad you did not wait. What is your Mini doing right now? If you have a weird AC symptom that is not on this list, drop a comment below and let us figure it out together.