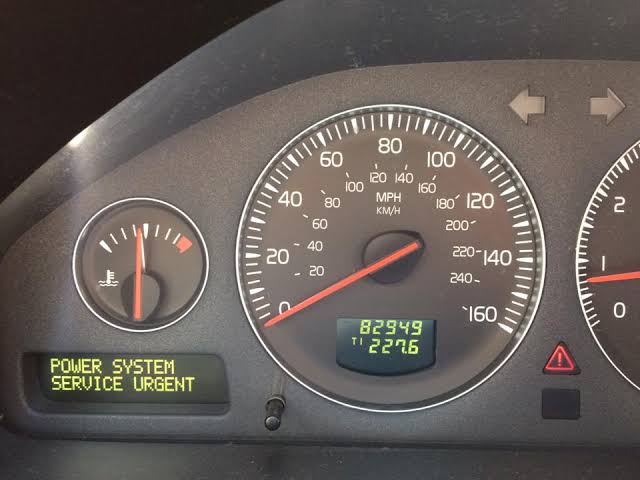
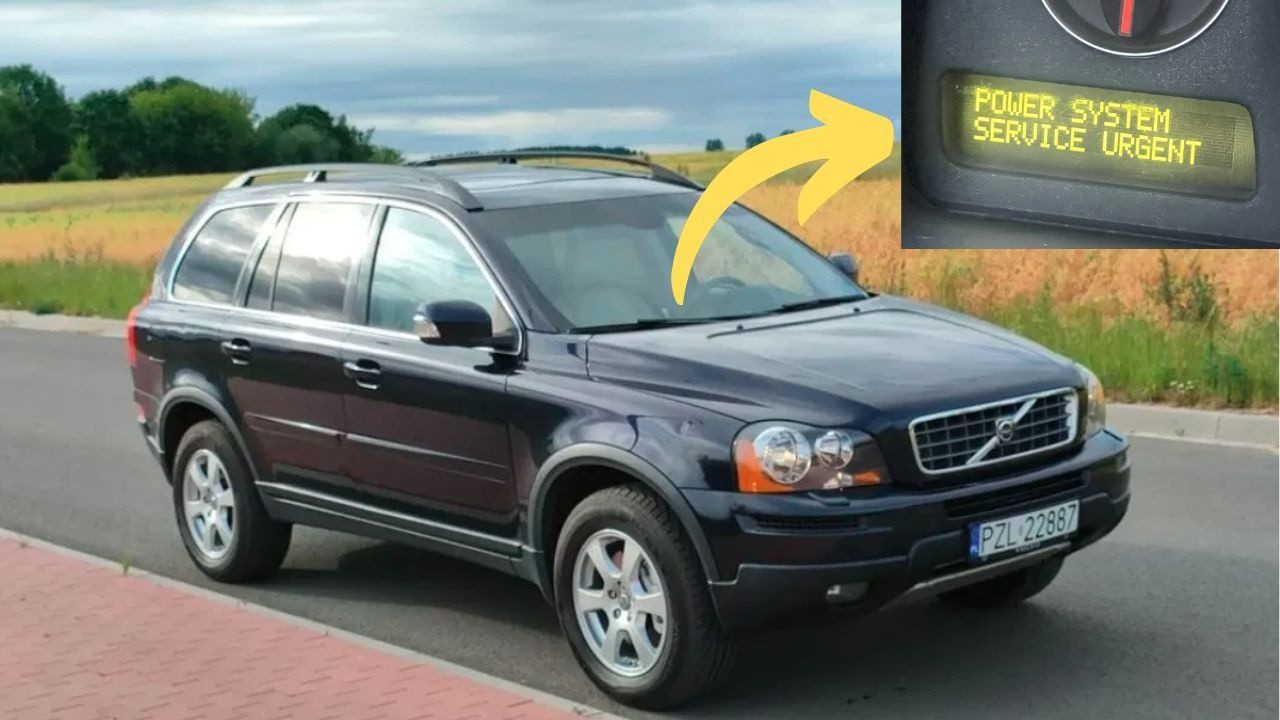
Picture this: you are driving your Volvo to work on a regular Tuesday morning, coffee in hand, mentally preparing for your day. Suddenly, a bright warning message flashes across your dashboard that reads “Power System Service Urgent.” Your heart skips a beat. What does it mean? Is your car about to die on you right here on the highway?
Take a deep breath. Your Volvo is not about to explode or leave you stranded immediately. But here is the thing: this warning is your car’s way of telling you something important. The power system in your vehicle has dropped below the recommended threshold, and it needs your attention sooner rather than later.
Table of Contents
In most cases, the fault lies with your alternator or battery. Sometimes it is a loose connection. Other times, it could be corroded terminals or a failing voltage regulator. Whatever the cause, you will need to identify and fix the damaged parts before the problem escalates into a complete breakdown.
This guide will walk you through everything you need to know about the “Power System Service Urgent” warning in your Volvo. We will break down what causes this message, how to diagnose the problem yourself, what repairs you might need, and when you absolutely should call in a professional. By the end, you will understand your vehicle’s electrical system better and know exactly what steps to take next.
What Does “Power System Service Urgent” Actually Mean?
Before we jump into fixes, let us talk about what this warning actually means in plain English. Your Volvo has a sophisticated electrical system that constantly monitors voltage levels throughout the vehicle. Think of it as a watchdog that never sleeps.
When voltage drops below a certain threshold, usually around 12.5 volts while the engine is running, the system recognizes something is wrong. The Engine Control Unit (ECU) or Powertrain Control Module (PCM) triggers this warning to alert you that the charging system is not performing as it should.
Your car’s electrical system is remarkably simple in concept but complex in execution. The battery provides power to start the engine. Once running, the alternator takes over, generating electricity to power everything from your headlights to your infotainment system while simultaneously recharging the battery. This cycle repeats endlessly while you drive.
When this warning appears, something has disrupted this cycle. Maybe the alternator is not generating enough power. Perhaps the battery cannot hold a charge anymore. It could be that a loose connection is preventing electricity from flowing properly. The warning is intentionally urgent because if left unchecked, you will eventually lose all electrical power, and your car will stop running.
Here is what makes this different from a simple battery light: Volvo’s “Power System Service Urgent” message indicates the computer has detected a more serious issue that requires immediate professional attention. It is not just a gentle reminder. It is a red flag.
Why Is Your Volvo Screaming for Attention? Common Causes Explained
Now that you understand what the warning means, let us dig into why it happens. There are several culprits that can trigger this message. Some are minor and easy to fix. Others require professional intervention and can be expensive. But knowledge is power, so let us go through each one.
1. The Alternator Has Given Up the Ghost
The alternator is the workhorse of your electrical system. It is responsible for converting mechanical energy from the engine into electrical energy. While your engine runs, the alternator spins, generating the electricity needed to power your car and recharge the battery.
When the alternator starts to fail, it cannot produce enough voltage. Your battery tries to pick up the slack, but it is not designed to power the entire vehicle for long periods. Eventually, the battery drains, voltage drops, and boom: you get the warning message.
Alternators typically last between 80,000 and 150,000 miles, but this varies based on driving conditions. Stop-and-go city driving is harder on alternators than highway cruising. Extreme temperatures can also shorten their lifespan.
Signs your alternator is failing include dimming headlights, flickering interior lights, strange noises (a grinding or whining sound from under the hood), and of course, this warning message. You might also notice that your car struggles to start or that electrical accessories behave erratically.
Real-world example: Sarah, a Volvo XC90 owner from Michigan, noticed her dashboard lights would dim slightly when she turned on the air conditioning. A week later, the “Power System Service Urgent” message appeared. Her mechanic tested the alternator and found it was only producing 11.8 volts instead of the required 13.5 to 14.5 volts. A new alternator solved the problem completely.
2. The Voltage Regulator Is Not Regulating Anything
Inside your alternator lives a small but mighty component called the voltage regulator. Its job is exactly what the name suggests: regulate voltage output from the alternator. Think of it as a traffic cop directing electrical flow.
The regulator ensures your electrical system receives a steady, consistent voltage between 13.5 and 14.5 volts. Without this regulation, voltage would spike and drop wildly based on engine speed. At idle, you might get too little power. At high RPMs, you could get dangerously high voltage that fries sensitive electronics.
When the regulator fails, chaos ensues. The alternator might overcharge the battery, causing it to overheat and potentially leak or bulge. Or it might undercharge, leaving the battery perpetually drained. Both scenarios will trigger the warning message.
The tricky part is that voltage regulator failure often masquerades as alternator failure. Many mechanics will test the alternator output, see abnormal voltage, and recommend replacing the entire alternator when really only the regulator needs attention. However, because the regulator is internal to most modern alternators, replacing the whole unit is often more cost-effective than trying to replace the regulator alone.
3. Battery Terminals Look Like a Science Experiment Gone Wrong
Open your hood and look at your battery terminals. See that white, blue, or greenish crusty buildup? That is corrosion, and it is a surprisingly common cause of this warning message.
Corrosion happens when battery acid vapors escape and react with the metal terminals. This creates a barrier that prevents proper electrical contact. Even if your alternator and battery are in perfect condition, corrosion can cause voltage drops that trigger the warning.
The good news is that this is one of the easiest problems to fix. A wire brush, some baking soda mixed with water, and ten minutes of your time can often resolve the issue completely. We will cover the exact cleaning process later in this article.
But do not underestimate how much havoc corroded terminals can wreak. I have seen cars that would not start, threw multiple error codes, and acted possessed, all because of terminal corrosion. Clean terminals ensure maximum electrical contact, which is exactly what your system needs.
4. Your Battery Is on Its Last Legs
Car batteries do not last forever. Most give you about three to five years of reliable service, depending on climate and usage patterns. Hot climates are particularly brutal on batteries because heat accelerates the chemical reactions inside, causing faster degradation.
As batteries age, their ability to hold a charge diminishes. Internal plates deteriorate, the electrolyte solution breaks down, and capacity drops. An old battery might test fine when fully charged but drain rapidly under load.
When your battery can no longer hold sufficient charge, the alternator works overtime trying to compensate. This constant strain can trigger the power system warning. Eventually, the battery will fail completely, leaving you stranded.
Warning signs of a dying battery include slow engine cranking (especially on cold mornings), the need for jump-starts, a swollen battery case, and a rotten egg smell. If your battery is more than four years old and you are getting this warning, the battery should be high on your list of suspects.
5. Wiring Issues and Blown Fuses Are Sabotaging Your System
Your vehicle has miles of wiring running through it. These wires carry electricity from the alternator to the battery, from the battery to the starter, and to every electrical component in between. Over time, wires can fray, break, or short out.
Rodents are a common culprit. Mice and rats love to nest in engine bays, and they will chew through wiring insulation without a second thought. I have seen cars come into shops with entire harnesses destroyed by hungry rodents.
Heat is another enemy. Engine bays get hot, and over years of heat cycles, wire insulation can become brittle and crack. Once exposed, wires can short against metal components, creating electrical faults.
Fuses protect electrical circuits from overload. When too much current flows through a circuit, the fuse blows, breaking the connection and preventing damage. A blown fuse in the charging system circuit can definitely trigger the power system warning.
Diagnosing wiring issues requires patience and often a wiring diagram specific to your Volvo model. A multimeter is your best friend here, allowing you to test continuity and voltage at various points in the system.
6. The Serpentine Belt Is Slipping or About to Snap
The serpentine belt is that long, winding belt you see when you open the hood. It connects the engine crankshaft to various components including the alternator, power steering pump, air conditioning compressor, and water pump.
When the engine runs, the crankshaft spins the serpentine belt, which in turn spins the alternator pulley. This mechanical energy is what the alternator converts into electrical energy. No belt movement means no alternator function.
Serpentine belts wear out over time. They develop cracks, become glazed (smooth and shiny), or stretch, causing them to slip on the pulleys. A slipping belt cannot effectively spin the alternator, reducing electrical output and triggering the warning.
Listen for squealing noises from under the hood, especially when starting the car or accelerating. That high-pitched squeal often indicates a loose or worn serpentine belt. Visual inspection can reveal cracks, fraying, or missing chunks of rubber.
Belt tensioners can also fail. These spring-loaded devices keep proper tension on the serpentine belt. When tensioners wear out, the belt becomes loose and slips, even if the belt itself is in good condition.
7. Everything Is Getting Too Hot to Handle
Electrical components hate excessive heat. While they are designed to operate in the hot environment of an engine bay, there are limits. When batteries, alternators, or wiring get too hot, performance degrades rapidly.
Battery overheating can occur if the voltage regulator fails and allows overcharging. The battery literally cooks from the inside, causing the electrolyte to evaporate and internal components to warp. A hot battery is a dead battery waiting to happen.
Alternators generate heat naturally as they work. Proper cooling is essential. If cooling fins are clogged with debris or internal bearings are failing, the alternator can overheat and shut down or reduce output. This will definitely trigger your warning message.
Wiring that overheats typically indicates a short circuit or excessive current draw somewhere in the system. Hot wires are dangerous and can cause fires. If you smell burning plastic or see melted insulation, stop driving immediately and have the vehicle towed to a shop.
8. The Powertrain Control Module Has Lost Its Mind
The Powertrain Control Module, or PCM, is essentially your car’s brain. It monitors and controls engine functions, transmission shifting, and yes, the charging system. Like any computer, it can glitch, become corrupted, or fail.
Sometimes the PCM will throw the “Power System Service Urgent” message even when the charging system is functioning perfectly. False positives happen, though they are relatively rare in Volvos.
More commonly, the PCM might have outdated software that misinterprets sensor data. Volvo has released software updates for various models to address charging system warnings. A dealership or qualified independent shop can flash updated software to your PCM.
In rare cases, the PCM itself fails and needs replacement. This is expensive but necessary if diagnostics point to the module as the culprit. Before replacing a PCM, though, a thorough diagnosis should rule out all other possibilities.
Rolling Up Your Sleeves: How to Diagnose the Problem Yourself
You do not need to be a certified mechanic to perform basic diagnostics on your Volvo’s electrical system. With a few simple tools and some patience, you can identify many common problems. Even if you ultimately take the car to a shop, understanding the issue helps you avoid unnecessary repairs and inflated bills.
Here is what you will need for basic troubleshooting:
- A digital multimeter (available at any auto parts store for $20-$50)
- A wire brush or battery terminal cleaner
- Safety glasses and gloves
- A flashlight or work light
- Your owner’s manual
- Basic hand tools (wrenches and socket set)
Step 1: Check Battery Voltage the Right Way
Testing battery voltage is the foundation of electrical system diagnosis. But you need to test it correctly. There is a big difference between testing a resting battery and testing the charging system.
Testing resting voltage: Turn off your car and let it sit for at least two hours. This allows surface charge to dissipate, giving you an accurate reading. Set your multimeter to DC voltage (20V range). Touch the red probe to the positive battery terminal and the black probe to the negative terminal.
A healthy, fully charged battery should read between 12.4 and 12.7 volts. Anything below 12.4 volts indicates a partially discharged battery. Below 12.0 volts means the battery is significantly discharged and may be failing.
Testing charging system voltage: Start your engine and let it idle. With the multimeter still connected to the battery terminals, check the voltage again. You should see between 13.5 and 14.5 volts. This indicates the alternator is working and charging the battery.
If voltage is below 13.5 volts with the engine running, the alternator is not charging properly. If it is above 15 volts, the voltage regulator has failed and is overcharging. Either scenario will trigger the warning message.
Here is a handy reference table:
| Condition | Expected Voltage | What It Means |
|---|---|---|
| Engine Off (Resting) | 12.4 – 12.7V | Battery is fully charged and healthy |
| Engine Off (Resting) | 12.0 – 12.4V | Battery is partially discharged |
| Engine Off (Resting) | Below 12.0V | Battery is discharged or failing |
| Engine Running (Idle) | 13.5 – 14.5V | Charging system is working properly |
| Engine Running (Idle) | Below 13.5V | Alternator is not charging adequately |
| Engine Running (Idle) | Above 15.0V | Voltage regulator has failed (overcharging) |
Step 2: Inspect Battery Terminals Like a Detective
Pop your hood and locate the battery. Look closely at the terminals where the cables connect. Do you see any white, blue, or green crusty buildup? Any powdery residue? That is corrosion, and it needs to go.
But do not just look at the obvious spots. Check where the cables attach to the terminal posts. Sometimes corrosion hides underneath the cable clamps where you cannot see it. Try wiggling the cable connections gently. They should be tight and immovable. If they move or feel loose, you have found part of your problem.
Also inspect the cables themselves. Look for cracks in the insulation, fraying, or green corrosion creeping up the cable. Battery cables can corrode internally, where you cannot see it. The cable looks fine on the outside but has turned to powder inside the insulation. If cables are more than seven or eight years old and you are having electrical issues, replacement might be necessary.
Step 3: Give That Serpentine Belt a Good Once-Over
Locate the serpentine belt. It will be a black rubber belt running through several pulleys on the front of your engine. With the engine off (and cold for safety), inspect the belt carefully.
Look for cracks on the ribbed side of the belt. Small surface cracks might be okay, but deep cracks that go across the width of the belt indicate it needs replacement. Check for chunks of rubber missing, frayed edges, or a shiny, glazed appearance (means the belt is slipping).
Push down on the belt between pulleys. It should have some give but feel firm. If it feels loose or you can push it down more than about half an inch, the belt or tensioner might be worn.
Start the engine and listen. A squealing noise that changes with engine speed often indicates belt slip. Be careful not to get clothing, jewelry, or body parts near the moving belt while the engine is running.
Step 4: Load Test the Battery (Advanced)
A voltage test tells you the battery’s charge level but not necessarily its health. A battery can show 12.6 volts and still be bad. That is where load testing comes in.
Most auto parts stores will load test your battery for free. They use a specialized tester that applies a heavy electrical load while measuring how well the battery maintains voltage. A healthy battery will maintain voltage above 9.6 volts during the test. If it drops below that, the battery has failed and needs replacement.
You can also perform a crude load test yourself. With your multimeter connected to the battery, turn on the headlights, rear defroster, and blower fan at full speed. Watch the voltage. It should drop slightly but stay above 12 volts. If it plummets below 11 volts, the battery cannot handle load and is likely bad.
Step 5: Check for Obvious Wiring Problems
With a good flashlight, trace the major wiring in your engine bay. Start at the alternator and follow the main power wire to the battery. Look for damaged insulation, exposed copper, melted areas, or disconnected wires.
Check the ground connections. Your battery has a negative cable that connects to the engine block or chassis. Make sure this connection is clean, tight, and corrosion-free. A poor ground connection causes all sorts of bizarre electrical issues.
Look for signs of rodent damage. Chewed wires often have a distinctive appearance with tiny teeth marks and missing insulation in small sections. If you find rodent damage, understand that what you can see might only be part of the problem. Mice often chew multiple areas.
Fixing the Problem: From DIY Quick Fixes to Professional Repairs
Now that you have identified the likely culprit, let us talk about fixes. Some of these you can handle in your driveway with basic tools. Others absolutely require professional help. Know your limits and do not be afraid to call in the experts when needed.
Clean Those Battery Terminals (DIY Difficulty: Easy)
If corrosion is your problem, this is a fifteen-minute fix that costs almost nothing. Here is how to do it properly:
- Turn off the engine and remove the key from the ignition.
- Put on safety glasses and gloves. Battery acid is corrosive.
- Identify the negative terminal (marked with a minus sign or “NEG”). Always disconnect negative first to prevent sparks.
- Using the appropriate wrench or socket, loosen the negative cable clamp and remove it from the terminal. Move it away from the battery.
- Repeat with the positive terminal (marked with a plus sign or “POS”).
- Mix a tablespoon of baking soda with a cup of water. This neutralizes battery acid.
- Pour the mixture over the terminals and cable clamps. It will fizz and bubble. That is normal.
- Use a wire brush or battery terminal cleaner to scrub away all corrosion. Get inside the cable clamps too.
- Rinse with clean water and dry thoroughly with a rag.
- Reconnect the positive cable first, then the negative. Tighten firmly but do not over-tighten.
- Apply a thin coating of petroleum jelly or battery terminal protector spray to prevent future corrosion.
Start your car. If corrosion was the only issue, the warning might clear immediately. If not, you will need to dig deeper.
Replace the Battery (DIY Difficulty: Easy to Moderate)
If testing confirms your battery is dead, replacement is straightforward. Here is the catch: modern Volvos often require battery registration after replacement. This tells the car’s computer that a new battery has been installed so it can adjust charging parameters accordingly.
Battery registration typically requires a scan tool that can communicate with your Volvo’s systems. Some auto parts stores can do this when they sell you a battery. Otherwise, a dealership or independent Volvo specialist will need to perform the registration.
Skipping battery registration might cause continued warning messages or reduce the new battery’s lifespan because the charging system does not calibrate properly.
When buying a battery, make sure you get one with the correct specifications for your Volvo. Check the owner’s manual or the label on your current battery for:
- Cold Cranking Amps (CCA) rating
- Reserve Capacity (RC)
- Group size (physical dimensions)
- Terminal configuration
Expect to pay between $150 and $300 for a quality battery that will last. Cheap batteries are a false economy. Spend a little more for a reputable brand with a good warranty.
Replace the Serpentine Belt (DIY Difficulty: Moderate)
Serpentine belt replacement is doable for someone with moderate mechanical skills and the right tools. You will need a serpentine belt tool or a long breaker bar to release tension on the belt tensioner.
Before removing the old belt, take a photo of the belt routing. Seriously, do this. Belt routing can be confusing, and that photo will save you tremendous frustration. Many engine bays also have a belt routing diagram on a sticker somewhere under the hood.
Locate the belt tensioner (a pulley with a square or hex hole in the center). Insert your tool and rotate to release tension. Slip the belt off one pulley, then slowly release the tensioner. Remove the old belt.
Compare the old and new belts to make sure they are the same length and width. Route the new belt following your photo or the diagram, leaving one pulley (usually the easiest to access) for last. Pull the tensioner again, slip the belt onto the final pulley, and release.
Double-check that the belt sits properly in all pulley grooves. A misaligned belt will squeal, slip, and wear prematurely. Start the engine and listen for any unusual noises.
Serpentine belts typically cost between $25 and $75. If you are not confident doing this yourself, a shop will charge about $100 to $200 for parts and labor.
Replace the Alternator (DIY Difficulty: Moderate to Difficult)
Alternator replacement difficulty varies wildly depending on your Volvo model. Some have the alternator mounted in an easily accessible location. Others bury it behind engine components, requiring significant disassembly to reach.
If you have mechanical experience and the alternator is accessible on your model, you can save several hundred dollars by doing this yourself. You will need basic hand tools and about two to four hours.
The general process:
- Disconnect the battery negative cable.
- Remove the serpentine belt.
- Disconnect the electrical connections from the alternator (usually one or two connectors and a wire with a nut).
- Remove the alternator mounting bolts.
- Extract the alternator from the engine bay (might require wiggling and patience).
- Install the new alternator in reverse order.
- Reinstall the belt and reconnect the battery.
When buying an alternator, you have choices. A new OEM Volvo alternator might cost $400 to $800. Aftermarket new units run $200 to $400. Remanufactured alternators cost $150 to $300 and are often a good middle ground between price and quality.
Professional installation typically costs $500 to $1,200 total, depending on labor rates in your area and the specific Volvo model. Luxury vehicle labor rates are usually higher than average.
Fix Wiring Issues (DIY Difficulty: Moderate to Difficult)
Wiring repairs require more diagnostic skill than mechanical ability. If you have found damaged wiring, the repair itself is often straightforward: cut out the damaged section, splice in new wire, and protect it with heat shrink tubing or electrical tape.
The challenge is finding all the damage and ensuring your repair will hold up over time. Wiring in engine bays faces harsh conditions: heat, vibration, moisture, and chemical exposure. Repairs need to withstand these stresses.
For major wiring damage, especially rodent damage to harnesses, professional repair is usually wise. A shop can properly splice or replace entire harness sections and ensure everything is routed and protected correctly.
Blown fuses are easy to replace. Your owner’s manual shows fuse box locations and which fuse protects what circuit. Fuses cost pennies. But remember: fuses blow for a reason. If a new fuse blows immediately, you have a short circuit that needs professional diagnosis.
Address PCM Issues (Professional Help Required)
Diagnosing and repairing PCM problems is definitely professional territory. This requires specialized scan tools that can read Volvo-specific codes and data streams, plus the knowledge to interpret that information.
If your Volvo needs a software update, a dealership or independent shop with the proper equipment can flash new software to the PCM. This typically costs $100 to $200.
If the PCM itself has failed and needs replacement, you are looking at a major expense. A new PCM can cost $800 to $1,500 or more, plus programming and labor. Total cost might reach $2,000 to $3,000.
Thankfully, PCM failure is relatively rare. Exhaust all other possibilities before concluding the PCM is bad.
What Will This Cost Me? Breaking Down Repair Expenses
Let us talk money. Repair costs vary based on your location, the specific Volvo model you own, whether you go to a dealership or independent shop, and whether you use OEM or aftermarket parts. But here are realistic estimates to help you budget.
| Repair | DIY Cost | Shop Cost (Parts + Labor) | Time Required |
|---|---|---|---|
| Battery terminal cleaning | $5 – $10 | $50 – $100 | 15 – 30 minutes |
| Battery replacement | $150 – $300 | $250 – $450 | 30 minutes – 1 hour |
| Serpentine belt replacement | $25 – $75 | $100 – $250 | 30 minutes – 1 hour |
| Belt tensioner replacement | $50 – $150 | $200 – $400 | 1 – 2 hours |
| Alternator replacement | $150 – $600 | $500 – $1,200 | 2 – 4 hours |
| Battery cable replacement | $30 – $100 | $150 – $300 | 1 – 2 hours |
| Wiring repair (minor) | $10 – $50 | $100 – $300 | 1 – 3 hours |
| Wiring harness replacement | $200 – $800 | $500 – $2,000 | 4 – 8 hours |
| PCM software update | Not DIY | $100 – $250 | 30 minutes – 1 hour |
| PCM replacement | Not recommended | $1,500 – $3,000 | 2 – 4 hours |
Keep in mind these are estimates. Dealership rates are typically at the higher end of these ranges or beyond. Independent shops that specialize in European cars often offer better value while still providing quality work.
One money-saving tip: if your alternator has failed, ask about remanufactured units. Quality remanufactured alternators come with warranties and cost significantly less than new OEM parts. Many have failure rates comparable to new units.
Can You Keep Driving When This Warning Appears?
This is the question everyone wants answered. You are at work, the warning appears, and you need to get home. Can you drive it?
The honest answer is maybe, but you should not plan on it. When this warning appears, your electrical system is operating outside normal parameters. How long you can drive depends on what has failed and how badly.
If the alternator has completely failed, your car is running entirely on battery power. A fully charged battery might keep a Volvo running for 30 minutes to two hours, depending on electrical load. Turn off all non-essential accessories (radio, climate control, heated seats) to conserve power. Drive straight to a safe location or repair shop.
Watch for these signs that your battery is dying:
- Dimming headlights and interior lights
- Warning lights and messages multiplying on the dashboard
- Power steering becoming heavy (electric power steering failing)
- Engine beginning to run rough
- Infotainment system shutting off
When these symptoms appear, you have minutes before the engine stalls. Pull over safely immediately.
If the voltage regulator has failed and is overcharging, continued driving risks damaging the battery and sensitive electronics. Overcharging generates excessive heat and can cause batteries to leak or even explode in extreme cases. This is not a risk worth taking.
The safest approach when you see “Power System Service Urgent” is to minimize driving. Get to a safe location, turn off the vehicle, and arrange for diagnosis and repair. If the car dies while driving, you lose power steering and power brakes (they will still work but require much more physical effort). This is dangerous in traffic.
If you absolutely must drive before getting repairs, keep your phone charged, stay on familiar routes, avoid highways if possible, and tell someone your route and expected arrival time. Better yet, have the car towed.
Preventing Future Power System Problems
An ounce of prevention beats a pound of cure, especially when it comes to your car’s electrical system. While some failures are simply bad luck, many can be prevented with proper maintenance and attention.
Keep Those Terminals Clean
Check your battery terminals every few months, especially if you live in a humid climate or near the ocean. A quick visual inspection takes thirty seconds. If you see any corrosion starting, clean it immediately before it becomes a problem.
Applying a battery terminal protector spray or a thin layer of petroleum jelly after cleaning helps prevent corrosion from forming. This simple step can save you from a no-start situation down the road.
Replace the Battery Proactively
Do not wait for your battery to fail. If your battery is four years old or more, have it load tested annually. When it starts showing signs of weakness, replace it on your schedule, not when it leaves you stranded in a parking lot.
Yes, batteries are expensive. But they are cheaper than a tow truck and far less inconvenient than being stranded. Plus, a weak battery forces your alternator to work harder, potentially shortening its life.
Inspect the Serpentine Belt During Oil Changes
Make serpentine belt inspection part of your regular maintenance routine. Have your mechanic check it during every oil change. Look for cracks, glazing, or fraying. Most manufacturers recommend replacing the serpentine belt every 60,000 to 100,000 miles, but if it shows wear before that, replace it.
When replacing the serpentine belt, consider replacing the belt tensioner and idler pulleys at the same time if they have significant mileage. These components wear together, and replacing everything together prevents a return trip to the shop in six months when a pulley fails.
Take Short Trips Seriously
If your daily driving consists of short trips (under ten minutes), your battery never fully recharges. The alternator needs time to replenish the energy used during starting. Frequent short trips without longer drives can slowly drain the battery and shorten its life.
If this describes your driving pattern, consider taking a longer drive once a week to let the charging system do its job. Or use a battery maintainer (trickle charger) to keep the battery topped off when the car sits.
Watch for Early Warning Signs
Your car often gives subtle hints before a major failure. Pay attention to:
- Slower than normal engine cranking
- Flickering lights
- Unusual noises from under the hood
- Battery warning light (different from the power system message)
- Electrical accessories behaving oddly
These symptoms often precede the “Power System Service Urgent” message. Address them early, and you might avoid a bigger problem.
Protect Against Rodents
If you park outside or in a garage where rodents might be present, take preventive measures. Rodent deterrent sprays, electronic repellers, or even dryer sheets in the engine bay can help. Check under the hood occasionally for signs of nesting material.
If you find evidence of rodents, inspect wiring thoroughly. Catching damage early means a simple repair instead of a major harness replacement.
When to Call a Professional Instead of Going It Alone
There is no shame in calling a professional. Some repairs are simply beyond the scope of a driveway mechanic, and attempting them can create bigger problems. Here is when you should definitely seek professional help:
You lack the proper tools. Trying to work around not having the right tool often leads to damaged parts or injury. If a repair requires specialized equipment you do not own, let a shop handle it.
You cannot safely access the problem. If the alternator on your Volvo requires removing the motor mount and partially lowering the engine, that is not a driveway job for most people.
Diagnostics are unclear. If you have tested everything and still cannot pinpoint the problem, a professional with proper scan tools and experience can save you time and money. Guessing and replacing parts hoping to fix the issue is expensive.
The repair requires programming or calibration. Battery registration, PCM programming, and similar tasks require dealer-level scan tools. You cannot do these at home without proper equipment.
You are not confident in the repair. Electrical system repairs that are done incorrectly can cause fires, leave you stranded, or damage expensive components. If you are not sure you can do it right, let someone who is sure handle it.
The vehicle is under warranty. Attempting repairs yourself can void warranties. If your Volvo is still under warranty, take it to the dealership and let them handle it.
Choosing the Right Shop for Your Volvo
If you decide to take your Volvo to a shop, choosing the right one matters. You have three basic options: the dealership, an independent shop specializing in European vehicles, or a general repair shop.
Dealerships have Volvo-specific training, tools, and access to technical service bulletins. They use OEM parts. The downside is cost. Dealer labor rates are typically the highest, and they always recommend OEM parts, which are more expensive than quality aftermarket alternatives.
For warranty work or very complex problems, dealerships make sense. For routine repairs, you can often save money elsewhere without sacrificing quality.
Independent European specialists are often the sweet spot. These shops focus on brands like Volvo, BMW, Mercedes, and Audi. Their technicians know these vehicles inside and out. They have the right diagnostic equipment. And their labor rates are usually 20 to 40 percent lower than dealerships while offering comparable expertise.
Look for shops with good online reviews, ASE certified technicians, and a clean, professional appearance. Ask if they have Volvo-specific scan tools. A shop that specializes in European vehicles is usually a better choice than a general repair shop for diagnosing complex issues.
General repair shops can handle basic maintenance and simple repairs, but complex electrical diagnostics might be beyond their capability. They may not have Volvo-specific scan tools or experience with the particular quirks of your model.
That said, some general shops have excellent reputations and skilled technicians who work on all makes and models successfully. Check reviews and ask questions about their experience with Volvos before committing.
Common Questions Volvo Owners Ask
Will disconnecting the battery reset the warning message?
Maybe temporarily, but this does not fix the underlying problem. The warning message is there because your electrical system has a real issue. Disconnecting the battery might clear the code and message, but it will return as soon as the system detects the problem again, which could be seconds after you start the car.
Clearing the code without fixing the problem is like putting tape over your check engine light. It does not make the problem go away.
Can cold weather trigger this warning?
Extreme cold can stress your electrical system. Batteries lose capacity in cold weather, sometimes as much as 50 percent when temperatures drop below zero Fahrenheit. A battery that is marginal in warm weather might fail in winter.
If you see this warning only in very cold weather and it goes away when temperatures moderate, your battery is likely weak and should be replaced before next winter.
Why did the warning appear right after I replaced the battery?
If you installed a new battery without registering it with the vehicle’s computer, the charging system might not calibrate correctly, triggering the warning. Many modern Volvos require battery registration when you install a new battery.
Take the vehicle to a shop with a Volvo scan tool and have them register the battery. This usually resolves the issue.
How long does an alternator last in a Volvo?
Most alternators last between 80,000 and 150,000 miles, though this varies widely based on driving conditions and electrical load. Vehicles with lots of electrical accessories (heated seats, premium sound systems, etc.) work the alternator harder.
An alternator in a Volvo that spends its life highway commuting in moderate climates might last 200,000 miles. One that does short trips in extreme heat might fail at 60,000 miles. There is no precise expiration date.
Can I replace just the voltage regulator instead of the whole alternator?
In theory, yes. In practice, it is often not worth it. Modern alternators have internal voltage regulators that require significant disassembly to access. The labor to replace just the regulator often approaches the cost of replacing the entire alternator with a remanufactured unit that comes with a warranty.
If your alternator is relatively new and you are confident the regulator is the only problem, it might be worth attempting. But most mechanics will recommend replacing the whole unit for reliability.
Does this warning mean my car will not start next time?
Not necessarily, but it could. If the alternator has failed but the battery still has some charge, the car might start but run poorly and die quickly. If the battery is completely dead, you will need a jump start.
The warning is telling you to address the problem before it leaves you stranded. Listen to it.
Real Stories from Volvo Owners
Sometimes hearing how others dealt with this issue helps put things in perspective. Here are a few real-world examples of Volvo owners who faced the “Power System Service Urgent” warning.
Mike’s XC90 experience: Mike owns a 2016 XC90 with 95,000 miles. He started noticing the battery light flickering occasionally but ignored it. Two weeks later, the “Power System Service Urgent” message appeared while he was driving his kids to school. He immediately took the vehicle to his trusted independent shop. They diagnosed a failing alternator and corroded battery terminals. The shop cleaned the terminals, but the alternator needed replacement. Total cost was $725 for a remanufactured alternator installed. Mike wishes he had addressed the flickering battery light earlier but is glad he did not wait and get stranded.
Jennifer’s S60 saga: Jennifer owns a 2014 S60. She got the warning message and panicked, taking the car immediately to the dealership. They quoted her $1,400 for a new alternator. She got a second opinion from an independent European specialist who discovered the actual problem was a loose serpentine belt and corroded battery terminals. Total repair cost was $180. The lesson here is that second opinions can save you significant money.
Carlos and the dead battery: Carlos has a 2017 V60 Cross Country. His warning appeared on a Friday evening. He tested the battery himself with a multimeter and found it was reading only 11.8 volts. The next morning, he drove to an auto parts store where they load tested the battery and confirmed it was bad. He bought a replacement battery for $210, installed it himself, but the warning persisted. He then learned about battery registration and took the car to a Volvo specialist who registered the new battery for $50. Problem solved for $260 total, and he learned something about his car in the process.
The Bottom Line on Keeping Your Volvo’s Power System Healthy
The “Power System Service Urgent” warning is not something to ignore or hope goes away on its own. Your Volvo is telling you, in no uncertain terms, that the electrical system needs attention. The good news is that most causes are straightforward to diagnose and repair.
Start with the simple stuff. Clean those battery terminals. Check your connections. Test the battery voltage. These steps cost you nothing but a few minutes and might solve the problem immediately. If basic checks do not reveal the issue, it is time to dig deeper or call in professional help.
Remember that your charging system is not optional. Without it, your Volvo becomes a very expensive paperweight. The alternator, battery, wiring, and all related components work together to keep you on the road. When one fails, the whole system suffers.
Do not gamble with continued driving when this warning appears. The potential for getting stranded, possibly in an unsafe location or terrible weather, is not worth the risk. Address the issue promptly, and you will save yourself stress, money, and inconvenience.
Whether you tackle the repair yourself or hand it to a professional, make sure the job gets done right. Shortcuts and half-measures with electrical systems often create bigger problems down the road. Use quality parts, follow proper procedures, and do not forget things like battery registration that might seem minor but matter.
Your Volvo is designed to serve you reliably for many years and miles. Give it the attention it needs when it asks for help, and it will reward you with the dependable performance Volvo is known for. That warning message is not your enemy. It is your car looking out for you, giving you a heads-up before a small problem becomes a big one. Respect that warning, and both you and your Volvo will be better off for it.