It sounds like the most trivial automotive task imaginable. You need to bolt a license plate to your bumper. How complicated could it possibly be? Then you stand in the hardware aisle staring at three different bins of screws, none of which are clearly labeled for your specific car, and you realize that you have no idea whether you need a self-tapping screw, a machine screw, a stainless cap screw, or whatever the mystery hardware your car came with originally. The wrong choice either strips the hole in your bumper, leaves the plate wobbling like a loose tooth, or snaps off halfway in when you try to tighten it.
License plate screws are one of those things that every driver needs eventually and almost nobody thinks about until the original ones rust solid, snap off, or go missing entirely during a car wash. Getting the right fastener matters more than most people realize. A plate that falls off at highway speed can cause an accident. A screw that is too large can crack a plastic bumper mount. A screw that is too small leaves the plate rattling and flapping on the highway, which in many states constitutes a moving violation. Let us get this right the first time.
Table of Contents
Why License Plate Screw Sizing Is Not One-Size-Fits-All
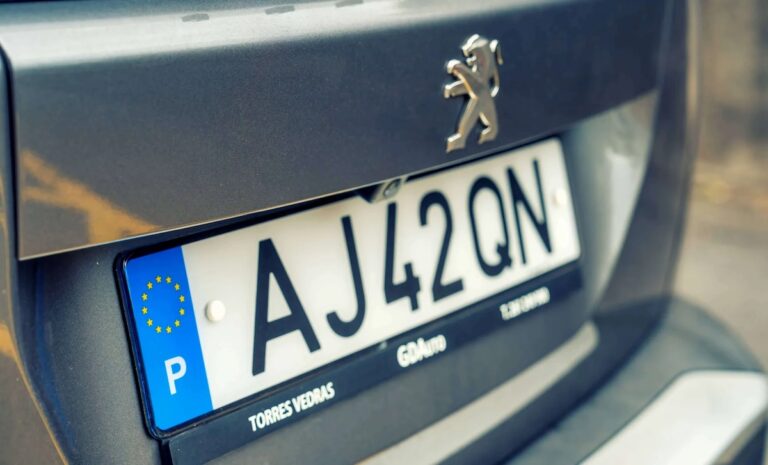
The license plate itself is standardized in the United States. Every plate is 12 inches wide by 6 inches tall, with mounting holes positioned in the same locations across all states. That standardization makes you think the screws would be universal too. They almost are, but not quite. The variation comes from the mounting point on the vehicle itself, not from the plate. Some vehicles have threaded metal inserts behind the bumper that accept a machine screw with specific thread pitch. Others have plastic or nylon clip retainers designed for self-tapping screws that cut their own threads as they go in. Some vehicles skip the threaded hole entirely and use push-in plastic fasteners that lock through the plate hole and the bumper hole simultaneously.
When you use the wrong screw type for your mounting system, one of a few things happens. A self-tapping screw driven into a threaded metal insert will cut conflicting threads that chew up the insert, leaving you with a stripped hole that nothing holds securely. A machine screw driven into a plastic push-in retainer may crack the retainer or simply spin without catching anything. A screw that is too short bottoms out in the hole before the plate is clamped tight, creating an illusion of security while the plate wobbles on the road. Getting the correct screw type and size for your specific vehicle’s mounting system is what separates a plate that stays attached for ten years from one that leaves your bumper on the freeway six months later.
The US Standard License Plate Screw Size You Should Know
The most widely used license plate screw in the United States is a one-quarter inch diameter screw in lengths ranging from three-quarters of an inch to one inch. Expressed in standard hardware notation, you will often see these listed as 1/4-14 x 3/4 inch or similar designations depending on thread pitch and length. This size fits the vast majority of domestic and imported vehicles sold in America that use plastic or nylon retainers behind the bumper. These retainers grip the screw threads as the screw is driven in, and the combination creates a secure hold without needing any pre-threaded hole in the bumper structure itself.
Self-tapping screws in this size category are the workhorse of the license plate world precisely because they are forgiving. They create their own thread path as they go in, so minor variations in retainer size or material do not matter much. They are widely available at hardware stores, auto parts stores, and online. A box of stainless steel self-tapping screws in the 1/4-14 x 3/4 size will solve the license plate fastener problem for most American drivers on most vehicle types. That said, “most” is not “all,” and the specific thread diameter and length requirements do vary between manufacturers and sometimes between model generations within the same brand.
Brand-Specific License Plate Screw Sizes and Recommendations
Honda: Reliable Fit Across the Entire Lineup
Honda vehicles, including their cars, trucks, and motorcycles, typically accept screws in the quarter-inch to three-quarter-inch diameter range, which maps directly to the standard size described above. Honda’s reputation for thoughtful engineering extends to small details like mounting hardware, and their plastic retainer system is robust enough to hold self-tapping screws securely for years without the retainer cracking or the screw working loose from vibration.
For Honda vehicles specifically, stainless steel screws with a black finish are an excellent choice. The black finish provides an additional layer of corrosion resistance beyond what bare stainless steel offers, and it looks clean against dark bumpers. Stainless steel hardware on a Honda will outlast the original fasteners without question and requires no special installation technique beyond a standard Phillips head or flathead screwdriver. No nylon inserts or thread-locking compound are needed. The self-tapping thread does the work.
Toyota: Front and Rear Mounting Differences You Need to Understand
Toyota has an important distinction that many owners discover the hard way. The rear license plate mounting on most Toyota vehicles works smoothly with standard self-tapping screws in approximately a 1 x 0.5 x 0.5 inch dimensional range. The rear bumper structure typically includes proper retainer points that accept these screws without any additional preparation.
The front bumper on many Toyota models, however, requires a different approach. Because the front mounting area on some Toyota vehicles does not include pre-installed retainer clips from the factory, installing a front license plate requires drilling appropriate-sized holes and using plastic anchors to give the screws something to grip into. Attempting to drive a self-tapping screw directly into the front bumper material without a proper anchor often results in a screw that spins freely without tightening. Use two self-tapping fasteners with plastic expansion anchors at the front, and standard self-tapping screws at the rear. RSD Never Rust OE-style stainless screws are a well-regarded option for Toyota rear mounting applications in particular.
Chevrolet: Thread Length Variations Matter Here
Chevrolet vehicles generally use screws in the 10-millimeter length range as their original factory hardware. That said, there is more variation in the Chevrolet lineup than in some other brands because the mounting systems changed meaningfully between different truck, SUV, and passenger car platforms across different generations. Depending on your specific Chevrolet model and year, a 10-millimeter screw may be exactly right, slightly short, or borderline too long for the retainer depth in your bumper.
The practical approach for Chevrolet owners is to pick up screws in both 8-millimeter and 12-millimeter lengths in addition to the 10-millimeter standard, and test fit one before committing. The correct length will pull the plate snug against the bumper surface without the screw bottoming out in the retainer before clamping force is achieved. Stainless steel without truss heads is the right specification for Chevrolet applications. Self-tapping versions work with the plastic retainers most Chevy vehicles use, and the lack of a truss head means a clean, low-profile installation that sits flush against the plate surface.
Nissan: Standard Sizing With a Specific Head Style
Nissan vehicles accept standard license plate screws without much complication. The thread specification and diameter fall within the common US standard range, so the same general hardware that works on Honda and most domestic vehicles will work on a Nissan. The distinguishing feature of original Nissan license plate hardware is the slotted hex head design. This head style allows you to drive the screw with either a flathead screwdriver or a hex socket, giving you two tool options for installation and removal.
For replacement hardware on Nissan vehicles, stainless steel screws plated with zinc offer the best corrosion resistance combination. The zinc plating adds a sacrificial layer that corrodes before the stainless steel beneath it, essentially providing galvanic protection in environments where road salt or coastal air would otherwise attack the fastener. A black finish on top extends the life further. Nissan retainer clips are generally reliable and hold the standard self-tapping screw without cracking or backing out from road vibration.
Ford: A Specific Thread Designation That Fits the Whole Lineup
Ford’s license plate screw specification is one of the most specific in the domestic market. The correct size for Ford cars, trucks, and most motorcycle accessories is a 1/4-14-5/8 inch self-tapping screw. That designation tells you three things: the nominal diameter is one-quarter inch, the thread pitch is 14 threads per inch, and the length from under the head to the tip is five-eighths of an inch. This specification fits Ford F-150 models particularly well and transfers across most other Ford platforms that use plastic or nylon retainers.
The slotted head design on Ford-specification screws means you can use either a flathead screwdriver or a 3/8-inch drive socket for installation. The socket method is faster and provides better torque control, reducing the risk of stripping the head during installation. Using the correct socket size matters because an undersized socket will round off the corners of a hex head before the screw is fully seated. Stainless steel is the right material choice here as in all other applications. Chrome-plated screws look attractive initially but lose their finish to road salt and moisture faster than solid stainless does.
Screw Material: Why Stainless Steel Is Always the Right Choice
License plates live on the exterior of your vehicle. They are exposed to rain, road spray, winter salt, summer heat, and everything else the road throws at them. The original screws on most vehicles are zinc-plated steel. Zinc plating provides decent corrosion resistance when new, but it chips, scratches, and degrades over years of outdoor exposure. Once the zinc layer is compromised, the steel underneath rusts rapidly. You end up with a fastener that has fused itself into its mounting hole through corrosion, making removal extremely difficult and sometimes requiring drilling the screw out entirely.
Stainless steel does not have this problem. True stainless steel, particularly the 18-8 or 304 alloy grades commonly available as automotive fasteners, resists corrosion extremely well in outdoor environments. It does not require a plating layer to maintain its appearance and integrity. A stainless steel license plate screw installed today should look essentially the same and come out just as easily fifteen years from now. The slight premium over zinc-plated steel is one of the best small investments you can make in your vehicle’s ongoing ease of maintenance. Every time you need to remove the plate for inspection, registration renewal, or bumper repair, you will thank yourself for using stainless hardware.
| Vehicle Brand | Recommended Screw Size | Thread Type | Recommended Material | Special Notes |
|---|---|---|---|---|
| Honda | 1/4 to 3/4 inch diameter | Self-tapping | Stainless steel, black finish | Works on cars, trucks, and motorcycles universally |
| Toyota | 1 x 0.5 x 0.5 inch | Self-tapping | Stainless steel | Front bumper may need plastic anchor; rear is standard |
| Chevrolet | 10 mm standard, 8 mm or 12 mm as alternatives | Self-tapping | High-quality stainless steel | Test fit length before final installation |
| Nissan | Standard US size | Self-tapping | Stainless with zinc plating | Slotted hex head accepts flathead or hex socket |
| Ford | 1/4-14-5/8 inch | Self-tapping | Stainless steel | Use 3/8-inch drive socket for cleanest installation |
How to Remove Rusted License Plate Screws Without Destroying the Bumper
Before you can install new hardware, you often have to deal with the rusted, stubborn hardware that is already there. Old zinc-plated screws that have been on a vehicle for years in a salt-belt state can corrode into their retaining clips to the point where they feel like a single fused piece. Getting them out without stripping the head, snapping the shank, or cracking the plastic bumper requires patience and the right approach.
Start with penetrating oil. Products like PB Blaster or Kroil are formulated specifically to wick into corroded fastener threads and break the rust bond. Spray the screw heads and the surrounding area generously. Let the penetrating oil sit for a minimum of thirty minutes. For severely corroded screws, leaving the penetrating oil overnight and applying a second coat in the morning gives the best results. Rushing this step is the most common reason people end up with a snapped screw shank and a much larger problem than they started with.
If penetrating oil alone does not free the screw after a patient attempt, white vinegar is a useful supplement. Vinegar contains acetic acid, which reacts with iron oxide and dissolves it. Applying vinegar with a small brush directly to the screw head and the visible threads, then following up with a wire brush to scrub the loosened rust off the surface, can give the penetrating oil better access to the deeper thread contact areas. This combination of vinegar pre-treatment and penetrating oil often breaks corrosion that either product alone could not address.
For a screw that still will not budge after chemical treatment, an impact driver is the next tool. An impact driver delivers rotational force in sharp, high-torque pulses rather than a steady turning force. This hammering action breaks corrosion bonds that steady torque cannot overcome. Use the correct bit size with a tight fit in the screw head. A loose bit will cam out and destroy the head, leaving you with a headless shank that now requires extraction with a screw extractor. The impact driver approach should be used before the situation deteriorates to that level.
If the screw snaps off flush with the bumper surface, or the head strips beyond recovery, a screw extractor set drilled into the remaining shank can sometimes back the remnant out. This technique requires a steady hand with a drill to create a centered pilot hole without enlarging the original screw hole, and it works best when the snapped shank is not too deeply embedded. If all else fails, the plastic retainer clip can be replaced entirely. These clips typically push or twist into place from behind the bumper, and replacement clips for most vehicles are inexpensive and widely available. Removing the old clip with the rusted screw locked inside it and installing a new clip is often faster and cleaner than fighting a deeply corroded fastener.
Installing New License Plate Screws the Right Way
Once the old hardware is out and the mounting points are clean, installation of new screws goes quickly if you follow the right sequence. Start by checking the condition of the plastic retainer clips behind the bumper. If a clip is cracked, split, or has a stripped bore from the old screw cutting too large a thread, replace the clip before installing the new screw. A new stainless screw driven into a damaged retainer will not hold the plate securely no matter how tight you try to make it.
Hand-start each screw before applying any tool. Insert the screw tip into the retainer hole and turn it clockwise by hand until you feel the first couple of threads catch. Doing this by hand ensures the screw is properly aligned and threading correctly rather than starting at an angle. A screw that goes in at an angle will either bind before it is fully seated or strip the retainer threads as you force it the rest of the way.
Once hand-started, finish driving the screw with a screwdriver or appropriate socket. Use firm, steady pressure and stop the moment you feel the plate seat firmly against the bumper. Overtightening a self-tapping screw in a plastic retainer is the single most common installation mistake. Plastic retainers have a limited thread engagement depth, and continuing to drive the screw after the plate is clamped simply strips those threads. The correct torque is just enough to make the plate snug without compressing the plate mounting ears into the bumper surface or creating any visible distortion around the screw holes.
After all four screws are installed, give the plate a firm tug in all four directions to confirm it does not shift or flex. Grab the plate from the edges and try to wiggle it. No movement is the goal. A plate that wiggles even slightly under hand pressure will flex and fatigue at the mounting holes under road vibration, eventually enlarging the holes to the point where the screws no longer hold. If there is movement, the screws may need to be slightly longer, the retainer clips may need replacement, or both.
Optional Accessories That Make License Plate Mounting More Secure
Beyond the screws themselves, a few additional items can extend the life of your license plate mounting hardware and prevent common problems.
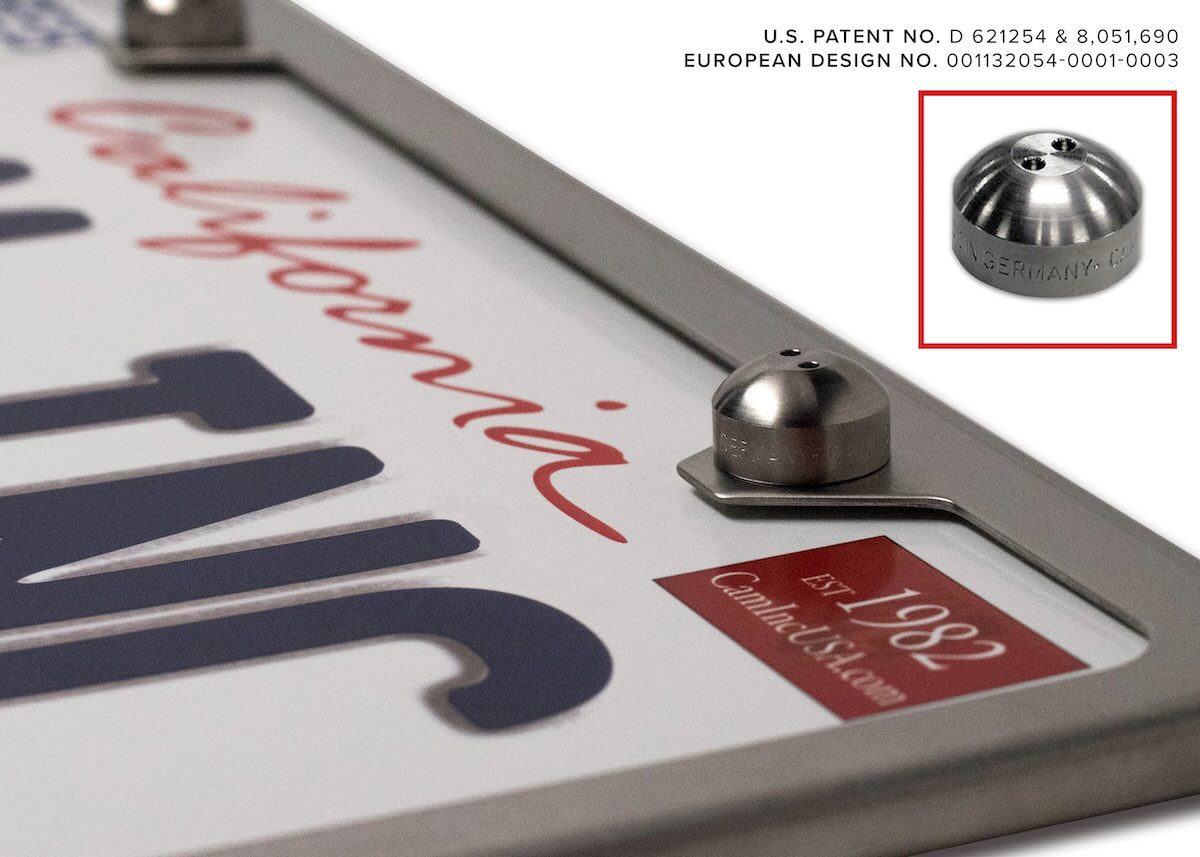
Anti-theft license plate screws use a unique drive pattern that standard screwdrivers cannot engage. These screws require a proprietary bit that only comes with the fastener set. They prevent someone from removing your plate with a common screwdriver, which deters both casual theft and the increasingly common practice of stealing plates to use on other vehicles for toll evasion or criminal activity. Anti-theft screws are available in the same standard sizes as conventional fasteners, and they are a practical upgrade especially if you live in a high-vehicle-theft area.
License plate frames add a layer of protection around the plate edges. They do not directly affect the security of the screws, but they prevent the plate from bending and flexing at the mounting holes from wind pressure and road vibration. Frames also protect the plate edges from chips and nicks that can eventually cause the plate to rust from the edges inward. Stainless steel or ABS plastic frames are both durable options.
Anti-rattle pads are foam or rubber gaskets that sit between the plate and the bumper surface. They prevent the metallic plate from vibrating against the plastic bumper and creating the annoying rattling noise that many drivers experience at highway speeds. They also prevent the plate from wearing through the bumper paint at contact points over years of vibration. Self-adhesive foam tape in the correct thickness cut to fit under the plate corners accomplishes the same result for a fraction of the cost of purpose-made anti-rattle pads.
A thin coating of anti-seize compound on the threads of your new stainless screws before installation is a final touch that ensures easy removal years from now. Anti-seize is a lubricant containing metal particles that prevent the chemical bonding that causes fasteners to fuse to their retainers over time. Apply a small amount to the screw threads before driving them home, and the next time you need to remove the plate for any reason, the screws will back out without a fight. This simple step takes about thirty additional seconds per screw and saves considerable frustration down the road.
License plate screws are genuinely one of the smallest mechanical details on a vehicle, but they are also one of the most consequential. A plate that detaches at highway speed is a hazard to the driver behind you. A plate that is unreadable because it is bent and vibrating is a ticket waiting to happen in most states. Choosing the right size for your specific vehicle, installing quality stainless hardware correctly, and applying a thin coat of anti-seize before you close everything up transforms a five-minute annoyance into a job that will not need to be done again for years. That is the kind of small effort that makes every subsequent interaction with your vehicle just a little bit easier.