Your Dodge Ram’s backup camera was working perfectly yesterday. Today you shift into reverse and get a blank screen, a blue screen, or a blurry mess that’s about as useful as looking through a foggy window. Frustrating? Absolutely. But before you start panicking about a dealer bill, here’s the reality: most backup camera problems on the Ram are fixable, and a good number of them are fixable without spending a dime.
This guide walks you through everything. The common causes, the diagnostic steps, the actual fixes, and when it makes sense to replace the camera entirely. Let’s get into it.
Table of Contents
Why Your Dodge Ram Backup Camera Matters More Than You Think
The backup camera is not just a convenience feature. Since 2018, federal law has required all new vehicles sold in the United States to come equipped with a rear visibility system. That requirement exists because backup collisions kill hundreds of people and injure tens of thousands every year, and children and elderly pedestrians are disproportionately affected.
On a truck as large as the Dodge Ram, the blind zone directly behind the vehicle is significant. The camera eliminates a large portion of that blind zone and gives you a clear view of what’s behind you when reversing out of a driveway, a parking space, or a tight loading area. When it stops working, that safety net disappears.
That’s why a broken backup camera on your Ram is not something to put off until your next oil change. It needs to be addressed.
Start Here: The First Checks Before You Do Anything Else
Before you start pulling wires or ordering parts, run through these basic checks. They take less than ten minutes and will save you a lot of unnecessary work if the answer turns out to be something simple.
Check the Camera Lens First
This sounds almost too obvious to mention, but it’s the number one overlooked cause of backup camera problems. The camera lens on your Ram sits at the back of the truck, right in the path of road spray, mud, dust, and whatever else you drive through. On trucks that see off-road use or dirt road driving, the lens can get coated completely within a single trip.
Walk to the rear of the truck and look directly at the camera lens. Is it caked with mud? Is there a film of road grime over it? Is there a water droplet sitting right in the middle of the lens? Any of these will degrade or completely block the image.
Use a soft microfiber cloth and a mild cleaner to wipe the lens gently. Do not use abrasive cloths or paper towels, which can scratch the lens coating. Check whether the image improves immediately after cleaning. If it does, you’ve solved the problem at zero cost.
Check the Fuse
A blown fuse is one of the most common electrical causes of a backup camera failing. The camera draws power from the vehicle’s electrical system through a dedicated fuse. When that fuse blows, the camera loses power entirely, which typically results in either a blank screen or a blue screen when you shift into reverse.
Here’s how to check it:
- Locate the fuse box. On the Ram, there are usually two: one under the dashboard on the driver’s side and one in the engine compartment. Consult your owner’s manual to find the specific fuse labeled for the backup camera or rearview camera system.
- Remove the fuse using a fuse puller tool or a pair of needle-nose pliers.
- Hold it up to a light source and look at the metal strip inside the plastic housing. If that strip is broken or melted, the fuse is blown.
- Replace it with a new fuse of the exact same amperage rating. The amperage is printed on the top of the fuse and listed in your owner’s manual. Do not go up in amperage to fix a blowing fuse. That creates an electrical fire risk.
If the new fuse blows immediately or blows again after a short period of use, there’s a short circuit somewhere in the camera wiring that needs to be found and repaired before the fuse will hold.
Inspect the Wiring and Connections
The camera on your Ram is connected to the infotainment system through a wiring harness that runs the length of the truck. That’s a lot of wire exposed to heat, vibration, moisture, and mechanical stress over thousands of miles. Any weak point along that run can cause the camera to malfunction.
Start at the camera itself. Look at the connector at the back of the camera. Is it seated firmly? Is there any corrosion on the pins? Has the connector cracked from heat or impact? Then trace the wiring as far as you can see it, looking for any sections that appear pinched, frayed, melted, or chewed through by a rodent.
Rodent damage is more common than most people expect, particularly on trucks that are parked outdoors or in areas with high rodent activity. A single chewed wire can take out the entire camera system.
Also check the connector at the display unit end. On some Ram models, the camera cable plugs into a port on the back of the head unit, and vibration from the road can work that connector loose over time.
Check the Battery and Its Connections
A weak or failing battery affects the entire electrical system on the truck, and electronic components like the backup camera are often the first to show symptoms of marginal power. If your battery is getting old or the terminals are corroded, the camera may behave erratically, show a degraded image, or fail to activate at all.
Check the battery terminals for corrosion. White or greenish buildup on the terminals creates resistance and reduces the effective voltage reaching your electronics. Clean the terminals with a wire brush and a mixture of baking soda and water. Dry them thoroughly and make sure they are reconnected tightly.
If the battery is more than four or five years old, have it load-tested at an auto parts store. Most will do this for free. A battery that fails a load test should be replaced regardless of whether it seems to start the truck fine. Starting and sustained electronic performance are two different things.
Specific Problems and What They Usually Mean
Not all backup camera failures look the same. The way your camera is failing actually tells you a lot about what’s causing the problem. Here’s how to read the symptoms:
Blank Screen When You Shift Into Reverse
A completely blank screen when you put the truck in reverse usually points to a power or signal issue. The display knows the camera should be activating, but it’s not receiving any signal from it.
Most likely causes:
- Blown fuse for the camera circuit
- Disconnected or broken wiring harness
- Camera unit has failed completely
- Head unit software glitch
Start with the fuse and wiring inspection. If both check out, try the software reset procedure described later in this article. If the screen is still blank after all of that, the camera unit itself is the likely failure point.
Blue Screen Instead of a Camera Image
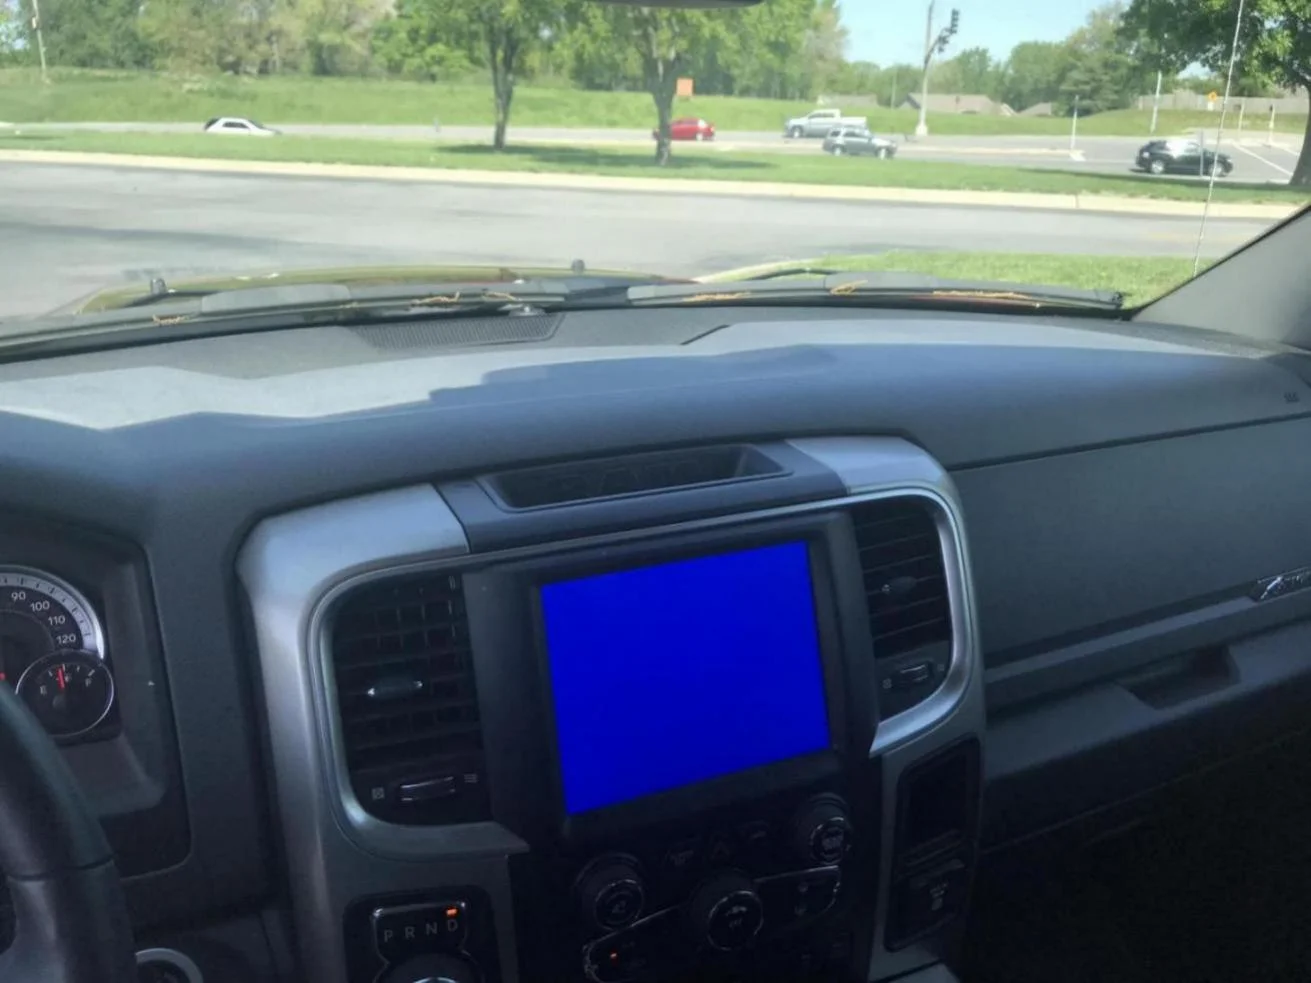
A blue screen is slightly different from a blank screen. It means the infotainment system is recognizing that the camera is there and is trying to display its feed, but the signal it’s receiving is not valid video. Think of it like a TV that’s tuned to a channel with no broadcast coming through.
Most likely causes:
- Loose or damaged video cable connection between camera and head unit
- Camera sensor failure (the unit powers on but the image sensor inside is damaged)
- Blown fuse that’s cutting partial power to the camera
- Water intrusion into the camera housing causing internal corrosion
Check all wiring connections first. If those are solid, the camera unit itself is likely the problem and will need to be replaced.
Blurry, Foggy, or Distorted Image
If you’re getting an image but it looks blurry, cloudy, or has a milky haze over it, there are two likely explanations. The first is a dirty lens, which you’ve already checked. The second is moisture inside the camera housing.
Camera housings are sealed from the factory, but seals degrade over time, especially on trucks exposed to pressure washing, heavy rain, or submersion during off-road water crossings. When moisture gets inside the housing, it fogs the lens from the inside, and no amount of external cleaning will fix it.
A fogged lens from internal moisture usually clears temporarily when the camera warms up with use, only to fog back up again when it cools. That cycle is a giveaway that moisture is inside the unit. The fix is replacement of the camera housing or the entire camera unit.
Image Freezes, Flickers, or Cuts In and Out
An intermittent image that freezes, goes black for a moment, or flickers while you’re reversing is almost always a wiring or connection issue. A solid failure like a blown fuse or a dead camera produces a consistent blank or blue screen. Intermittent behavior points to a connection that’s making and breaking contact.
Wiggle the wiring connectors at both the camera and the head unit while someone watches the display. If the image changes when you move a connector, you’ve found the problem. Clean the connector pins with electrical contact cleaner, make sure the connector is seated fully and clicks into place, and check for any damaged pins that may not be making proper contact.
Camera Works Sometimes and Not Others
This is one of the most frustrating presentations because you can’t consistently reproduce the problem. Sometimes the camera works perfectly. Other times it doesn’t activate at all. You take it to the shop and of course it works fine when they look at it.
Intermittent failures like this are commonly caused by:
- A partially corroded connector that makes contact inconsistently
- A software glitch in the head unit that affects camera activation
- Temperature-related component behavior (works when warm, fails when cold, or vice versa)
- A marginal fuse that’s borderline but not completely blown
Try the battery disconnect reset first. If the problem persists, have the connector pins cleaned and the connections inspected. If it keeps happening with no obvious physical cause, a software update for the infotainment system is the next step.
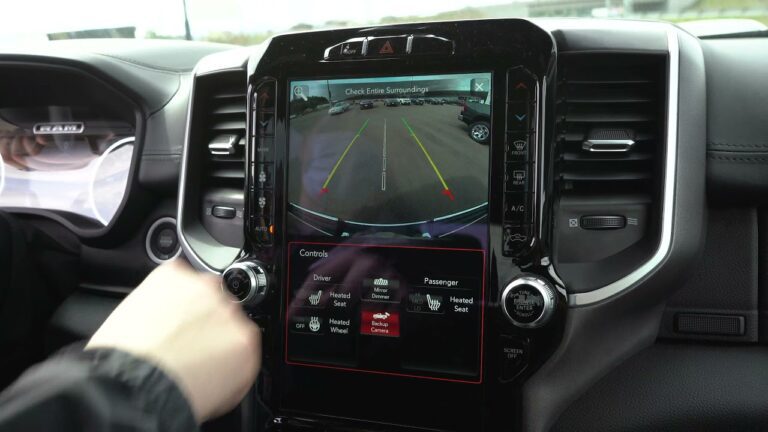
How to Reset Your Dodge Ram Backup Camera
A software reset is one of the easiest fixes to try and should be done before any parts are replaced. Modern infotainment systems can develop software glitches that affect camera behavior, and a reset clears those glitches without affecting any mechanical component.
Soft Reset Through the Infotainment Menu
- Start the truck and let the infotainment system fully load.
- Navigate to the Settings menu on the Uconnect screen.
- Look for the backup camera or rear camera settings option.
- Select the Reset option if available and allow the system to complete the reset process.
- Shift into reverse to test whether the camera now displays correctly.
Battery Disconnect Reset
If the menu reset does not work, try disconnecting the battery to force a full system reset. This clears any temporary error states in the control modules.
- Turn the truck off completely.
- Disconnect the negative battery terminal (the black cable).
- Leave it disconnected for at least 30 minutes. Overnight is better if you can manage it, as this ensures all capacitors in the system fully discharge.
- Reconnect the negative terminal firmly.
- Start the truck and allow the infotainment system to boot up completely before shifting into reverse to test the camera.
Factory Reset of the Infotainment System
This is the nuclear option and should be reserved for situations where both of the above resets have failed. A factory reset wipes all personalized settings, paired phones, saved addresses, radio presets, and any other customizations you’ve made to the system. Write down anything important before proceeding.
- Navigate to Settings in the Uconnect menu.
- Look for a “Factory Reset” or “Restore to Factory Settings” option.
- Confirm the reset and allow the system to complete the process. This can take several minutes.
- Once the system restarts, test the backup camera before reconfiguring your personal settings.
If the camera works after a factory reset, a software issue in the previous configuration was likely the culprit. Going forward, keeping the Uconnect software updated reduces the risk of this happening again.
Uconnect Software Updates and Backup Camera Performance
Dodge Ram trucks use the Uconnect infotainment system, and Stellantis (the parent company of Dodge/Ram) periodically releases software updates for it. These updates fix known bugs, improve system stability, and sometimes resolve issues with connected features including the backup camera.
If your backup camera problems started appearing after a system update, or if they’ve been ongoing without a clear physical cause, checking for and installing the latest Uconnect software version is worth doing.
You can check for updates through:
- The dealership: They can check the current software version and update it using their diagnostic tools. This is the most reliable method.
- The Uconnect website: Some Ram models support over-the-air updates or allow you to download an update to a USB drive and install it yourself. Check the official Uconnect support page for your specific model year and system version.
If your truck is still under the factory warranty or a dealer warranty, software updates should be performed at no cost to you. Ask specifically about any technical service bulletins (TSBs) related to backup camera behavior on your model year. Manufacturers issue TSBs when a known defect or software issue affects a significant number of vehicles, and the repair is often covered even if you didn’t specifically ask about it.
Replacing the Backup Camera on Your Dodge Ram
If you’ve worked through every diagnostic step and the camera is still not functioning correctly, replacement is the next step. This is not as intimidating as it sounds. With the right camera and a bit of patience, it’s a manageable job.
Choosing the Right Replacement Camera
Not every backup camera will work with every Ram. The camera needs to be compatible with your specific model year and the Uconnect system version in your truck. Here’s what to look at when selecting a replacement:
| Factor | What to Check |
|---|---|
| Model year compatibility | Camera must be rated for your specific Ram model year |
| OEM vs. aftermarket | OEM (Mopar) cameras are plug-and-play; aftermarket may need adapters |
| Wired vs. wireless | Wired gives stable signal; wireless is easier to install but can lose signal |
| Image resolution | Higher resolution improves visibility, especially at night |
| Viewing angle | Wider angle gives better coverage of the area behind the truck |
| Night vision capability | Important if you regularly reverse in low-light conditions |
| Warranty | Look for at least a one-year warranty on any replacement unit |
OEM replacement cameras from Mopar are the safest bet for compatibility. They connect directly to the existing wiring harness without adapters and are recognized immediately by the Uconnect system. Aftermarket options can be excellent, but do your research and verify compatibility with your specific truck before purchasing.
How to Install a Replacement Backup Camera
Here is the step-by-step process for replacing the camera on a Dodge Ram:
- Disconnect the battery: Before touching any wiring, disconnect the negative battery terminal to eliminate the risk of electrical shorts or accidental airbag deployment.
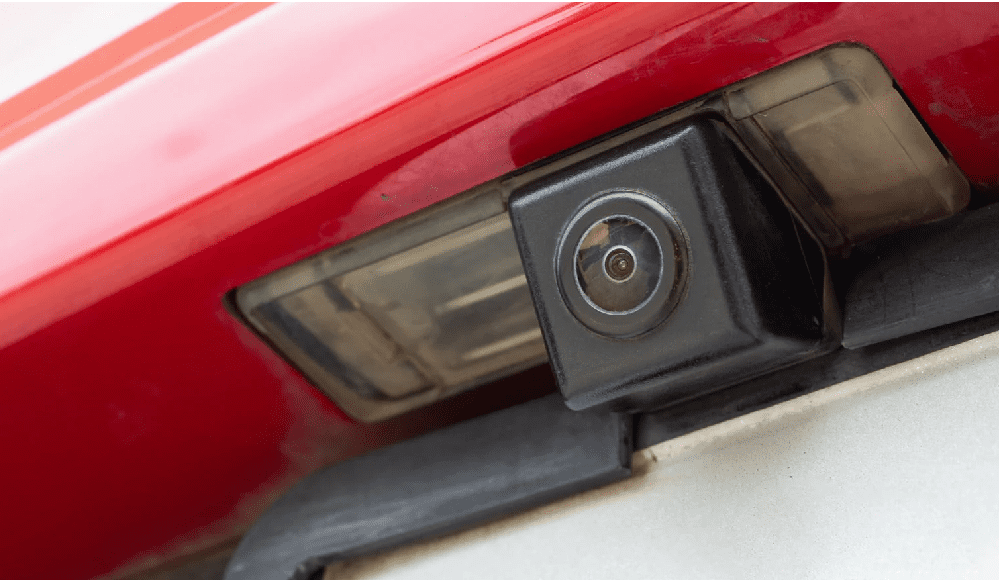
- Access the old camera: The backup camera on most Ram trucks is integrated into the tailgate handle or mounted just above or below it. You may need to remove the tailgate handle trim panel to access the camera and its connector. Use a trim removal tool to avoid scratching the paint or breaking plastic clips.
- Disconnect the wiring: Unplug the wiring connector from the back of the old camera. Note how the connector is oriented before removing it so you can match it with the new unit.
- Remove the old camera: Depending on the mounting style, the camera may unscrew, unclip, or slide out. Remove any mounting hardware carefully and keep the screws somewhere they won’t get lost.
- Install the mounting bracket (if needed): If the new camera includes a new mounting bracket or bezel, install that first according to the manufacturer’s instructions. Alignment matters here. A camera that’s pointed even slightly downward or to one side will give you a distorted view that doesn’t match the parking guidelines on screen.
- Connect the new camera: Plug the wiring connector into the new camera. It should click firmly into place. If you’re installing an aftermarket camera with different connectors, this is where you’ll use any included adapter harness.
- Secure the camera: Fasten the new camera securely using the mounting hardware. Gently tug the camera to verify it won’t vibrate loose over time.
- Reassemble the trim: Reinstall the tailgate handle panel or any other trim pieces you removed. Make sure all clips are fully seated.
- Reconnect the battery and test: Reconnect the negative battery terminal, start the truck, and shift into reverse. Verify that the camera activates, the image is clear, and the parking guidelines are visible and properly positioned on screen.
If you’re not comfortable with the wiring aspect of this job, particularly if you’re installing an aftermarket camera that requires routing new cables, a professional installation is a reasonable choice. Most shops can complete a backup camera installation in one to two hours.
How to Keep Your Ram Backup Camera Working Long-Term
Fixing the problem is one thing. Keeping it from coming back is another. These habits will significantly extend the life and reliability of your backup camera system:
- Clean the lens regularly. Make it part of your regular wash routine. A quick wipe with a microfiber cloth takes ten seconds and prevents the gradual buildup that degrades image quality over time.
- Avoid high-pressure washing directly at the camera. Pressure washers can force water past the camera’s seals. When washing the tailgate area, keep the pressure washer nozzle at a safe distance from the camera housing.
- Inspect the wiring annually. At least once a year, do a visual inspection of the camera wiring. Look for any signs of chafing, cracking, or damage and address minor issues before they become major ones.
- Keep the Uconnect software updated. Software bugs that affect camera behavior are usually addressed in updates. Staying current reduces the risk of software-related failures.
- Address any physical impacts to the tailgate promptly. A minor fender-bender that damages the tailgate can also damage the camera housing or knock the connector loose. Any time the rear of the truck takes a hit, check camera function before assuming everything is fine.
- Monitor battery health. Keep the battery in good condition and replace it before it becomes marginal. A healthy battery means stable power to your electronics, including the camera.
When to Go to the Dealer vs. an Independent Shop
For backup camera issues on the Dodge Ram, here’s a practical breakdown of when each option makes more sense:
| Situation | Best Option |
|---|---|
| Truck is still under factory warranty | Dealer (covered at no cost) |
| Known TSB exists for your model year’s camera issue | Dealer (may be covered even out of warranty) |
| Software update needed for Uconnect | Dealer (they have the right tools) |
| Simple wiring repair or fuse replacement | Independent shop or DIY |
| Aftermarket camera installation | Independent shop with AV/electronics experience |
| OEM camera replacement on an older truck | Either; get quotes from both |
Always check whether a Technical Service Bulletin has been issued for your specific problem before paying for a repair. The National Highway Traffic Safety Administration (NHTSA) maintains a public database of TSBs at nhtsa.gov, and you can search by make, model, and year. If a TSB exists covering your backup camera issue, bring it to your dealer and ask whether the repair is covered.
A functioning backup camera is not a luxury on a truck as large as the Ram. It’s a safety tool you rely on every time you back out of a parking spot or a driveway. If yours is giving you trouble right now, start with the simple checks, work through the diagnostic steps methodically, and don’t skip the software reset before assuming you need new hardware. Nine times out of ten, the fix is simpler and cheaper than it first appears.