
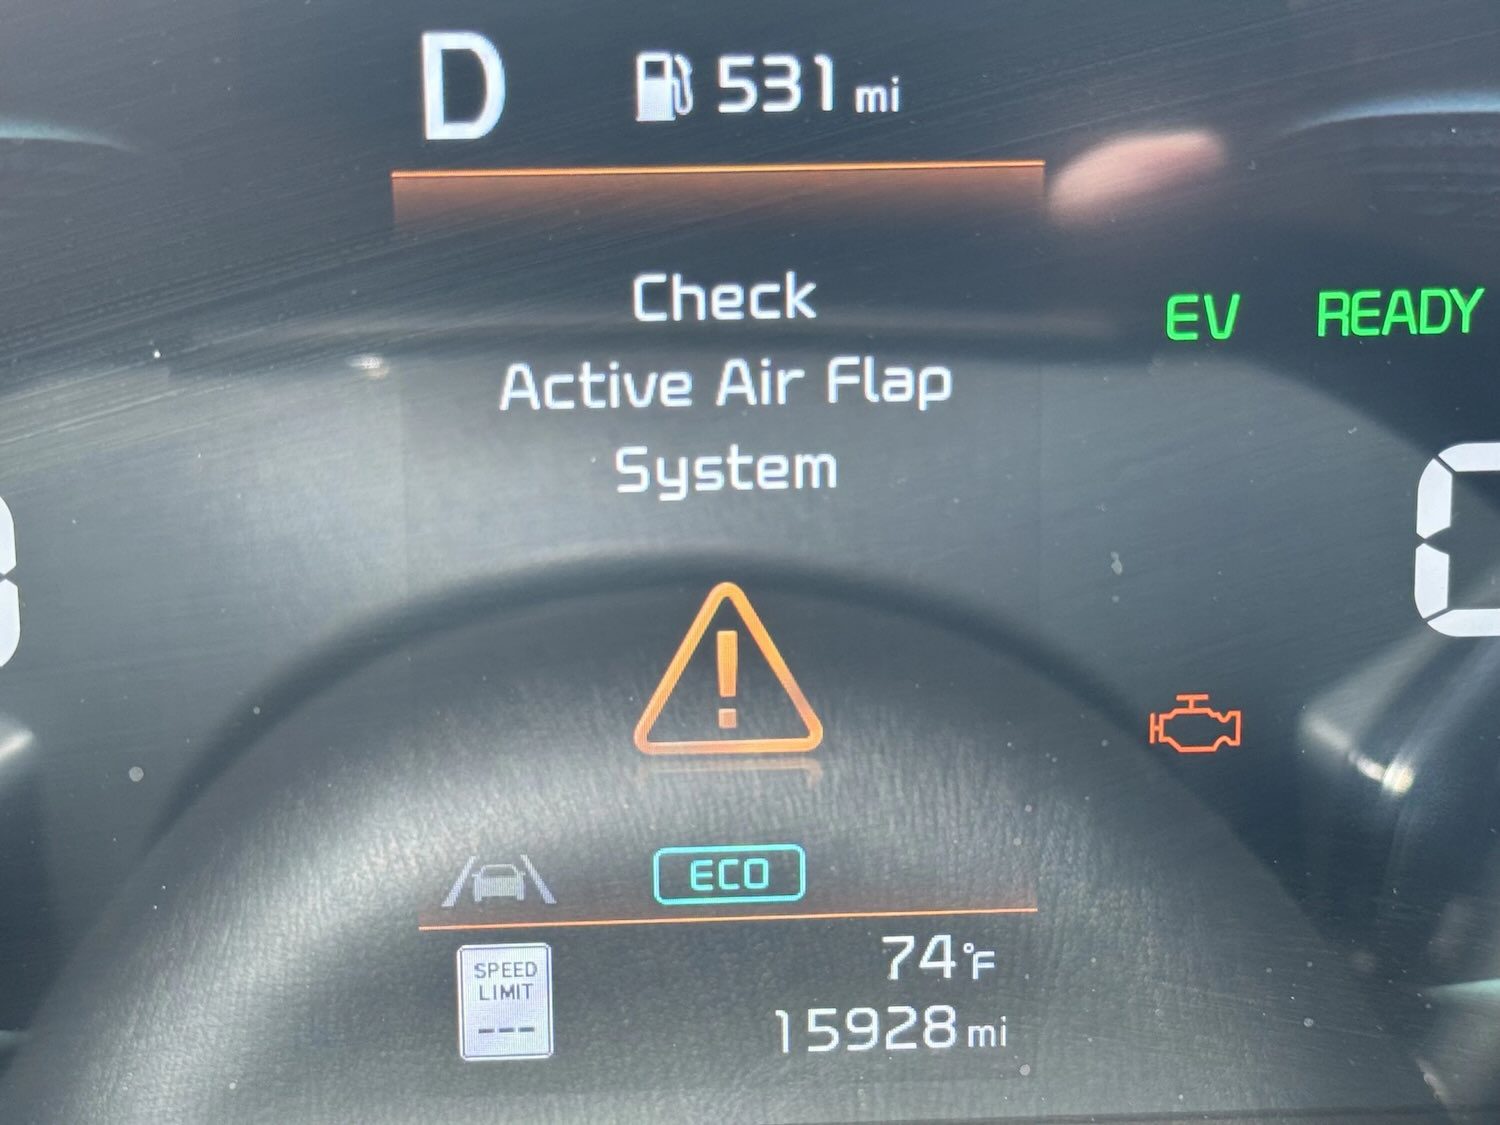
You are cruising down the highway in your Hyundai Sonata, enjoying the drive, when suddenly a message flashes across your dashboard: “Check Active Air Flap System.” Your stomach drops a little. What does that even mean? Is your car about to break down? Can you keep driving? How much is this going to cost?
Take a breath. I have seen this warning message on hundreds of Hyundai vehicles over my years as a mechanic. The good news is that this is rarely an emergency. The even better news is that many cases can be fixed without breaking the bank.
Table of Contents
As someone who has diagnosed and repaired this exact issue countless times, I can tell you that the “Check Active Air Flap System” warning is one of those problems that sounds more complicated than it actually is. Sure, the name makes it sound like some exotic, expensive system. In reality, it is a relatively simple mechanism that sometimes gets stuck or confused.
This guide will walk you through everything you need to know about your Hyundai active air flap system. We will cover what it does, why it fails, what symptoms to watch for, how to diagnose problems, and most importantly, how to fix it. Whether you are a DIY enthusiast or just want to understand what your mechanic is talking about, you will have all the information you need by the end.
What This Active Air Flap System Actually Does
Before we dive into troubleshooting, let us talk about what this system is and why Hyundai engineered it in the first place. Understanding how it works makes diagnosing problems infinitely easier.
The active air flap system is essentially a set of motorized shutters located behind your front grille. Think of them as adjustable blinds for your radiator. These flaps open and close automatically based on what your vehicle needs at any given moment.
Hyundai designed and patented this system with a specific goal in mind: improving fuel economy without sacrificing engine cooling. It is a balancing act, and the active air flaps are the solution.
How the System Works in Real-World Driving
When you start your car on a cold morning, the flaps stay closed. Your engine needs to warm up quickly for optimal efficiency and emissions control. Closed flaps block cold air from hitting the radiator, allowing the engine to reach operating temperature faster.
Once you get on the highway and start cruising at steady speeds, the flaps often remain closed. At highway speeds, your car is cutting through air at 60, 70, or 80 mph. All that air creates drag, which hurts fuel economy. By keeping the flaps closed, your Hyundai reduces aerodynamic drag. The car slips through the air more efficiently, saving fuel.
But here is where it gets smart. When the engine control unit (ECU) detects that coolant temperature is rising too high, or when you are sitting in traffic on a hot day, or when you are towing a trailer up a mountain pass, the flaps snap open. Fresh outside air rushes through the radiator, cooling the engine exactly when it needs it most.
This happens automatically, constantly adjusting based on engine temperature, vehicle speed, ambient temperature, and engine load. You never have to think about it. At least, not until that warning message appears.
The Components That Make It Work
The system consists of several key components working together. There is a motorized actuator that provides the power to move the flaps. This little motor receives commands from the ECU telling it when to open and close.
The flaps themselves are mounted on a hinge shaft that allows them to rotate between fully open and fully closed positions. Most Hyundai models have two separate sets of flaps: upper and lower. Some models have just one set. The exact configuration depends on your specific model and year.
Position sensors tell the ECU where the flaps currently are. Are they fully open? Fully closed? Somewhere in between? This feedback allows the system to verify that flaps actually moved when commanded.
Wiring harnesses and connectors link everything together, carrying power to the motors and sensor signals back to the ECU. Like any electrical system, these connections can corrode, come loose, or get damaged over time.
What Happens When the System Fails
When your active air flap system malfunctions, the flaps typically get stuck in one position or the other. Understanding the implications of each failure mode helps you assess urgency and plan your response.
Stuck Open: The Less Dangerous Scenario
If your flaps are stuck in the open position, your engine gets plenty of cooling air at all times. From an overheating standpoint, this is fine. Your engine will not overheat because it has constant airflow through the radiator.
The downsides are more subtle. Your fuel economy will decrease slightly because the car creates more aerodynamic drag. We are not talking about a massive difference here. You might see a drop of one or two mpg, depending on how much highway driving you do.
Your engine might also take longer to warm up on cold mornings. This can temporarily increase emissions and reduce efficiency during the warm-up period. Again, not a catastrophic problem, but not ideal either.
Stuck Closed: The Potentially Serious Problem
Flaps stuck in the closed position create a much more concerning situation. Your radiator is not getting adequate airflow, especially at low speeds or when idling.
At highway speeds, air pressure forces some airflow around and through the closed flaps, providing some cooling. But in slow traffic, sitting at stoplights, or idling in a parking lot, your engine might start to overheat.
Watch your temperature gauge closely if you suspect stuck-closed flaps. If the needle starts climbing into the hot zone, you need to address this immediately. Pull over, shut off the engine, and call for a tow if necessary. Overheating can cause catastrophic engine damage costing thousands to repair.
Real-world example: Tom from Arizona ignored his “Check Active Air Flap System” warning for two weeks during summer. His flaps were stuck closed. He was fine on his highway commute to work. But one Saturday, he got stuck in slow-moving traffic. His temperature gauge climbed into the red zone before he noticed. He pulled over immediately and avoided engine damage, but it was close. Do not be like Tom. Address stuck-closed flaps promptly, especially in hot climates.
Recognizing the Symptoms of a Failing System
The warning message itself is the most obvious symptom, but other signs can help you diagnose what is wrong before you even connect a scan tool.
The Dashboard Warning Message
Most Hyundai models display the message “Check Active Air Flap System” or something similar on the instrument cluster or information display. This message appears when the ECU detects a problem with the system.
The message might be accompanied by a check engine light or warning light. Different model years handle this differently, so do not panic if you see multiple warning lights together. They might all be related to the same issue.
Visible Flap Position
You can actually see the flaps on most Hyundai models if you look through the front grille. Park your car, turn it off, and peek through the grille openings. You should see the flap assemblies behind the grille.
With the engine off, the flaps should be in a neutral position. When you start the engine, you might see them move. Or if they are stuck, you will see them remaining motionless regardless of engine status.
Try this test: start the engine cold and watch the flaps. They should close or remain closed. After the engine warms up and you drive the car, watch them again. They should open when cooling is needed. If they never move, you have found your problem.
Decreased Fuel Economy
If your fuel economy has dropped noticeably and you are getting the active air flap warning, the two are probably related. Stuck-open flaps increase aerodynamic drag, reducing highway fuel economy.
Track your fuel economy over several fill-ups. If you normally get 32 mpg on the highway but suddenly you are seeing 29 or 30 mpg, and the warning message appeared around the same time, connect the dots.
Engine Temperature Fluctuations
Stuck-closed flaps can cause higher than normal engine temperatures, especially in slow traffic or hot weather. Your temperature gauge might creep higher than you are used to seeing.
Conversely, stuck-open flaps in cold weather might cause the engine to run cooler than normal. If your temperature gauge never seems to reach the middle of its range on cold days, suspect stuck-open flaps.
Diagnostic Trouble Codes
Connect an OBD-II scanner to your vehicle and you will likely see one or more of these codes stored in the ECU:
- U1008: Lost communication with radiator shutter (Active Air Flap). This code indicates the ECU cannot talk to the flap control module.
- P1235: Active air flap system fail. A general code indicating the system is not functioning properly.
- P059F: Active Grille Air Shutter “A” Performance/Stuck Off. This means the upper flaps are not responding correctly.
- P05B2: Active Grille Air Shutter “B” Control Circuit Range/Performance. This indicates issues with the lower flaps or their control circuit.
These codes give you a starting point for diagnosis. They tell you whether the problem is communication-related, mechanical, or electrical. A good scan tool will also show live data from the flap position sensors, letting you see in real-time whether the flaps are actually moving when commanded.
Why This System Fails: Common Causes
Active air flap systems fail for several reasons. Some causes are simple and cheap to fix. Others require part replacement. Let us walk through each common cause so you know what you might be dealing with.
Physical Obstructions and Debris
This is the simplest cause and the easiest fix. Leaves, plastic bags, sticks, ice, snow, or other debris can physically block the flaps from moving. The motor tries to move them, but they are jammed by something stuck in the mechanism.
I have seen everything from fast-food wrappers to small animals (unfortunately) wedged into active air flap assemblies. One memorable case involved a plastic shopping bag that got sucked into the grille at highway speed and wrapped around the flap mechanism like a cocoon.
Check for obstructions by looking through your grille. If you see anything that should not be there, carefully remove it. Sometimes you need to remove the grille for better access, but often you can fish debris out with a long screwdriver or wire hook.
Mechanical Failure of the Flaps or Actuator
The flaps themselves are plastic assemblies that live in a harsh environment. They face extreme temperatures, constant vibration, road salt, and impact from road debris. Over time, they can crack, break, or warp.
The hinge mechanism can wear out, causing binding or excessive play. The linkage connecting the motor to the flaps can break. I have seen hinge shafts snap cleanly in half on high-mileage vehicles.
The motorized actuator can also fail. These little motors work hard, cycling open and closed repeatedly over the life of the vehicle. Eventually, the internal gears strip, the motor burns out, or the position sensor inside the actuator fails.
Mechanical failures typically require part replacement. You cannot repair a cracked flap assembly or a motor with stripped gears. Replacement is the only option.
Electrical and Wiring Problems
The active air flap system relies on electrical power and data communication to function. When wiring or connectors fail, the system goes down even if all the mechanical components are perfect.
Corroded connectors are surprisingly common. The flap actuators live right behind the front bumper, fully exposed to road spray, salt, and moisture. Connector pins corrode, creating high resistance or complete loss of connection.
Wiring can also get damaged. Rodents chewing wires is a real issue, especially if you park outside or in areas with mice or rats. Impact damage from accidents or road debris can break wires. Even vibration over time can cause wires to flex and eventually break inside the insulation.
The U1008 trouble code specifically points to communication loss. If you see this code, suspect wiring or connector problems before assuming the actuator itself has failed.
Outdated or Corrupted Software
Modern vehicles are computers on wheels. The ECU controlling your active air flaps runs software, and like any software, it can have bugs or become corrupted.
Hyundai has released multiple Technical Service Bulletins (TSBs) addressing active air flap system software issues. These TSBs provide updated software that fixes known bugs and improves system performance.
If your Hyundai has never had the ECU software updated, there is a decent chance that a simple software flash at the dealer could solve your problem. This is especially true if the flaps physically move but the system still throws error codes.
Battery voltage issues during an ECU update can corrupt software. If someone attempted an update but the battery voltage dropped during the process, the software might be partially corrupted, causing glitches.
Faulty ECU or Control Module
In rare cases, the ECU itself develops faults. Internal components fail, solder joints crack, or the processor gets corrupted beyond what a software update can fix.
ECU failure is uncommon and should be your last suspect, not your first. Exhaust all other possibilities before concluding the ECU needs replacement. ECU replacement is expensive and requires programming to your specific vehicle.
Step-by-Step Diagnosis and Troubleshooting
Now that you understand the system and common failure modes, let us walk through a systematic diagnostic process. Follow these steps in order to efficiently identify your problem.
Step One: Visual Inspection for Obvious Problems
Start with the simplest checks. Pop your hood and look at your front grille area. Can you see anything obviously wrong? Debris stuck in the grille? Visible damage to the flap assemblies?
Get a flashlight and look through the grille openings. Examine the flap assemblies carefully. Are they intact? Do you see cracks, broken pieces, or bent components?
Check for obstructions. Remove any debris you find. Sometimes this alone solves the problem. After removing obstructions, start the engine and see if the warning clears and the flaps start functioning.
Look at the area around the flap actuators. Check for signs of impact damage, like dents or scratches on the bumper or components near the flaps. Even minor front-end impacts can damage these systems.
Step Two: Check Trouble Codes
Connect your OBD-II scanner and retrieve stored trouble codes. Write down the exact codes you find. Clear the codes and see if they immediately return or if they stay cleared.
If codes return immediately, you have an active, ongoing problem. If codes stay cleared for a while before returning, you might have an intermittent issue that only occurs under certain conditions.
Use your scan tool to view live data if it has that capability. Watch the flap position sensor readings. Command the flaps to open and close using the scan tool active test function if available. Do the position readings change when you command movement? Does physical movement match what the sensors report?
Step Three: Test the Electrical System
Verify that the actuator motors are receiving power. You will need a multimeter for this test. Locate the connectors for the active air flap actuators. They are usually on or near the actuator motors themselves.
Check for battery voltage at the connector with the key on. You should see approximately 12 volts on the power supply wire. No voltage means a wiring issue between the fuse box and the actuator.
Check the ground circuit. You should have good continuity to chassis ground with minimal resistance. High resistance or no continuity indicates a bad ground connection.
Inspect the connectors themselves. Look for corrosion on the pins. Green, white, or blue crusty buildup indicates corrosion. Clean corroded connectors with electrical contact cleaner and a small wire brush.
Check connector pin tension. Loose pins create intermittent connections. Gently tug on wires at the connector. They should not pull out easily. If a wire comes loose, the terminal needs to be replaced or tightened.
Step Four: Perform a Functional Test
With the engine running, watch the flaps while someone commands them to open and close using a scan tool. Do they move smoothly? Do they bind or struggle? Do you hear the motor running but see no movement?
Listen carefully to the actuator motor. A working motor makes a distinct whirring sound when operating. A grinding noise indicates mechanical binding or stripped gears. No sound at all suggests the motor is not receiving power or has failed electrically.
If the flaps move but slowly or with resistance, suspect mechanical wear or binding. If they do not move at all but the motor runs, the linkage has probably broken or disconnected.
Step Five: Check for Software Updates
Contact your Hyundai dealer service department with your VIN. Ask if any TSBs or software updates apply to your vehicle for the active air flap system. If updates exist and you have not had them installed, this might be your solution.
Software updates typically cost $100 to $200 at a dealer. Some dealers include this free with a paid service visit. Independent shops usually cannot perform manufacturer software updates as they require proprietary dealer equipment.
Fixing the Problem: Repair Methods
Once you have identified the cause, you can proceed with the appropriate repair. Let us cover each repair scenario.
Method One: Clearing Obstructions
If debris is blocking the flaps, carefully remove it. Do not force anything that could damage the flap mechanism. Use gentle pressure and work slowly.
For access to stubborn obstructions, you might need to remove the front grille. This varies by model but usually involves removing plastic clips and a few screws. Your owner’s manual might have instructions, or search online for your specific model year.
After clearing obstructions, test the system. Start the engine and let it run. Clear the trouble codes with your scan tool. Drive the vehicle and see if the warning returns. If the flaps now move freely and codes stay cleared, you solved the problem for free.
Method Two: Repairing Wiring and Connections
If you found corroded connectors, clean them thoroughly. Spray electrical contact cleaner into the connector and work it around. Use a small wire brush or pick to remove heavy corrosion from individual pins.
After cleaning, apply dielectric grease to the connector. This prevents future corrosion and ensures good electrical contact. Reconnect and verify proper connection.
For damaged wiring, repair or replace the affected section. Solder and heat shrink is the proper way to repair automotive wiring. Crimp connectors work too if done correctly. Never just twist wires together and wrap them with electrical tape. That creates resistance and will fail again.
If rodents chewed multiple areas of the harness, replacement is usually more reliable than trying to repair every damaged spot. Harness replacement is labor-intensive but ensures reliability.
Method Three: Replacing Failed Components
When mechanical components fail, replacement is necessary. Active air flap assemblies are sold as complete units in most cases. You cannot typically buy just the flap or just the hinge separately.
Replacement involves removing the front bumper cover on most Hyundai models. This is a job that requires patience and care to avoid breaking plastic clips. Have replacement clips on hand because you will probably break a few during removal.
Once the bumper is off, accessing the flap assemblies is straightforward. Disconnect the electrical connector, remove the mounting bolts, and take out the old assembly. Install the new assembly in reverse order.
Make sure the new assembly is properly aligned before tightening bolts. Misalignment causes binding and premature failure. Test the system before reinstalling the bumper cover to verify everything works.
Method Four: ECU Software Update
ECU updates must be performed at a dealer or shop with Hyundai dealer-level equipment. This is not a DIY job for most people.
Before the update, ensure your battery is fully charged. Connect a battery maintainer during the update process to prevent voltage drops. Low or fluctuating voltage during an update can corrupt the software, making problems worse instead of better.
The update process takes 30 minutes to an hour depending on what needs updating. Do not start the engine, turn off the ignition, or disconnect anything during the update. Let the process complete fully.
After the update completes, clear trouble codes and test drive the vehicle. Most software updates include improved diagnostic routines that more accurately detect actual problems versus false alarms.
Method Five: Clearing Codes and Testing
After completing any repair, clear all stored trouble codes using your scan tool. This gives you a clean slate to verify the repair worked.
Start the engine and let it idle. Watch for immediate code returns. If codes come back right away, the problem is not fixed. Go back to diagnosis.
If codes stay cleared, drive the vehicle through various conditions. Highway speeds, city driving, cold starts, hot weather. Give the system opportunities to fail if a problem still exists.
After several days of driving without the warning returning, you can be confident the repair was successful.
What This Repair Will Cost You
Repair costs vary dramatically depending on what is actually wrong. Let us break down realistic cost expectations for different scenarios.
Simple Fixes
Clearing debris or obstructions costs nothing if you do it yourself. Even at a shop, this should not exceed $50 to $100 for labor.
Cleaning corroded connectors runs $50 to $150 at a shop. Again, free if you do it yourself with a $10 can of contact cleaner.
Software updates at the dealer typically cost $100 to $200. Some dealers include this free if done during other paid service work.
Component Replacement Costs
| Repair | Parts Cost | Labor Cost | Total Cost |
|---|---|---|---|
| Upper air flap assembly | $150 – $350 | $200 – $400 | $350 – $750 |
| Lower air flap assembly | $150 – $350 | $200 – $400 | $350 – $750 |
| Both assemblies | $300 – $700 | $250 – $500 | $550 – $1,200 |
| Actuator motor only | $100 – $250 | $150 – $300 | $250 – $550 |
| Wiring harness repair | $50 – $200 | $150 – $400 | $200 – $600 |
| Diagnostic fee | N/A | $100 – $150 | $100 – $150 |
Labor costs depend heavily on your vehicle model and how difficult bumper removal is on that particular car. Some models have straightforward bumper removal. Others fight you every step of the way with hidden clips and tight clearances.
Dealer labor rates run higher than independent shops. Expect to pay $120 to $175 per hour at dealers versus $80 to $120 at independent shops. However, dealers have model-specific experience and proper diagnostic equipment.
Ways to Save Money
Get multiple quotes if component replacement is needed. Prices vary significantly between shops.
Consider aftermarket parts if available. Quality aftermarket flap assemblies cost less than OEM Hyundai parts and often come with warranties.
Do the diagnosis yourself if you have a scan tool and basic mechanical knowledge. This saves diagnostic fees.
Check if your Hyundai warranty covers this repair. Some model years have extended warranty coverage for active air flap system issues under specific TSBs.
If you are handy with tools, consider doing the repair yourself. Bumper removal looks intimidating but is actually not too difficult once you figure out where all the clips and bolts hide. Watch YouTube videos specific to your model year for guidance.
Can You Drive With This Warning?
This is one of the first questions everyone asks. Your check engine light is on, a warning message glares at you from the dash, and you need to know if your car is safe to drive.
The answer depends on which way the flaps are stuck and what driving conditions you face.
Driving With Stuck-Open Flaps
If your flaps are stuck open, driving is generally safe. Your engine gets plenty of cooling. The only downsides are slightly reduced fuel economy and slower engine warm-up.
You can continue driving while you schedule a repair appointment. Just be aware your fuel costs might be a bit higher until you get it fixed.
Driving With Stuck-Closed Flaps
Stuck-closed flaps require more caution. In cool weather with mostly highway driving, you might be fine. The high-speed airflow provides some cooling despite the closed flaps.
But in hot weather, stop-and-go traffic, towing, or any situation with reduced airflow, you risk overheating. Watch your temperature gauge constantly. If it starts climbing toward the hot zone, pull over immediately and shut off the engine.
Do not attempt long trips or highway driving in hot weather with stuck-closed flaps. The risk of overheating and engine damage is real and expensive.
Get stuck-closed flaps repaired promptly. This is not something to put off for months.
Preventing Future Active Air Flap Problems
Prevention is always cheaper than repair. These simple practices help keep your active air flap system working reliably.
Regular Visual Inspections
When you wash your car, take a minute to look through the front grille. Check for debris, damage, or anything that looks out of place. Catching problems early prevents bigger failures later.
Address Minor Front-End Damage Promptly
Even minor impacts to the front bumper can damage air flap components. If you back into something or hit a curb, check the flap system even if external damage looks minimal.
Keep Up With Software Updates
When you take your Hyundai in for service, ask if any software updates apply to your vehicle. Staying current with updates prevents software-related failures.
Protect Against Rodents
If you park outside or in areas with rodent activity, take preventive measures. Rodent deterrent sprays, ultrasonic repellers, or even dryer sheets in the engine bay can help. Check periodically for signs of rodent activity like chewed wires or nesting materials.
Understanding Hyundai Technical Service Bulletins
Hyundai has released several TSBs addressing active air flap system issues on various models. These bulletins provide dealers with specific diagnostic and repair procedures for known problems.
TSBs are not recalls. They do not require Hyundai to notify you or fix the problem for free unless your vehicle is still under warranty. But they are valuable diagnostic resources.
If you are experiencing active air flap problems, ask your dealer to check for applicable TSBs using your VIN. TSBs often include software updates, revised repair procedures, or improved replacement parts that solve problems the original parts had.
Some TSBs have associated extended warranty coverage. Hyundai might cover certain repairs beyond the standard warranty period if a TSB established a pattern of failures. Always ask about extended coverage before paying for repairs.
Real Stories From Other Hyundai Owners
Hearing how others dealt with this problem might help you tackle your own situation.
Sarah’s debris disaster: Sarah brought her 2017 Sonata to me with the active air flap warning. She had hit the warning message for weeks but ignored it because the car seemed to run fine. I found a plastic grocery bag completely wrapped around the lower flap assembly. Thirty minutes to remove the bag and test the system, and she was good to go. Total cost: $75 for my time. The lesson is that sometimes the fix is simple if you address it promptly.
Mike’s expensive lesson: Mike also ignored his warning for months. His flaps were stuck closed. On a hot summer day stuck in traffic, his engine overheated. He did not notice the temperature gauge climbing until steam started pouring from under the hood. The overheating warped his cylinder head. What could have been a $400 flap assembly replacement turned into a $3,500 head gasket and machine work nightmare. Do not be like Mike. Address stuck-closed flaps immediately.
Linda’s software solution: Linda’s 2016 Elantra had intermittent active air flap warnings. Sometimes they worked. Sometimes they did not. I diagnosed for an hour and could not find anything mechanically wrong. Checked for TSBs and found Hyundai had released a software update addressing false warnings. A $150 software flash solved her problem completely. The moral is to always check for TSBs before throwing parts at a problem.
Your Path to Getting This Fixed
The “Check Active Air Flap System” warning looks intimidating when it first appears. The name sounds complicated and expensive. But as you now understand, this system is relatively simple, and many problems have straightforward solutions.
Start with visual inspection and basic troubleshooting. Check for debris and obstructions. Look for obvious damage. Retrieve trouble codes to narrow down the problem. You might solve it yourself in your driveway with no cost beyond your time.
If basic troubleshooting does not reveal the problem, systematic diagnosis using proper tools and procedures will. Whether you do it yourself or take it to a professional, the diagnostic process is straightforward once you understand what to check.
Repairs range from free to expensive depending on what failed. Simple fixes like clearing debris or cleaning connectors cost nothing. Component replacement can run several hundred dollars. Either way, addressing the problem is cheaper than ignoring it and risking overheating damage.
Pay attention to which way your flaps are stuck. Stuck open is inconvenient. Stuck closed is potentially dangerous. Adjust your urgency accordingly.
Check for TSBs and warranty coverage before spending money. You might be entitled to free repairs or extended coverage you do not even know about.
Most importantly, do not panic. This is a fixable problem that rarely turns into a catastrophe if addressed with reasonable promptness. Your Hyundai will be back to running properly soon, and that annoying warning message will be nothing but a memory.