

Electrical gremlins in a Jeep Grand Cherokee can drive you absolutely crazy. Lights flickering for no reason, gauges jumping around, random stalling, a battery that keeps dying despite testing fine. You replace fuse after fuse, check every relay you can find, and nothing changes. Then someone tells you to check your ground wires, and suddenly everything makes sense.
Bad or corroded ground connections are behind more unexplained electrical problems in the Jeep Grand Cherokee than most owners ever realize. The ground wiring system is not complicated once you understand how it works and where everything connects. But when it fails, it can mimic symptoms that look like much more expensive problems, and plenty of owners have replaced perfectly good sensors, modules, and batteries chasing a problem that was just a bad ground connection all along.
This guide covers exactly where the ground wires are located, what happens when they fail, how to test them, and how to fix the problem properly.
Why Ground Wires Matter So Much in a Jeep Grand Cherokee
Before getting into the specific locations, it helps to understand what ground wires actually do and why they are so critical in a vehicle like the Grand Cherokee.
Every electrical circuit in your vehicle needs two things to work: a power supply and a return path back to the battery. The positive side of the circuit delivers power to the component. The ground wire or ground strap is the return path. Without a complete circuit, current cannot flow and the component does not work.
In a Jeep Grand Cherokee, the vehicle’s body, frame, and engine block all serve as part of the grounding system. Individual components ground to the nearest chassis point, and the chassis itself connects back to the negative terminal of the battery through the main ground straps. This system works brilliantly when all the connections are clean and tight. But when corrosion builds up, a bolt works loose, or a ground strap develops a break in the wire itself, the return path for electrical current becomes restricted or disappears entirely.
Here is what makes this tricky. A ground fault rarely kills a circuit completely. Instead, it usually creates increased resistance in the return path. Current still flows, but it struggles through the restricted connection. The result is voltage drops, erratic behavior, and sensor readings that do not make sense, because sensors operate on reference voltages and a ground fault changes those reference voltages in unpredictable ways.
The ECU and BCM, which rely on clean ground references to interpret sensor data correctly, go haywire when ground integrity is compromised. They start throwing codes for sensors, modules, and components that are actually fine. That is why chasing ground wire problems with a parts cannon is so expensive and so futile.
Where the Ground Wires Are Located on a Jeep Grand Cherokee
The Jeep Grand Cherokee has multiple ground connection points throughout the vehicle. The exact count and locations vary between model years, from the ZJ generation through the WK2 and beyond, but the general layout follows the same principles across all generations.
The Battery Negative Terminal
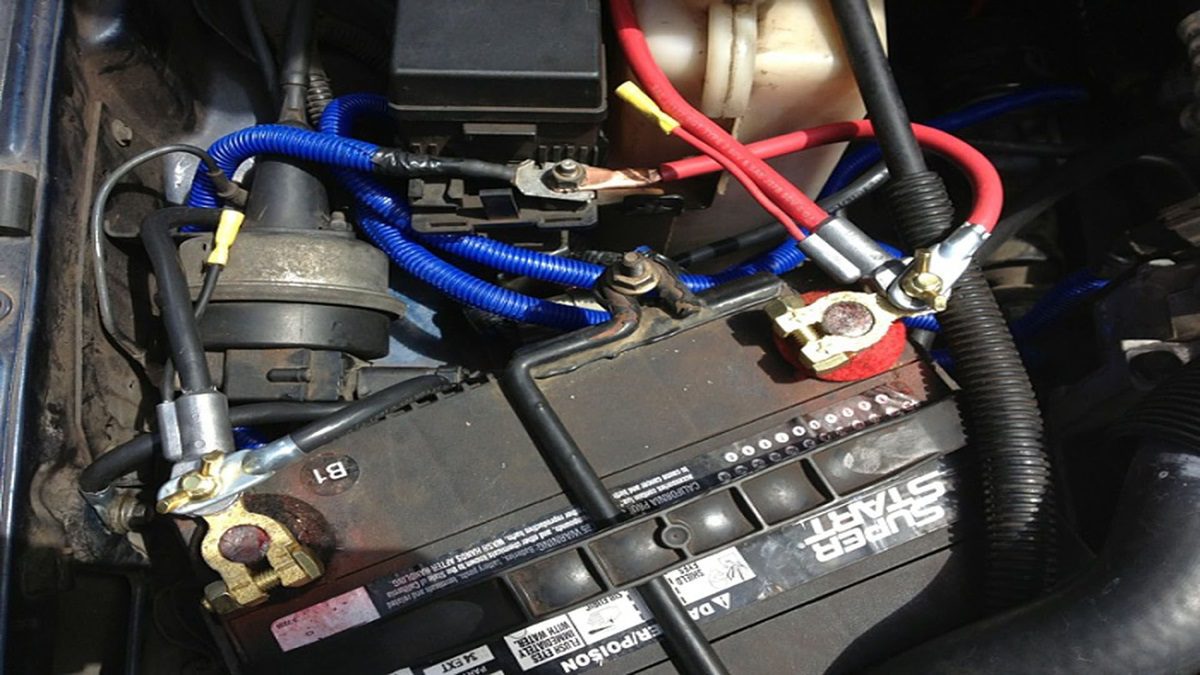
This is the starting point of the entire ground system. The battery’s negative terminal connects to both the engine block and the chassis through short, heavy-gauge cables. These are your main ground straps, and they carry the bulk of the current from the entire vehicle’s electrical system back to the battery.
On most Grand Cherokee generations, there are two main straps coming off the negative terminal. One goes to the engine block and one goes to the chassis near the battery tray. The chassis strap is typically a short, flat braided cable rather than a round wire. Inspect both for corrosion where they bolt to their respective mounting points.
The Engine Block Ground
The engine block ground is one of the most important ground connections in the vehicle because the engine has so many electrically controlled components: ignition coils, injectors, sensors, and the starter motor all rely on a clean ground path through the engine block. The connection typically runs from the negative battery terminal to a bolt on the engine block, often near the front of the engine on the driver’s side.
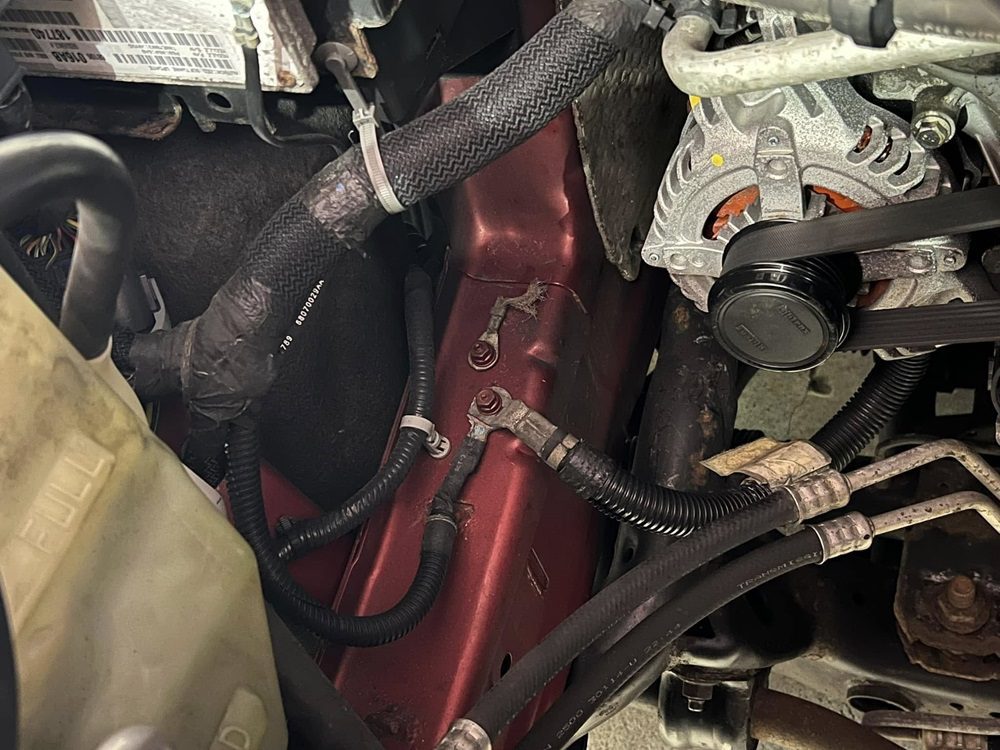
On some Grand Cherokee models, there is also a ground strap connecting the engine block back to the firewall, creating an additional return path for engine-related electrical components. This strap is worth inspecting, particularly on higher-mileage vehicles, because it tends to get forgotten during routine maintenance.
The Firewall Ground Points
The firewall, which is the metal barrier between the engine bay and the passenger cabin, serves as a major ground distribution point on the Grand Cherokee. Multiple ground wires from interior components, including the instrument cluster, body control module, HVAC controls, and interior lighting systems, connect back to ground points on the firewall.
On the engine side of the firewall, you will typically find ground connections for engine management components and sensors. On the interior side, these ground points serve the cabin electronics. The firewall ground connections on the driver’s side are particularly worth inspecting when you are chasing instrument cluster or BCM-related electrical issues.
The Chassis Ground Points
The chassis serves as the main ground bus for the vehicle. Ground wires from components throughout the vehicle connect to chassis ground points, and the chassis itself is connected back to the battery negative terminal through the main battery-to-chassis ground strap.
On the right side frame rail, roughly halfway between the radiator support and the firewall, there are ground straps for body-related systems. These are easy to overlook because they are not immediately visible without getting under the vehicle.
The Driver’s Side Chassis Ground
On the driver’s side of the engine compartment, near where the wiring harness routes from the engine area toward the chassis, there are typically one or more ground points where the main wiring harness grounds connect to the chassis or the inner fender. These are critical connection points because they serve a large number of circuits simultaneously.
The harness ground points on the driver’s side are a known trouble spot on higher-mileage Grand Cherokees, particularly in areas that see significant moisture and road salt exposure. Corrosion at these points can affect multiple systems simultaneously, which is why a single corroded chassis ground can produce seemingly unrelated symptoms across the vehicle.
Additional Grounds Near the Dipstick and Engine Accessories
On certain Grand Cherokee model years, there is a ground connection near the engine dipstick bolt. This connection serves components in that area of the engine bay and is a relatively common failure point because it is exposed and easy to disturb during routine maintenance like oil changes. If someone has done work in that area and did not retighten the ground connection afterward, you can end up with electrical issues that seem completely unrelated to any recent work.
How Ground Wires Connect to Key Systems
The Fuel System
The fuel pump is one of the highest-current-draw components in the fuel system, and it gets its ground reference through the PCM via the fuel pump relay. When ground integrity to the PCM is compromised, fuel pump control can become erratic. This can manifest as hard starting, stalling at idle, or the engine cutting out under load, all of which look identical to a failing fuel pump. A bad ground has sent more than a few fuel pumps to the recycling bin when they were working perfectly fine.
Power Windows
Power windows in the Grand Cherokee get their ground through connections that link the window motors to the chassis ground system. A window that operates sluggishly or stops working entirely, especially when other windows continue working, is sometimes a ground issue at the motor or in the door wiring rather than a failed motor or switch.
Dashboard Gauges
The instrument cluster gauges operate on reference voltages that depend on clean grounding. When a ground connection degrades, the reference voltage shifts, and the gauge reads incorrectly. A fuel gauge that reads empty when the tank is full, a temperature gauge that spikes to hot and then drops back, or a speedometer that reads incorrectly are all classic signs of a ground issue affecting the instrument cluster circuit, not necessarily a failed sender unit or a failing gauge cluster.
The BCM and ECU
The Body Control Module and Engine Control Unit are the most sensitive components in terms of ground quality. They operate on precise reference voltages and interpret sensor signals that are only microvolts in amplitude in some cases. Any noise or voltage offset introduced by a poor ground connection corrupts those readings and can cause the modules to log fault codes, make incorrect decisions, or fail to communicate with each other properly.
If you are getting a strange mix of fault codes across multiple systems, especially codes that do not point to any obvious single cause, check grounds before replacing anything. A bad ground serving a shared chassis ground point can log codes in the BCM, ECU, transmission control module, and ABS module all at the same time.
Symptoms of a Bad Ground Wire on a Jeep Grand Cherokee
Knowing what to look for is half the battle. Here is a breakdown of the most common symptoms and what they suggest about which ground connection might be failing.
Dead or Repeatedly Failing Battery
A corroded or loose main ground strap between the battery and the chassis or engine block creates resistance in the primary return path. The charging system compensates by working harder, the battery never fully recovers its charge, and you end up with what appears to be a dead battery. You replace the battery, and the same thing happens again three months later.
Before replacing any battery more than once in a short period, check the main ground straps first. Look at the bolt contact surfaces where the straps attach to the engine block and chassis. If there is white or greenish corrosion at those contact points, that is resistance in the ground path and it is killing your batteries.
Erratic or Inaccurate Dashboard Gauges
Gauges that jump around, read incorrectly, or peg to their maximum or minimum reading are classic symptoms of a ground fault affecting the instrument cluster or the sensors that feed it. The fuel gauge and temperature gauge are particularly prone to this because their sender units use variable resistance and are very sensitive to ground quality.
Flickering or Dimming Lights
Lights that flicker, dim unexpectedly, or cycle in brightness while other electrical loads are active are pointing to a ground that cannot carry the return current cleanly. Headlights that dim when you turn on the blower motor, interior lights that flicker when you use the power windows, or brake lights that flicker when the hazards are on are all symptoms of ground current finding its way back through unintended paths because the proper ground path has too much resistance.
Poor Engine Performance or Stalling
When engine management sensors are affected by a ground fault, the ECU starts making fueling and ignition decisions based on bad data. The result can be rough idle, hesitation under acceleration, poor fuel economy, and random stalling. These symptoms can come and go with temperature changes, because corrosion resistance changes with heat and humidity, which is another hallmark of a ground problem versus an actual failed sensor.
Random Fault Codes That Keep Coming Back
If you are clearing codes and the same ones return without any clear mechanical cause, or if you are getting codes across multiple unrelated systems simultaneously, a shared ground fault is a very likely explanation. The codes are real, but the components they accuse are innocent. The actual fault is in the ground path they share.
How to Test Ground Wires on a Jeep Grand Cherokee
You do not need specialized equipment to test ground wires. A basic digital multimeter handles this job effectively.
The Voltage Drop Test
The voltage drop test is the definitive way to find a bad ground connection. It measures the actual resistance in a ground path under load, which is something a simple resistance test cannot do accurately because resistance in a corroded connection changes depending on whether current is flowing through it.
- Set your multimeter to DC voltage, 2-volt scale if available.
- Connect the positive lead of the multimeter to the battery’s negative terminal.
- Connect the negative lead of the multimeter to the ground bolt or ground strap end you want to test.
- Start the vehicle and turn on a significant electrical load, such as the headlights and the blower motor simultaneously.
- Read the voltage displayed on the meter. A good ground connection should show less than 0.1 volts of drop. Anything above 0.2 volts indicates a problem in that ground path. A reading above 0.5 volts means the connection is significantly compromised.
Test each main ground strap and each chassis ground point this way. The one showing the highest voltage drop is where you need to focus your repair effort.
The Visual and Physical Inspection
Sometimes the problem is obvious if you know what to look for.
- Look for white, green, or gray powdery corrosion at the contact surfaces where ground wires bolt to metal surfaces.
- Check for ground cables that have darkened or discolored insulation, which indicates the wire has been overheating from carrying too much current through a restricted connection.
- Physically tug on each ground strap to feel for looseness. A properly torqued ground connection should not move at all.
- Inspect the wire itself for any breaks, fraying, or sections where the outer insulation has worn through and the wire has been making unintended contact with metal surfaces.
How to Fix a Bad Ground Wire on a Jeep Grand Cherokee
Once you have identified a problem ground connection, the repair process is straightforward but requires doing it properly. A rushed ground repair that just tightens the bolt without cleaning the surfaces will fail again quickly.
- Disconnect the negative battery terminal first. Always do this before working on any electrical connection. It prevents accidental short circuits while you are working.
- Remove the ground strap or wire from its mounting point. Depending on the connection, this is usually a bolt that you loosen and remove with a wrench or socket. Keep track of the bolt size and thread pitch so you can reinstall correctly.
- Inspect the wire and terminal. Look at the terminal end of the wire, the circular ring that the bolt passes through. If the terminal is heavily corroded, cracked, or the wire strands inside are corroded and stiff, the wire should be replaced entirely rather than just cleaned. A compromised wire will fail again quickly even if the surface contact looks good after cleaning.
- Clean the contact surface on the chassis or engine block. Use a wire brush or 80-grit sandpaper to remove all corrosion, paint, and oxidation from the area where the terminal contacts the metal surface. You are trying to expose bare, shiny metal. The terminal and the mounting surface must both be clean bare metal for a reliable connection.
- Clean the terminal itself. Use a wire brush, sandpaper, or a terminal cleaning tool to clean the inside and outside of the ring terminal.
- Apply dielectric grease to the cleaned surfaces. This does two things: it improves electrical contact by filling microscopic surface irregularities, and it creates a moisture barrier that slows future corrosion. Apply a thin layer to both the terminal and the contact surface.
- Reposition the terminal and tighten the bolt. Make sure the terminal is flat against the mounting surface with good metal-to-metal contact all the way around the ring. Tighten the bolt snugly. The correct torque is typically 10 to 15 ft-lbs for most chassis ground connections, but do not use a torque wrench as a substitute for judgment here. Snug and firm without stripping the threads is the target.
- Reconnect the battery and test. Start the vehicle and check whether the symptoms have cleared. Run the voltage drop test again on the repaired connection to confirm the reading is now below 0.1 volts.
Watch the video below for a visual walkthrough of locating and servicing ground connections on a Grand Cherokee:
When to Add a Ground Wire Instead of Just Cleaning
Some Jeep Grand Cherokee owners, particularly those who have been dealing with persistent electrical issues despite cleaning existing grounds, find that adding supplemental ground wires resolves problems that cleaning alone did not fix. This is especially common on higher-mileage vehicles where the original ground strap wires have developed internal corrosion that cleaning the terminal ends cannot address.
A supplemental ground involves running a new wire from a known-good chassis ground point directly to the component or module that is experiencing issues, or to a central distribution point. Use wire of at least the same gauge as the original, preferably one gauge heavier for a more robust connection. Terminate both ends with proper ring terminals that are crimped and soldered rather than just crimped, and route the wire away from heat sources and moving components.
If you have cleaned all existing grounds and still have unexplained electrical issues on a higher-mileage Grand Cherokee, adding a supplemental ground from the engine block to the firewall and another from the firewall to the chassis is a common first step that many experienced Jeep owners recommend.
Quick Reference: Ground Wire Locations on the Jeep Grand Cherokee
| Ground Connection Point | What It Serves | Common Failure Signs |
|---|---|---|
| Battery negative to engine block | Engine electrical systems, starter | Hard starting, stalling, engine codes |
| Battery negative to chassis | Entire vehicle electrical system | Multiple system faults, dead battery |
| Engine block to firewall | Engine management and chassis | ECU codes, sensor faults |
| Firewall driver’s side (interior) | BCM, instrument cluster, interior electronics | Erratic gauges, BCM codes, interior electrical faults |
| Right frame rail ground straps | Body and chassis electronics | Lighting issues, body system faults |
| Driver’s side wiring harness chassis grounds | Multiple engine bay circuits | Random multi-system faults, sensor codes |
| Near dipstick area | Engine bay components in that zone | Isolated faults in nearby components |
Frequently Asked Questions About Jeep Grand Cherokee Ground Wires
How do I know if my Jeep has a ground wire problem rather than a failed component?
The clearest signs are multiple unrelated symptoms appearing simultaneously, symptoms that come and go without a clear pattern, symptoms that change with temperature or humidity, and fault codes that return immediately after being cleared even though no component was replaced. Any one of these on its own might point to a failed component. All of them together almost always point to a ground fault.
Can a bad ground cause the check engine light to come on?
Yes, absolutely. A ground fault affecting the ECU reference voltage or any sensor circuit can cause the ECU to log fault codes and illuminate the check engine light. Common codes that appear from ground faults include sensor range codes, circuit low voltage codes, and communication fault codes between modules. These codes clear after fixing the ground and will not return if the ground was the actual cause.
How often should I inspect the ground connections on my Grand Cherokee?
Adding a ground inspection to your annual maintenance routine is a good practice, particularly on vehicles driven in climates with road salt. High-mileage Grand Cherokees, especially those over 100,000 miles, benefit from a thorough ground inspection every two to three years regardless of whether symptoms are present. Prevention is significantly cheaper than chasing electrical gremlins after the fact.
Does the model year affect where the grounds are located?
Yes, the exact location and number of ground points varies between Grand Cherokee generations. The ZJ (1993-1998), WJ (1999-2004), WK (2005-2010), WK2 (2011-2021), and current generation all have different wiring layouts. The general principles are the same across all of them, but the specific bolt locations and routing differ. For model-specific diagrams, resources like AutoZone’s repair guides and Jeep enthusiast forums provide generation-specific ground location information.
The Cheapest Diagnostic Step You Can Take on Any Electrical Problem
Before spending money on sensors, modules, relays, or batteries to fix a Jeep Grand Cherokee electrical problem, spend an afternoon cleaning and inspecting every ground connection you can find. It costs nothing but a couple hours and some sandpaper. The number of owners who have fixed weeks or months of electrical frustration with nothing more than a wire brush and a wrench is significant.
Ground wires are the most overlooked part of any vehicle’s electrical system because they are not glamorous, they are not expensive, and they are not something most people think about during routine maintenance. But they are foundational. Everything else in the electrical system depends on them working correctly.
If your Grand Cherokee is doing things it should not be doing and nothing you have tried has fixed it, the grounds have not been checked yet. That is where to look next.