
You hop into the driver’s seat, turn the key or press the Start button, and listen to the starter motor spin the engine over strong and fast: rrr-rrr-rrr-rrr-rrr. The battery clearly has plenty of juice, the dashboard lights up like normal, and you know you put half a tank of gas in yesterday, yet the engine refuses to start. After fifteen years of diagnosing “crank, no-start” cars in the shop, I can tell you that when an engine has good compression and strong spark but acts completely dead, nine times out of ten the electric fuel pump in the tank isn’t spinning.
Here is where car owners (and plenty of hasty mechanics) waste hundreds of dollars: they immediately assume the fuel pump itself is dead, pay $850 to drop the gas tank and install a brand-new pump, turn the key, and the car still won’t start! Why? Because the old fuel pump wasn’t broken at all, it simply wasn’t getting 12-volt electrical power (or a clean chassis ground) to turn its motor on.
Before you crawl under the back of your car with floor jacks and fuel line disconnects, you need to know how power travels from your battery to the gas tank, what cuts that voltage off, and how to test the circuit in ten minutes. Let’s walk through how mechanical and electric fuel pumps work, the seven real reasons a fuel pump loses power, how to test and safely energize your pump from under the hood, and what each fix actually costs.
What a fuel pump does (and mechanical vs. electric fuel pumps explained)
At its core, a fuel pump has one job: it draws liquid fuel out of the storage tank at the back of the vehicle and pushes it forward through the fuel lines and filter to the engine’s fuel injectors (or carburetor on a classic car) at the exact flow rate and pressure the engine needs to run. Without steady fuel pressure waiting behind the injectors, opening an injector nozzle achieves nothing, and the cylinders starve for fuel.
Depending on the age and design of your engine, automotive fuel systems use two main types of fuel pumps: mechanical fuel pumps and electric fuel pumps. While both move gasoline from the tank to the engine, they operate completely differently.
1. Mechanical fuel pumps (classic engines and modern GDI high-pressure pumps)
If you open the hood of an older carbureted car, classic pickup truck, or vintage V8 built before the late 1980s, you will usually find a mechanical diaphragm fuel pump bolted directly to the side of the engine block. It has zero wires attached to it. Instead, a lever arm sticks out of the pump into the engine block and rides against an eccentric lobe on the engine’s camshaft (or an intermediate shaft near the distributor). As the camshaft spins, it rocks the lever arm up and down, pulling a rubber diaphragm back to suck fuel from the tank and pushing it forward at a gentle 4 to 7 PSI into the carburetor float bowl.
Interestingly, mechanical fuel pumps made a huge comeback on modern Gasoline Direct Injection (GDI) engines! However, on a modern direct-injection car, that camshaft-driven high-pressure mechanical pump on top of the engine (which boosts fuel pressure to 1,500 to 3,000+ PSI) cannot suck fuel all the way from the rear gas tank by itself. It still relies on an electric low-pressure “lift” pump inside the fuel tank to feed it 50 to 75 PSI of liquid fuel first.
2. Electric fuel pumps (how the internal motor and cover assembly work)
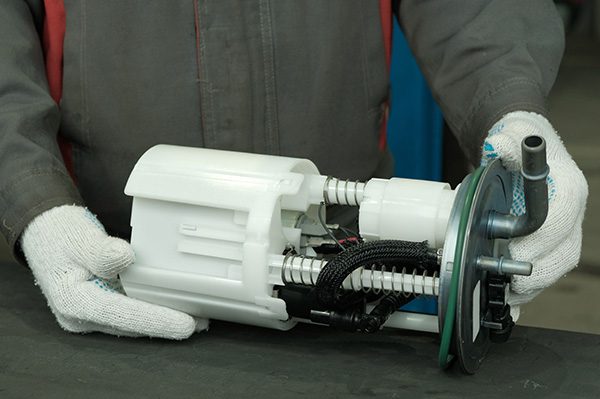
On almost every fuel-injected car, truck, and SUV built since the late 1980s, the primary fuel pump is an electric fuel pump submerged right inside the fuel tank as part of the fuel pump module (or fuel sender assembly). Why put an electrical motor inside a tank full of liquid gasoline? Because liquid gasoline with zero oxygen vapor inside the submerged pump housing cannot ignite, and the cool fuel flowing directly through the electric pump motor carries away heat and lubricates the spinning impeller!
If you dissect a modern electric fuel pump cartridge, it is divided into three main sections:
- The pump section (impeller or roller-cell chamber): At the bottom intake sits a mesh strainer sock that blocks rust and dirt. Just above it, a spinning turbine impeller or positive-displacement roller-cell rotor draws fuel in and pressurizes it to 35 to 65+ PSI.
- The electric DC motor section: In the middle sits a permanent-magnet direct-current (DC) armature that spins at 3,000 to 7,000 RPM whenever electrical current flows through its copper windings.
- The top cover and electrical connection head: The cover section at the top of the pump houses the electrical terminal pins, the internal carbon brushes that ride against the motor’s spinning copper commutator, radio-frequency interference suppression chokes/capacitors (so the spinning pump doesn’t create static buzzing on your car radio or sensor wires), and a spring-loaded one-way check valve at the hydraulic outlet. That check valve traps pressurized fuel inside the fuel line when you shut the engine off so the car starts immediately the next morning.
How your car sends power to the fuel pump (and the 3-second prime trap!)
Because an electric fuel pump can draw anywhere from 4 to 12 amps of continuous electrical current (and up to 15 to 20 amps under heavy turbo boost), your car’s delicate ignition switch and engine computer (PCM or ECU) cannot feed that much amperage to the pump directly without melting their internal circuit boards. Instead, your car uses a two-stage relay or driver circuit to power the fuel pump.
Here is the exact chain of events that happens every single time you put the key in the ignition (or press the Start button) to start your car:
- Key ON (The 2-to-3-Second Prime): The instant you turn the ignition key to the ON/RUN position (before you even crank the starter), the Powertrain Control Module (PCM) wakes up and switches on the fuel pump relay for roughly 2 to 3 seconds. High-amperage 12-volt battery power flows through the fuel pump fuse, across the closed contacts of the fuel pump relay, down the wiring harness (often through an inertia crash switch or fuel pump driver module), and into the fuel pump cover terminals. The pump hums for three seconds, pressurizes the fuel rail up to operating pressure, and makes it effortless to turn the key and go.
- Safety Shutoff if You Don’t Crank: Here is the trap that tricks thousands of DIYers every weekend! If you turn the key to ON and leave it sitting there without cranking the engine, the PCM intentionally shuts the fuel pump relay OFF after 2 to 3 seconds! Why? Because if you were knocked unconscious in a car wreck with the ignition key still in the ON position and a ruptured fuel line under the hood, you wouldn’t want the electric fuel pump spraying gallons of gasoline onto a hot exhaust manifold!
- Continuous Power During Cranking and Running: Once you turn the key to START (or the starter begins spinning the engine), the PCM watches the signal from the Crankshaft Position Sensor (CKP). The moment the PCM sees the crankshaft spinning at 150+ RPM, it re-energizes the fuel pump relay (or commands the Fuel Pump Driver Module on) and keeps the fuel pump powered continuously until you turn the engine off.
Mechanic’s tip: Because of that 3-second safety timer, if you turn your ignition key to ON in the driver’s seat and then take forty-five seconds to walk around to the trunk and touch a multimeter to the fuel pump plug, you will always read 0.0 volts, even on a brand-new, perfectly working car! To test for fuel pump power accurately, you must either have a helper cycle the key from OFF to ON while you watch the meter during that 3-second window, or test while cranking the engine!
| Fuel Pump Power Component | Where It Usually Lives | What Job It Does in the Circuit | What Happens When It Fails |
|---|---|---|---|
| Fuel Pump Fuse (15A to 25A) | Under-hood fuse box (IPDM / PDC / TIPM) or interior dash fuse block | Protects the wiring harness from melting if the pump motor shorts out | Complete, permanent loss of 12V power to the fuel pump |
| Fuel Pump Relay (or PGM-FI Main Relay) | Under-hood relay box (or under dash on older Hondas/Acuras; soldered inside TIPM on Chrysler/Jeep/Dodge) | Heavy-duty magnetic switch triggered by the PCM to send 12V battery power to the tank | Intermittent hot no-starts, or dead pump with zero click at key-ON |
| Inertia Fuel Shutoff Switch | Passenger kick panel, trunk side trim, or behind glovebox (common on Ford, Mazda, Lincoln, Rover) | Pops open mechanically during a collision or hard pothole hit to cut fuel pump power | Sudden loss of pump power after hitting a pothole, curb, or slamming the trunk |
| Fuel Pump Driver Module (FPDM / EKPS / FPC) | Frame crossmember above spare tire (Ford trucks), rear quarter panel, or trunk wall | Varies voltage/PWM duty cycle to run the fuel pump at variable speeds based on engine demand | Corroded aluminum housing or burnt board cuts power between relay and pump (`P025A` / `U0109`) |
| Top-of-Tank Harness Connector & Frame Ground | Top of the gas tank sender hat and rear chassis frame rail (`G401` / rear body ground) | Delivers positive 12V current into the pump and returns current to the vehicle frame | Melted terminal pin or rusted frame ground stops pump from spinning even when relay works |
Why the fuel pump isn’t getting power: the 7 real-world causes
When your car cranks without starting, or stalls out dead in traffic because the fuel pump quit drawing gasoline from the tank, and your test light confirms no electricity is reaching the pump motor, the break in the chain is always upstream. Let’s look at the seven exact causes we find in the shop, ranked from the easiest 5-minute fixes to the trickiest hidden failures.
1. A blown fuel pump fuse (and why you should ask what blew it!)
The simplest reason your fuel pump gets zero power is a blown automotive blade fuse (usually rated at 15, 20, or 25 amps and labeled `FUEL PUMP`, `F/PMP`, `FP`, or `EFI` inside the under-hood fuse box lid). Inside a fuse is a thin calibrated strip of zinc or copper alloy designed to melt and break the circuit if amperage exceeds its rating.
Here is what ten years in the bays teaches you about fuses: fuses do not get “tired” and blow for no reason! When a 20-amp fuel pump fuse pops, one of two things caused it:
- An aging, worn-out fuel pump motor drawing excessive amperage: As the carbon brushes and commutator bars inside an old electric fuel pump wear down (or as a clogged fuel filter forces the pump to push against a blockage), the electric motor works harder and harder, pulling 16, 18, or 22 amps until the fuse finally melts.
- A chafed positive wire shorting to bare metal: If the fuel pump power wire rubs through its plastic insulation against a sharp heat shield or frame bracket under the car, it shorts directly to ground and pops the fuse the instant the relay clicks on.
2. A bad fuel pump relay (or a notorious soldered-in TIPM / Main Relay failure)
Right next to the fuel pump fuse in your under-hood power distribution center sits the fuel pump relay. Inside a standard 4-pin or 5-pin plug-in relay is a small electromagnet coil (Pins 85 and 86) controlled by the engine computer, and a heavy spring-loaded copper switch contact (Pins 30 and 87) that sends 12-volt battery power back to the fuel pump.
Every single time you start and shut off your car, those internal copper contacts snap together and pull apart under a heavy electrical load, creating a tiny spark (arc). After five to ten years and thousands of heat cycles, those contacts become pitted, blackened with carbon, or welded open, or the solder joints holding the relay pins to the circuit board crack from heat expansion. Even worse, on several popular vehicle families, the fuel pump relay is a known weak spot:
- 2007 to 2016 Chrysler, Dodge, Jeep, and Ram vehicles (TIPM 7 Fuel Pump Relay): On Grand Caravans, Town & Country minivans, Jeep Grand Cherokees, Wranglers, and Ram trucks, the fuel pump relay isn’t a $15 plug-in cube you can pull out with your fingers! Instead, it is a miniature relay soldered directly onto an internal circuit board inside the $900+ Totally Integrated Power Module (TIPM) fuse box. When that tiny internal relay burns out, the fuel pump either gets zero power on startup or stays stuck ON after you park the car until it drains the battery dead!
- 1990s to mid-2000s Honda and Acura models (PGM-FI Main Relay): Tucked under the dashboard near the steering column or glovebox, the grey/brown PGM-FI Main Relay develops microscopic circular cracks in its lead-free solder joints. The car starts fine on a cool morning, but if you park at the grocery store on a hot summer afternoon with the cabin baking in the sun, the cracked solder joint expands, separates, and cuts power to the fuel pump until the cabin cools down!
- GM, Ford, Toyota, and Nissan micro-relays: Moisture intrusion or contact pitting inside the under-hood relay box causes the relay to click audibly (meaning the magnet coil works), yet pass 0 volts across the burned load contacts on Pin 87.
3. A tripped inertia fuel shutoff switch (the 30-second button check!)
Before you buy a single tool or replacement part on a Ford, Lincoln, Mercury, Mazda, Jaguar, Land Rover, or certain Honda/Fiat models, check the inertia fuel shutoff switch! An inertia switch is a mechanical safety device wired directly in series with the 12-volt power wire going to the fuel pump. Inside the switch sits a heavy steel ball held in a funnel-shaped pocket by a permanent magnet.
If the car gets into a collision, the sudden impact jolts the steel ball loose from the magnet, kicking a spring-loaded plunger upward that breaks the electrical circuit and cuts power to the fuel pump instantly. Here is the catch: you don’t need a major car crash to trip an inertia switch! I have rescued dozens of stranded drivers whose fuel pumps lost power after they hit a deep pothole at 45 mph, backed over a concrete parking curb, had their tire shop drop the car a little too fast off the floor jack, or tossed a heavy toolbox into the trunk against the side carpet panel.
On most cars equipped with one, the inertia switch has a red or black rubber button on top. You simply reach behind the front passenger kick panel (right by the passenger’s right foot) or behind the trunk side carpet trim, feel the top of the switch, and press the button firmly straight down until it clicks. Just like that, 12-volt power returns to your fuel pump for $0!
4. A failed or corroded Fuel Pump Driver Module (FPDM / FPC / EKPS)
On older cars, the fuel pump ran at 100% full speed whenever the engine was on, and a mechanical bypass regulator sent unused fuel back to the tank through a return line. To save fuel and reduce evaporative emissions, most vehicles built since the mid-2000s use a returnless electronic fuel system managed by a dedicated Fuel Pump Driver Module (FPDM), also called a Fuel Pump Control Module (FPCM) on GM and VW/Audi vehicles, or an EKPS module on BMWs.
Instead of feeding raw, constant 12V power straight from the relay to the pump, the relay feeds 12V power into the Fuel Pump Driver Module, and the module pulses power to the fuel pump using Pulse-Width Modulation (PWM) so the pump spins slowly at idle and ramps up to 100% under hard acceleration. When the FPDM fails, the fuel pump gets zero power even though your under-hood fuse and relay are 100% healthy! You can check if your vehicle’s fuel pump control module is covered by an active safety recall on the NHTSA recall lookup database.
A classic example we see every single month in the shop is the 2004 to 2008 Ford F-150, Expedition, Lincoln Navigator, and Mustang. Ford bolted the bare cast-aluminum backplate of the Fuel Pump Driver Module directly against the painted steel frame crossmember right above the spare tire under the rear of the truck. Road salt, mud, and water get trapped between the aluminum module housing and the steel crossmember, causing severe galvanic corrosion that eats a jagged hole right through the back of the aluminum module! Water pours onto the circuit board, shorts out the driver transistors, and leaves the truck with a dead fuel pump (often triggering code `P1233` or `P025A`).
5. Broken, chafed, or melted wiring, and rusted chassis ground straps!
Electrical current has to travel all the way from the front fuse box to the rear fuel tank,often routed along the underside of the floorpan or inside the dusty frame rail where rocks, road salt, winter slush, and rodents love to attack it. Even more common than a broken wire in the middle of the harness are two specific failure points right at the back of the car:
- Melted or corroded pins inside the top-of-tank connector plug: Because the top of the fuel tank sits in a pocket that collects wet mud and road salt, moisture creeps past the rubber weatherpack seal of the electrical connector plugged into the fuel pump module hat. As tiny amounts of corrosion build up on the positive power pin or ground pin, electrical resistance rises. High resistance + 10 amps of continuous pump current = extreme heat! The terminal pin gets so hot that it melts the surrounding plastic socket, burns the metal pin black, and breaks contact completely.
- A rusted or broken fuel pump ground path (`G401` / frame ground): Electricity flows in a complete loop. You can have 12.6 volts of positive battery power sitting at the fuel pump’s positive wire all day long, but if the black ground wire coming out of the fuel pump cannot return that current to the negative battery terminal through the vehicle frame, the fuel pump motor will not spin a single turn! On pickup trucks and SUVs in northern salt states, the small 10mm bolt attaching the fuel pump ground eyelet to the rear frame rail rusts until it loses metallic contact with the frame.
6. A dead Crankshaft Position Sensor (CKP) or active security immobilizer lockout
What if your fuel pump hums for 2 seconds when you first turn the key to ON, but the moment you start cranking the engine, power to the fuel pump disappears completely? Or what if there is zero power at the pump, yet when you test the fuse, the relay, and the wiring harness from front to back, every single wire and relay tests good?
Remember how the PCM controls the fuel pump relay: after that initial 3-second key-ON prime, the PCM will only turn the fuel pump relay back ON if it receives a valid engine RPM signal from the Crankshaft Position Sensor (CKP) while cranking! If your crankshaft position sensor has failed internally (a super common failure on Nissan, Hyundai/Kia, Jeep, BMW, and Mercedes engines), the PCM thinks the engine isn’t turning, so it refuses to ground the fuel pump relay coil during cranking. Similarly, if your car’s anti-theft immobilizer system (such as a flashing key/padlock light on the dashboard) does not recognize the transponder chip inside your ignition key, the security module inhibits the PCM from energizing the fuel pump and injectors.
7. A faulty ECU / PCM fuel pump relay driver circuit
Finally, the Engine Control Unit (ECU) or Powertrain Control Module (PCM) itself is the brain that commands the fuel pump relay to close by switching on an internal low-side grounding transistor (or high-side 12V trigger) connected to Pin 85 or 86 of the fuel pump relay. You can read more about how onboard engine computers monitor powertrain circuits and emissions hardware on the EPA On-Board Diagnostics (OBD) resource page.
If someone previously jammed an oversized 30-amp fuse into the relay control circuit, connected jumper cables backward, or let water leak into the PCM connector pins, that tiny relay-driver transistor inside the PCM circuit board can burn out. When that happens, the PCM never sends the ground trigger to the fuel pump relay coil, so the relay never clicks shut and the fuel pump never receives power.
Solutions to why the fuel pump isn’t getting power (step-by-step fixes)
If you’ve discovered that your fuel pump isn’t getting power, don’t panic, and definitely don’t pay a shop $900 to drop the gas tank until you fix the electrical supply first! In a huge percentage of cases, restoring power to the pump takes a $3 fuse, a $20 relay, or thirty minutes of wire repair. Here is how we fix each cause properly in the shop.
1. Fix broken wires, replace melted pigtails, and clean the frame ground
When wires break, chafe through their insulation, or corrode green inside the insulation near the fuel tank, electrical current hits a dead end. Never fix an under-car fuel pump wire by twisting bare copper strands together and wrapping them in cheap black electrical tape, because water and road salt will turn that splice into green powder inside of three weeks!
- Use marine-grade adhesive-lined heat-shrink butt connectors (or solder + dual-wall heat shrink): Cut back the damaged wire on both sides until you reach bright, shiny copper strands (if the copper wire looks black or crusty green, keep cutting back a few inches until it’s clean). Crimp in an equal-gauge (usually 12-gauge or 14-gauge for fuel pump power/ground) heat-shrink splice and heat it until the internal hot-melt glue oozes out both ends to make an airtight seal.
- Always inspect and replace a melted fuel pump connector pigtail: Whenever you unplug the electrical connector on top of the fuel pump module, shine a flashlight inside the female terminal cavities. If one pin looks dark brown, burnt, or widened out, buy a new replacement connector pigtail ($15 to $35) and splice it in so the new terminal grips the pump pin tightly.
- Sand the frame ground down to shiny bare metal: Follow the black ground wire from the fuel tank harness to where its ring terminal bolts to the vehicle body or frame rail. Remove the 10mm bolt, wire-brush or sand both the brass eyelet and the steel frame spot until they shine like a new nickel, bolt it back down tight, and coat the outside of the bolt head with battery terminal protector or dielectric grease so rust never returns.
2. Replace the bad fuel pump relay (or install a TIPM bypass kit)
If a bad fuel pump relay is blocking 12-volt power from reaching the tank, your engine either won’t start at all or will cut out randomly once the relay box gets hot under the hood. Fortunately, testing and fixing a standard plug-in relay takes about sixty seconds:
- Open the under-hood fuse box lid and read the diagram printed on the underside to find the Fuel Pump Relay.
- Look right next to it in the fuse box for another relay with the exact same part number and pin layout that controls a non-essential system, such as the horn relay, A/C compressor clutch relay, rear defroster relay, or high-beam headlight relay.
- Pull the fuel pump relay straight out and plug that matching horn or A/C relay into the fuel pump socket! If your fuel pump immediately hums to life and the engine fires right up, go buy a brand-new OEM or Bosch/Denso/Standard relay for $15 to $35 and you’re done!
What if you drive a 2007 to 2016 Dodge, Chrysler, Jeep, or Ram where the fuel pump relay is soldered inside the TIPM fuse box? You do not have to spend $1,200 at the dealership for a whole new TIPM! You can either buy a plug-in TIPM fuel pump relay bypass cable ($25 to $60) that routes fuel pump power through an unused fuse slot controlled by ignition power, or have an automotive electronics tech solder a fresh $25 external relay kit or replacement PCB relay onto your TIPM board.
3. Replace the blown fuse (and check pump amperage draw!)
A blown fuse cannot conduct electrical current under any circumstance, so pulling the old fuse with plastic fuse pullers and sliding in a brand-new blade fuse of the exact same amperage rating (never put a 30A fuse into a 15A or 20A slot, or you will melt your wiring harness!) is step one.
Once the new fuse restores power and the car starts, do what a real technician does: clip a DC amp clamp (or connect a multimeter in series on the 20A setting at the fuse slot) and see how many amps the fuel pump is actually pulling while the engine idles. A healthy electric fuel pump typically draws 4 to 8 amps on a normal passenger car (or up to 9 to 11 amps on a large V8 truck). If your gauge shows the fuel pump pulling 14 to 19 amps at idle, or if the new fuse pops again five miles down the road, either the fuel filter is plugged solid or the electric fuel pump motor inside the tank is binding up and needs to be replaced before it leaves you stranded.
4. Reset the inertia switch or replace a bad Fuel Pump Driver Module (FPDM)
If your car has an inertia switch in the trunk or passenger kick panel and the button has popped up, press it back down until it clicks. If the inertia switch itself is internally corroded or melted at its two-wire connector, replacing the switch costs $30 to $65 and takes ten minutes with a socket wrench.
If your vehicle uses a frame-mounted or trunk-mounted Fuel Pump Driver Module (FPDM) and you have 12V power going into the module from the relay, a good ground, and a good PWM command signal from the PCM, yet 0 volts coming out of the module toward the fuel pump, replace the FPDM. On Ford trucks where the aluminum module bolts to the steel crossmember above the spare tire, make sure you use the updated replacement FPDM kit that comes with rubber or nylon stand-off mounting spacers so the aluminum module never touches the steel frame directly again!
5. Repair or replace a faulty ECU/PCM or Crankshaft Position Sensor
Because the car’s ECU or PCM controls the ground command to the fuel pump relay coil (and commands the Fuel Pump Driver Module based on fuel rail pressure sensor feedback), a dead relay driver inside the computer will leave the fuel pump powerless. Before condemning an expensive PCM, always verify two things with a scan tool and multimeter:
- Watch Live Data RPM while cranking the engine. If the tachometer needle stays pinned at zero and Live Data shows `0 RPM` while the starter spins the engine, replace or fix the Crankshaft Position Sensor ($40 to $150) first, because a healthy PCM will never turn on the fuel pump during cranking if it can’t see crankshaft rotation!
- Check that all PCM power feeds (`B+`, ignition wake-up) and PCM chassis grounds are clean and intact. If the PCM has power, ground, and RPM signal, commands `Fuel Pump Relay: ON` in scan tool live data, yet the wire connected to the PCM’s fuel pump relay control pin never switches to ground (and the wire itself has continuity with no opens), you can send the PCM out for a $250 to $450 board repair or install a programmed replacement PCM.
How do I know if my fuel pump is getting power? (Symptoms & tests with or without a test light)
You can tell a lot about whether your fuel pump is getting power before you ever open a toolbox, simply by paying attention to how the car behaves and sounds when you turn the key. If your fuel pump is losing power completely (or losing voltage intermittently as a bad relay, corroded wire, or dying FPDM heats up), your car will show these unmistakable symptoms:
- Dead silence during the 3-second key-ON prime: On a quiet morning, roll down your window or have a friend open the gas cap and put their ear near the filler neck while you turn the ignition key to ON (without cranking). A powered fuel pump makes a distinct, smooth hummmmmm or whirrrrr from the back of the car for 2 to 3 seconds and then clicks off. If you hear dead silence, either the pump isn’t getting power or the pump motor is locked up.
- Cranks strong, but never fires (or dies immediately after firing once): The starter motor spins the engine at normal speed, but without fuel pressure at the injectors, the cylinders never ignite.
- Sudden sputtering, bucking, and stalling once the car warms up: When a fuel pump relay, Honda Main Relay, or Fuel Pump Driver Module has a cracked internal solder joint, the pump gets full 12V power when cold, then suddenly drops to 0 volts once the relay box heats up after 15 minutes of driving, causing the engine to sputter, lose all throttle response, and stall out as fuel rail pressure collapses.
- Surging, hesitation, and loss of power under load (high-resistance voltage drop!): What if the fuel pump wire or frame ground isn’t broken completely in half, but is corroded green so that instead of getting 13.5 volts while driving, the pump only gets 8.5 volts? Because an electric DC fuel pump’s speed and pressure output are directly proportional to its supply voltage, low voltage makes the pump spin too slowly! The car may idle fine in the driveway, but the moment you try to merge onto the highway or climb a hill, fuel pressure drops, the engine surges and loses power, and fuel economy tanks.
- Lean misfires, backfiring through the intake, and hot combustion chambers: When low voltage starves the fuel pump and causes fuel rail pressure to drop below specification, the injectors spray too little gasoline for the amount of air entering the cylinders. That lean air-fuel mixture causes lean misfires (`P0171` / `P0174`), coughing or hesitation when you step on the gas, and higher combustion temperatures before the engine stalls out completely.
- Whining or groaning noise from the fuel tank: If a failing pump motor is binding internally (right before it blows the fuel pump fuse!), or if fluctuating voltage from a dying driver module makes the pump cavitate, you’ll hear a loud, high-pitched whine coming from under the rear seat.
How to test if the fuel pump is getting power WITHOUT a test light or multimeter
If you are stuck in a parking lot with zero electrical test tools, use these three quick mechanic checks:
- The Gas Cap Ear Test: Unscrew the gas cap, press your ear close to the open fuel filler pipe (which leads straight down into the fuel tank), and have someone turn the key from OFF to ON. If the pump is getting power and spinning, you will clearly hear it buzz for 2 to 3 seconds through the filler neck.
- The Finger-on-Relay Click Test & Relay Swap: Open the under-hood fuse box, place your fingertip on top of the fuel pump relay, and have your helper turn the key to ON. You should feel a crisp mechanical click inside the relay right at key-ON, and a second click 3 seconds later when the prime shuts off. Next, swap it with an identical horn or A/C relay right beside it to rule out burned internal contacts.
- The 2-Second Carb/Brake Cleaner Intake Spray Test: Want 100% proof in thirty seconds that your no-start is a fuel delivery problem and not a bad ignition system or jumped timing chain? Pop off the rubber air intake boot at the throttle body, spray a 2-second burst of starter fluid or carb cleaner into the intake, and crank the engine. If the engine fires right up and runs smoothly for two seconds on the spray before dying again, your spark and compression are fine, and your engine simply isn’t getting fuel!
How to test fuel pump power the PRO way (why you need a test light AND a multimeter!)
When a car rolls into my bay with a dead fuel pump, I reach for two tools: a digital multimeter AND an old-school incandescent test light (or a sealed-beam headlamp bulb wired with two test leads). Why both? Let me save you from the biggest electrical diagnostic trap in automotive repair!
A modern digital multimeter has 10 megohms of internal impedance, which means it draws practically zero current when measuring voltage. Suppose the positive wire going to your fuel pump is 99% rotted through with green corrosion under the car, leaving just one microscopic hair-thin strand of copper intact. If you unplug the fuel pump connector and probe the harness plug with a digital multimeter during the 3-second key-ON prime, your multimeter will happily display `12.4 Volts`!
You think, “Aha! I have 12.4 volts at the plug! The wiring is good, so the fuel pump must be bad!” Then you spend $600 and four hours replacing the fuel pump, plug it in, and the new pump doesn’t work either! Why? Because the moment the real fuel pump tried to pull 8 amps of current through that single corroded copper strand, the voltage instantly collapsed from 12.4V down to 0.0V under load!
Here is how to test fuel pump power so you never get fooled by “phantom voltage”:
- Access the fuel pump electrical conector: On many sedans and SUVs (Toyota, Honda, Subaru, Hyundai, Nissan, BMW, VW), you simply flip up the bottom cushion of the back seat and unscrew a small round metal inspection cover using a Phillips screwdriver to reach the top of the fuel pump module! On pickup trucks or cars without an access hatch, locate the inline fuel tank harness connector along the frame rail near the front of the gas tank.
- Check both 12V positive AND ground with an incandescent test light (load test): Instead of clipping your test lead to a shiny bolt on the body, connect your incandescent test light (or a 12V headlight test bulb) across the actual positive pin and actual ground pin inside the fuel pump harness plug! Have a helper turn the key to ON (or crank the engine). If the test bulb lights up bright and full strength for 2 to 3 seconds during prime (and while cranking), you just proved that the fuse, the relay, the positive wire, AND the ground wire can carry real amperage all the way to the tank! If the pump doesn’t spin when plugged back in (and giving the bottom of the plastic fuel tank a firm thump with a rubber mallet while cranking causes the worn-out brushes inside the pump to make contact and start the engine!), you know 100% that the fuel pump motor itself is dead.
- If the bulb doesn’t light, split the circuit to see whether you lost Positive or Ground: Move the negative clip of your multimeter/test light to a clean, unpainted metal spot on the chassis or battery negative.
- If the light shines brightly when grounded to the chassis, your 12V power feed is good, and your fuel pump ground wire is broken or rusted!
- If you still get zero light and 0 volts on the positive pin during key-ON prime and cranking, you lost 12V positive power upstream, so head straight to the under-hood fuse box to test the fuse and relay socket!
How do you energize a fuel pump directly to test it? (Safe mechanic methods)
What if you want to energize the electric fuel pump manually for 10 or 15 seconds (without the engine running and without fighting the PCM’s annoying 3-second prime timer) so you can listen to the pump, check fuel rail pressure with a gauge, or trace a voltage drop along the wiring harness?
First, a serious safety rule from the shop floor: NEVER touch bare, un-fused battery jumper wires directly to the terminals on top of a gas tank! Touching a bare wire to a terminal always creates a hot electrical spark at the point of contact, and if there is any raw gasoline vapor around the top of the fuel tank lock ring, a single spark can cause a dangerous flash fire. If you aren’t comfortable working with automotive electrical circuits around fuel lines, let a professional repair shop perform this test.
When we energize a fuel pump manually in the shop, we do it safely from six feet away at the under-hood fuse box (or via a scan tool) using one of these three clean methods:
Method 1: Use a bi-directional scan tool (“Active Test: Fuel Pump ON”)
On almost any modern car equipped with OBD-II (especially vehicles with PWM Fuel Pump Driver Modules), the safest and easiest way to energize the fuel pump is with a bi-directional scan tool plugged into the dashboard port. Navigate to `Engine / PCM → Active Tests / Bi-Directional Controls → Fuel Pump Relay` (or `Fuel Pump Duty Cycle`) and command it ON with the ignition key on and engine off. That tests the PCM driver, the relay, the driver module, the wiring, and the pump all at once with zero exposed sparks!
Method 2: Jump Pin 30 to Pin 87 at the under-hood Fuel Pump Relay socket
If your car uses a standard 4-pin or 5-pin fuel pump relay in the under-hood fuse box, you can bypass both the PCM and the relay in thirty seconds using a fused jumper wire (a short piece of 14-gauge wire with an inline 15A or 20A blade fuse and two male spade terminals) or a $15 switched relay-bypass tester:
- Turn the ignition off and pull the fuel pump relay straight out of the under-hood fuse box.
- Look at the bottom of the relay (or the diagram printed on the side of the relay case) to identify the pin numbers:
- Pin 85 & Pin 86: Low-current electromagnet control coil (from the PCM). Do not jump battery power into these pins, or you can damage the PCM!
- Pin 30: Constant 12-volt battery power (supplied through the fuel pump fuse). Verify with your test light or multimeter that the socket hole for Pin 30 has 12V battery power.
- Pin 87: Load output wire going directly back to the fuel pump in the tank!
- Plug your fused jumper wire (or switched relay bypass tool) between Socket 30 and Socket 87 in the fuse box.
- The instant you flip the switch (or connect Pin 30 to Pin 87), 12-volt battery power flows straight down the factory harness to the fuel pump! The fuel pump should immediately start humming continuously in the tank, allowing you to read fuel rail pressure on your gauge or check for voltage at the rear connector without rushing against a 3-second clock.
Method 3: Energizing the pump at the rear connector (and respecting PWM voltage levels!)
Most standard electric fuel pumps are designed to run on a 12-volt DC positive supply and a negative ground. If you need to energize the pump directly at the under-seat inspection hatch to confirm whether a silent pump is locked up, ALWAYS unplug the vehicle harness first, plug a sacrificial matching pigtail (or insulated female terminal pins) onto the pump’s Positive (`+`) and Negative (`-`) motor pins, and switch the power ON using a circuit-breaker protected tool like a Power Probe or a fused 12V battery pack held well away from the tank opening.
Important note on modern variable-voltage / PWM pumps: Some late-model vehicles use 3-phase brushless fuel pumps (which have 3 power phase wires coming from the controller instead of 2 DC brush wires!) or low-voltage PWM pumps designed to operate at lower regulated voltage levels under normal duty cycles. Never connect raw 12V DC across a 3-phase brushless pump plug; always check the factory wiring diagram for your exact year, make, and model first, and follow SAE J1979 / OEM diagnostic procedures as standardized by SAE International.
How do I get my fuel pump to get power again, and how to confirm if the pump itself is damaged
Suppose you found a blown fuse, a bad relay, or a corroded connector, fixed the electrical supply so that 12 volts and a solid ground are now reaching the tank, and got the fuel pump humming again. Before you slam the hood and call the job finished, if your car was struggling to accelerate, hesitating on hills, or blowing the fuel pump fuse, you must confirm whether the fuel pump itself is mechanically worn out or healthy!
Remember: restoring electrical power wakes up the motor, but if the internal turbine impeller or check valve inside the pump is worn out, it still won’t build enough hydraulic pressure to feed the engine properly. Here is how we verify fuel pump health with a fuel pressure gauge:
- Connect a mechanical fuel pressure gauge to the fuel rail (or check the Fuel Rail Pressure Sensor in Live Data): On many vehicles, the metal fuel rail on top of the engine has a small threaded Schrader test port that looks just like a bicycle tire valve. Wrap a shop rag around the port to catch any dribble of fuel, thread your mechanical fuel pressure test gauge onto the port, and route the gauge dial outside the windshield so you can see it from the driver’s seat. (On newer cars without a Schrader valve, either tee the gauge inline at the quick-disconnect fuel line or read the electronic Fuel Rail Pressure Sensor PID on a scan tool.)
- Check key-ON prime and idle fuel pressure: Turn the key to ON (or energize the fuel pump relay) and watch the needle jump. On most port-injected cars, fuel pressure should snap right up to 35 to 65 PSI (check your exact factory spec, as many GM V8s require 55 to 62 PSI, while older return-style systems use 38 to 45 PSI). If your pump has a full 12 to 13.5 volts at the tank plug yet can only push 15 or 22 PSI of fuel pressure (and the fuel filter isn’t clogged), the internal pump impeller or pressure relief valve is worn out and the fuel pump assembly must be replaced.
- Check the 5-minute leak-down hold test (Check Valve Test): Once the gauge hits full pressure, turn the key OFF and watch the pressure gauge for five minutes. The one-way check valve inside the fuel pump cover should trap that pressure in the line so it holds steady! If the needle immediately drops straight back down to 0 PSI the second the pump stops spinning, either the check valve inside the fuel pump is blown (causing hard “long cranking” starts every morning) or a fuel pressure regulator / fuel injector is leaking internally.
How much does it cost to fix fuel pump power issues vs. replacing the fuel pump?
If your tests show that the fuel pump motor itself is burned out beyond repair (or drawing excessive amps and blowing fuses), you will need to replace the fuel pump module. For a complete fuel pump replacement at a professional repair shop, the average total bill typically runs around $600 to $1,050 (with common estimates landing right around $834 to $874 on many midsize cars and SUVs). If you buy the part yourself, a bare replacement electric fuel pump cartridge can cost as little as $50 to $120 (while a complete OEM drop-in fuel pump module assembly with the float level sender costs $180 to $420), and professional shop labor usually ranges between $150 and $350+ depending on whether your car has a convenient under-seat access cover or requires dropping the fuel tank on a lift.
| Fuel Pump Power / Delivery Repair | Parts Cost | Shop Labor Cost | Typical Total Cost |
|---|---|---|---|
| Blown Fuel Pump Fuse Replacement | $2 to $10 | $0 (DIY) to $75 (Diag) | $2 to $85 |
| Standard Plug-In Fuel Pump Relay Swap | $15 to $45 | $0 (DIY) to $90 | $15 to $135 |
| Honda PGM-FI Main Relay or Chrysler TIPM Relay Bypass | $30 to $95 | $0 (DIY) to $180 | $30 to $275 |
| Inertia Fuel Shutoff Switch Reset / Replacement | $0 (Reset) or $35 to $65 (New) | $0 to $100 | $0 to $165 |
| Fuel Pump Driver Module (FPDM / EKPS) Replacement | $65 to $240 | $80 to $180 | $145 to $420 |
| Wiring Repair, Melted Pigtail Splice, or Frame Ground Clean | $15 to $45 | $100 to $250 | $115 to $295 |
| Full Electric Fuel Pump / Module Assembly Replacement | $50 (Bare pump) to $420 (Full OEM assembly) | $150 to $350+ (Higher if tank must drop) | $400 to $1,050 (Avg. ~$834 to $874) |
Real-world shop cases: three “dead fuel pump” cars that didn’t need a fuel pump!
To show you why diagnosing the power circuit beats throwing parts at a car every single time, here are three real vehicles towed into our shop with “bad fuel pumps” that didn’t actually need a fuel pump.
Case 1: the Ford Crown Victoria that hit a pothole
A customer had his Ford sedan towed in on a flatbed after it died immediately following a loud bang over a winter pothole on the highway. Another shop had glanced at it, sprayed starter fluid in the intake to confirm it lacked fuel, and quoted him $780 for a new fuel pump.
Before raising the car on the lift, I opened the trunk, pulled back the left-hand felt carpet liner, and looked at the factory inertia fuel shutoff switch. Sure enough, the red reset plunger had popped straight up from the jolt of the pothole! I pressed the red button down with my thumb until it clicked, walked up to the driver’s seat, and started the V8 engine on the very first turn of the key. Total repair time: forty-five seconds.
Case 2: the 2007 Ford F-150 5.4L with the corroded FPDM above the spare tire
A contractor brought in his 2007 F-150 that would crank all day long without firing after a heavy rainstorm. He had already checked Fuse #27 and the fuel pump relay under the hood, and both were fine, so he bought a $280 fuel pump module and asked us to drop the 26-gallon gas tank and install it.
Instead of dropping the tank blindly, I lowered his spare tire underneath the rear bed and unbolted the Fuel Pump Driver Module (FPDM) from the steel frame crossmember. The aluminum backplate of the FPDM had corroded right through in a coin-sized hole from touching the salty steel frame, and green water was sloshing around inside the circuit board! His original fuel pump inside the tank was 100% healthy. He returned the unused fuel pump to the parts store, we bolted on a new $85 Dorman/Motorcraft FPDM mounted on rubber stand-off spacers in twenty minutes, and the truck fired right up.
Case 3: the Chevy Silverado where the owner already replaced the pump twice
A frustrated DIYer towed in his Chevy Silverado 1500 after dropping the gas tank in his driveway and installing two brand-new fuel pumps in one weekend, and neither pump would make a sound when he turned the key! Why did he replace the pump in the first place? Because he probed the positive grey wire at the tank plug with his digital multimeter clip grounded to the shiny rear bumper, saw 12.4 volts during the key-ON prime, and assumed the pump had power.
What he didn’t test was the fuel pump ground wire! When I crawled under the driver’s side frame rail just behind the cab and tugged on the black ground wire bolted to the rusty frame (`G401`), the corroded ring terminal crumbled right off in my fingers. His positive wire had 12.4 volts, his fuse and relay were fine, and all three of his fuel pumps (including the original one he threw in the trash!) were completely fine, as none of them had a ground path back to the battery. Ten minutes with a wire wheel, a new soldered copper ring terminal, a stainless bolt, and a dab of dielectric grease fixed the truck permanently.

Frequently asked questions about fuel pump power issues
Why does my fuel pump get power when I jump the relay, but not when the relay is plugged in?
When jumping Pin 30 to Pin 87 at the fuel pump relay socket makes your fuel pump hum to life, you just proved that the fuse, the wiring harness to the rear of the car, the ground strap, and the fuel pump motor itself are 100% good! That narrows the problem down to only three possibilities at the relay socket: (1) the fuel pump relay itself is bad (swap it with the horn relay to check), (2) Pin 85 or 86 of the relay socket is missing its 12V ignition feed from a secondary ECU/ignition fuse, or (3) the PCM is not sending the ground trigger to the relay coil because of a bad Crankshaft Position Sensor, an active immobilizer theft lockout, or a failed relay driver inside the PCM.
Can Fuse #27 melting on a Ford F-150 stop the fuel pump from getting power?
Yes! On 2009 to 2014 Ford F-150 trucks (equipped with the 5.0L V8, 6.2L V8, or 3.7L V6), the factory 20-amp micro-fuse in Slot #27 of the under-hood battery junction box feeds power to the fuel pump relay. Because the tiny legs of that micro-fuse have too little surface area for continuous fuel pump current, the fuse legs overheat and melt the black plastic fuse box terminal right underneath Fuse #27, often without even blowing the fuse filament itself! Ford actually released a permanent fix kit (TSB 15-0137, part number `EL3Z-14293-A`, around $25) that relocates the fuel pump fuse wire from tiny Slot #27 over to a heavy-duty cartridge fuse in Slot #70.
Will a bad oil pressure sensor shut off power to my fuel pump?
On the vast majority of modern vehicles, no, as that is an old mechanic myth that only applies to specific older GM vehicles from the late 1980s and 1990s (and certain marine/industrial engines) where the oil pressure switch was wired as a parallel backup path for the fuel pump relay. On modern OBD-II cars and trucks, the PCM controls the fuel pump relay based on the Crankshaft Position Sensor (RPM) signal, not the engine oil pressure switch.
A mechanic’s verdict: what to do next before you drop the gas tank
The fuel pump really is the heart of your car’s fuel system, and without steady electrical power spinning that submerged pump motor at the right voltage, not a drop of pressurized gasoline reaches your injectors, and your engine isn’t going anywhere. However, when your car cranks without starting and the tank stays silent, jumping straight to an $850 fuel pump replacement without testing the electrical circuit first is the easiest way to waste a Saturday and a whole lot of money.
Take ten minutes to follow a smart diagnostic order from front to back. First, listen at the open gas cap during the first 2 to 3 seconds when a helper turns the key to ON (remembering that the computer shuts the pump off after 3 seconds if you don’t crank!). Second, check the under-hood fuel pump fuse, swap the fuel pump relay with an identical horn or A/C relay right next to it, and press the reset button on the inertia crash switch if your vehicle has one. Third, before condemning a silent pump, test the connector at the tank using an incandescent test light connected across both the positive and ground pins so you know for sure that high-resistance corrosion or a broken frame ground isn’t tricking your multimeter.
If the electrical fault turns out to be a $3 fuse, a $20 relay, a popped inertia switch, or a rusty 10mm ground bolt on the frame rail, you can easily fix it in your own driveway in under half an hour. And if your load test proves that a full 12 volts and a rock-solid ground are reaching the pump terminals while the pump motor stays dead (or fails a fuel pressure gauge check), then you can replace the fuel pump, or hand the keys to a trusted local mechanic to drop the tank, with 100% confidence that the new pump will fire your engine right up on the first turn of the key.
