

If you own a Mini Cooper, you already know this car is not your average economy box. It is packed with technology, personality, and enough electrical complexity to make even seasoned mechanics pause. And right at the heart of that electrical complexity sits a small but mighty component called the Footwell Module, or FRM for short.
Ignore it, and you could find yourself dealing with windows that refuse to move, headlights that will not turn off, or interior lights that flicker like a haunted house. Sound familiar? You are not alone. The FRM is one of the most talked-about pain points in the Mini Cooper community, and for good reason.
This guide is going to walk you through everything you need to know about the Mini Cooper Footwell Module, why it fails, what signs to watch for, and exactly how to reset it. Whether you are a first-time Mini owner or you have had yours for years, this is information worth having.
What Exactly Is the Mini Cooper Footwell Module (FRM)?
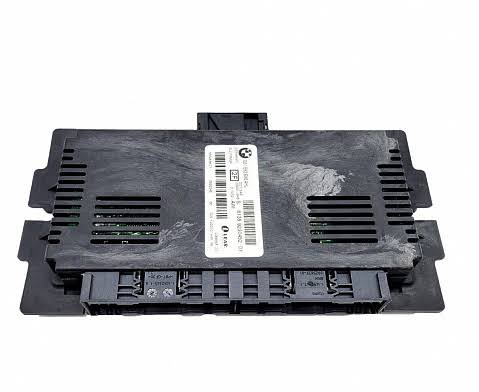
Picture this. You are cruising down the highway on a warm evening, music playing, windows down, everything is right with the world. Then suddenly, the windows stop responding. The interior lights go dark. You try the mirrors, and nothing happens. You have not hit anything, the car is still running, but something is clearly wrong.
Nine times out of ten, that “something” is the Footwell Module.
The FRM is essentially the electrical brain for a large chunk of your Mini Cooper’s systems. It sits in the driver’s side footwell area, tucked behind the kick panel, which is that plastic panel sitting below the dashboard on the driver’s side. Depending on your specific model year, the exact location might shift slightly, but it is always in that general area.
So what does it actually control? A lot more than most people realize:
- Interior and exterior lighting
- Power windows
- Exterior mirrors
- AC and heating fans
- Central locking
- Hazard lights
- Headlights and taillights
Think of it as an electrical hub. Every signal related to the systems listed above has to pass through this module at some point. When it works, you never think about it. When it fails, you feel it everywhere.
The FRM also monitors the wiring for short circuits. It is constantly scanning, checking, and adjusting. If it detects a fault, it will attempt to protect the system by shutting down the affected output. That sounds helpful, until you realize it may shut things down permanently unless you address the root cause and reset the module properly.
Why the Mini Cooper Electrical System Is More Complex Than Most Cars
Mini Coopers are not basic cars. Even the base models come loaded with features that most entry-level vehicles simply do not have. We are talking about ambient lighting, Union Jack LED taillights, LED fog lights, and advanced interior lighting setups. All of that requires a sophisticated electrical architecture to manage.
That sophistication is great when everything works. But it also means there are more potential failure points. More lights, more circuits, more reliance on modules like the FRM. Compare that to a simpler vehicle where a blown fuse just takes out one light. On a Mini, a failing FRM can take out an entire category of features all at once.
This is not a flaw so much as a trade-off. You get a car that feels premium and polished, but you also need to understand how to care for its electrical system. Most Mini owners learn about the FRM the hard way, and that is exactly why this guide exists.
Warning Signs Your FRM Is Starting to Fail
The FRM rarely fails all at once without any warning. In most cases, there are signs. Some are subtle at first, like a light that flickers occasionally. Others are more obvious, like windows that simply stop working mid-drive.
Here is a breakdown of the most common symptoms to watch for:
- Interior lights not behaving properly – They may flicker, fail to turn on when you open the door, or refuse to turn off when you close it.
- Headlights or taillights stuck on – You turn the car off, but the lights keep running. Or they simply will not come on at all.
- Power windows acting erratically – They may go down fine but struggle to come back up, or they work one minute and stop completely the next.
- Hazard lights not working – A surprisingly common FRM-related symptom that can be a serious safety concern.
- AC or heating fan failure – If your climate control fan suddenly stops responding, the FRM could be the culprit.
- Difficulty adjusting seats – If the module controls your seat adjustment motors, a failing FRM can lock them in place.
- Scan tools cannot communicate with the FRM – This is a big one. If you plug in an OBD scanner and it cannot talk to the FRM at all, the module may have already gone into a lockout or corrupted state.
- Service or maintenance light permanently on the dashboard – Once the FRM shuts down an output due to a detected fault, that warning light will stay on until the module is reset or replaced.
Here is the important thing to understand about that last point. Once the FRM detects a fault and permanently shuts off a function, fixing the underlying wiring issue alone will not bring that function back. The module has to be reset or reprogrammed to recognize that the fault has been resolved. That is what makes the reset process so critical.
What Actually Causes the FRM to Fail?
Understanding why the FRM fails in the first place helps you prevent future problems, not just fix the current one. There are several root causes, and they range from simple electrical mishaps to hardware damage.
Wiring or Connection Errors
The FRM is the gatekeeper for all of your car’s lighting circuits. Any loose connection, corroded terminal, or improperly repaired wire in that system can trigger a fault code within the module. Once the module sees something it does not like, it starts the shutdown process for that circuit.
This is actually one of the more common ways the FRM ends up failing in older Mini Coopers. Years of vibration, heat cycles, and general wear can loosen connections that were perfectly fine when the car left the factory.
Short Circuits
A short circuit is basically a worst-case scenario for any electrical module. When current flows through a path it is not supposed to, it can spike voltage levels well beyond what the FRM is designed to handle. That kind of electrical hit can corrupt the module’s software, fry its hardware, or both.
Short circuits in Mini Coopers are sometimes caused by aftermarket accessories that were not wired in correctly. If someone added a sound system, LED strips, or any other electrical modification without following proper wiring procedures, there is a real chance those changes contributed to an FRM failure down the line.
Damaged Connectors
The connectors that plug into the FRM are responsible for carrying signals to and from dozens of components. If those connectors are bent, cracked, corroded, or just not fully seated, the module will not receive clean signals. That leads to erratic behavior, fault codes, and eventually, a module that stops responding altogether.
Always inspect the connectors before assuming the module itself has failed. Sometimes a thorough cleaning and reseating of the connectors is all it takes to bring things back to life.
Dead Battery and Jump-Starting
This one surprises a lot of people. A dead battery is not just an inconvenience. It can actually damage your FRM. When the battery dies completely, the FRM loses its power supply, and during that process, voltage can fluctuate in ways that corrupt the module’s memory.
But here is the thing that really catches people off guard: jump-starting the car after a dead battery can make things worse. The sudden voltage surge that comes with a jump-start can be just as harmful to the FRM as the battery dying in the first place. If your battery is regularly dying or you have jump-started your Mini more than once, take that as a serious warning sign to get the battery and the FRM checked out.
Replacing a dead battery with a brand-new one also requires care. Modern Mini Coopers need the new battery to be registered with the car’s management system. Skip that registration step, and the car may not charge the battery correctly, which creates the same cycle of issues all over again.
Software Corruption
Sometimes the hardware is perfectly fine, but the software running on the FRM has become corrupted. This can happen due to electrical interference, a failed software update, or just the cumulative wear on the module’s internal memory over time. When the software is corrupted, the module cannot function correctly even if every wire and connector is in perfect shape.
This is actually the good news scenario, because a software issue can often be fixed through reprogramming without replacing the entire module.
Why You Cannot Just Use a Standard OBD Scanner to Fix This
Here is where a lot of people get stuck. They buy an OBD-II scanner, plug it into the port under the dashboard, and try to pull codes from the FRM. But the scanner comes back with nothing. No communication. No codes. Just silence.
That is not a scanner problem. That is what a failed FRM looks like from a diagnostic standpoint. When the module is corrupted or locked out, it stops communicating entirely. It cannot tell the scanner what is wrong because, from its perspective, it is not functioning well enough to transmit that information.
This is one of the most frustrating aspects of FRM failure. Standard diagnostic tools are essentially useless in this situation. You need specialized programming software and hardware to access and repair the module directly, bypassing the normal communication channels.
That is where tools like HexProg come in.
How to Reset the Mini Cooper FRM Module Step by Step
Before you start, be clear on one thing: this reset procedure addresses software-level corruption. If the FRM has physical damage, burned components, or a cracked circuit board, this process will not fix it. You would need a replacement unit in that case. But if the hardware is intact and the problem is corrupted EEPROM data, this is the process that can bring it back.
You will need:
- HexProg programmer software and hardware
- A BDM (Background Debug Mode) cable
- A soldering iron and basic soldering skills
- Patience and a clean, static-free workspace
Here is the full process:
Step 1: Remove the FRM Module from the Car
You will find the module in the driver’s side footwell, behind the kick panel beneath the dashboard. Remove the kick panel carefully by releasing the clips holding it in place. The FRM will be visible once the panel is out of the way.
Disconnect the electrical connectors from the module before removing it. Do this gently. Forcing the connectors can damage the pins, which would create a whole new problem on top of the one you are already dealing with. Once the connectors are free, the module should come out without much resistance.
Step 2: Open the Module Casing and Remove the Circuit Board
The FRM module comes in a plastic housing. Carefully open the casing and slide the circuit board out. Handle the board by its edges. Static electricity from your hands can damage sensitive components on the board, so if you have anti-static gloves, use them.
Take a close look at the board before doing anything else. Check for obvious signs of physical damage, burn marks, swollen capacitors, or cracked solder joints. If you see anything like that, the board needs professional repair or replacement, not just a software reset.
Step 3: Solder the BDM Cable Wires to the Board
This is the step that requires the most care. Using your BDM cable, you need to solder the programming wires directly to the designated test points on the FRM circuit board. These test points are where the programmer will communicate with the board’s processor.
The wires are color-coded for a reason. Make sure you connect each wire to its correct point:
- Red to the power point
- Black to the ground point
- Blue and Yellow to the designated data lines
Sloppy soldering here can damage the board beyond repair, so take your time. If you have never soldered before, this might be the step where it makes sense to hand the job off to someone with experience. A cold solder joint or a bridge between two contact points can cause serious, irreversible damage to the board.
Step 4: Connect the Board to the HexProg Programmer
Once the wires are soldered and confirmed to be in the right positions, plug the other ends into the correct slots on the HexProg connector. Open the HexProg software on your computer and follow the prompts to identify and select your specific FRM or CPU version.
Getting the version right is important. Selecting the wrong configuration can result in writing incorrect data to the board, which could make things significantly worse. If you are unsure which version applies to your module, check the part number printed on the board itself and cross-reference it with the HexProg documentation.
Step 5: Read the FRM Data
In the HexProg software interface, click “Read.” The programmer will pull the current data from the FRM’s EEPROM memory. This data includes the module’s configuration settings and any stored operational information.
Save this file before doing anything else. Think of it as a backup. If something goes wrong during the repair process, having the original read gives you a fallback point. Do not skip this step.
Step 6: Run the Repair FRM Function
Now you will use the “Repair FRM” function within the programmer. What this does is compare the corrupted EEPROM data against a reference known as the P-Splash data, which is essentially the original, factory-clean version of what the EEPROM should contain.
The software identifies the corrupted sections and overwrites them with the correct data. It is a targeted repair, not a full wipe, which is important because you want to preserve the module’s calibration and vehicle-specific settings while eliminating the corruption that was causing the failure.
Step 7: Confirm the Repair Was Successful
If the process completes successfully, the HexProg software will display a confirmation message indicating that the FRM EEPROM has been repaired. That is the green light you are looking for.
Once confirmed, carefully remove the soldered wires from the board, reassemble the module into its casing, and reinstall it in the car. Reconnect all the electrical connectors, making sure each one is fully seated and locked in place.
Step 8: Test Everything
Start the car and test all the systems the FRM controls. Run through the windows, check the interior lights, test the mirrors, try the central locking, and confirm the hazard lights are working. If the repair was successful, all of these should be functioning normally again.
If some functions are still not working, there may be additional fault codes stored in the system that need to be cleared, or there could be underlying wiring issues that caused the FRM corruption in the first place. Those would need to be addressed separately.

What If the Reset Does Not Work?
Not every FRM failure is a software problem. Sometimes the module has taken physical damage that no amount of reprogramming will fix. If you go through the entire reset process and the module still does not respond, it is time to start thinking about replacement options.
You have a few routes here:
New OEM Module from BMW/Mini
This is the cleanest solution but also the most expensive. A new module from the dealer will come properly coded for your vehicle and should drop right in without compatibility issues. Expect to pay a significant amount for the part alone, plus labor if you are having a shop do the installation.
Remanufactured or Rebuilt FRM
There are reputable companies that specialize in rebuilding FRM modules. They take failed units, replace the damaged components at the hardware level, and restore the module to full working order. This option is typically less expensive than buying a brand new module, and the quality can be excellent when you go with a well-reviewed rebuilder.
Used Module from a Salvage Yard
This is the cheapest option, but it comes with real risks. A used FRM from a salvage yard will need to be coded to your specific vehicle. It also cannot be guaranteed to be in good condition. If the car it came from had electrical problems of its own, you could be buying someone else’s headache.
If you go this route, make sure the module is from the same model year and engine configuration as your car, and budget for the coding process on top of the purchase price.
Should You Do This Yourself or Take It to a Shop?
That is the honest question most people are asking by this point. And the honest answer is: it depends on your comfort level with electronics and soldering.
The reset process itself is not overly complicated if you have some experience with circuit boards and soldering. The HexProg software is relatively user-friendly, and there are solid tutorials available online. But there is almost zero margin for error. One wrong wire connection, one bad solder joint, and you could permanently damage a module that was otherwise recoverable.
If you have never soldered before, or if you are not confident working with delicate electronics, take it to a specialist. Not just any mechanic, but someone with actual experience repairing BMW and Mini FRM modules. A general auto shop may not have the right tools or knowledge to handle this correctly.
The cost of having a professional do this is almost always less than buying a brand new OEM replacement module. So if you are weighing a DIY repair against professional help, professional help often wins on both cost and reliability grounds.
How to Protect Your FRM and Prevent Future Failures
Once you have gone through the hassle of resetting or replacing an FRM, the last thing you want is to be back in the same situation six months later. Here are some practical steps to protect the module going forward.
Keep Your Battery in Good Shape
This is the single most important thing you can do for your FRM. A healthy battery means stable voltage, which means the FRM never experiences those damaging voltage swings that come with a dying or dead battery. Test your battery annually, and replace it proactively if it is showing signs of weakness. Mini Cooper batteries typically last four to six years, but that varies depending on climate and driving patterns.
When you do replace the battery, make absolutely sure the new one is registered with the car’s ECU. This is a step that many general shops skip because they do not know it is required on Mini Coopers. Without battery registration, the charging system does not calibrate correctly for the new battery, and you will end up prematurely wearing it out.
Avoid Unnecessary Jump-Starts
As mentioned earlier, jump-starting a Mini Cooper puts stress on the FRM. If your battery dies, try using a battery tender or a slow trickle charger to bring it back up rather than jumping it with another vehicle. If you must jump-start, follow the procedure in your owner’s manual carefully. Improper jump-starting is a common cause of FRM damage.
Be Careful with Aftermarket Electrical Accessories
Any aftermarket electrical addition to your Mini, whether it is a stereo upgrade, LED interior lights, a dashcam, or anything else, needs to be wired correctly. Sloppy installations that tap into the wrong circuits can introduce short circuits that eventually reach the FRM.
If you are adding accessories, either learn proper wiring techniques or have a qualified auto electrician do the installation. The cost of a professional installation is far lower than the cost of an FRM repair or replacement.
Address Electrical Fault Codes Promptly
When a warning light comes on your dash, do not wait. The FRM monitors your electrical system constantly, and a fault that sits unaddressed gives the module more opportunities to detect repeated errors and start shutting down functions. Get codes pulled and the underlying issue fixed as soon as possible.
Inspect the Footwell Area for Moisture
Water intrusion into the driver’s footwell is more common than you might think, especially if door seals are aging or if the drain plugs in the sunroof (if your Mini has one) get blocked. Water and electronics are a terrible combination. If you notice the carpet in the footwell feels damp, find the source and fix it immediately. The FRM sitting right there in that area is extremely vulnerable to water damage.
FRM Failure by the Numbers: A Quick Reference Table
Here is a quick overview of the most common FRM-related scenarios and what they typically mean:
| Symptom | Likely Cause | Recommended Action |
|---|---|---|
| Lights flickering or not responding | Software corruption or wiring fault | Run FRM reset; inspect wiring |
| Windows work intermittently | FRM detecting wiring fault | Check window motor wiring; reset FRM |
| Headlights stuck on or off | FRM output permanently disabled | FRM reset required |
| OBD scanner shows no FRM communication | Module fully locked or corrupted | BDM-level programming with HexProg |
| Service light on with no other symptoms | Stored fault code in FRM | Diagnostic scan; may need FRM reset |
| AC fan not working | FRM controlling fan circuit | Inspect fuses; reset or replace FRM |
| Physical damage on circuit board | Voltage spike or water damage | Module rebuild or replacement |
Real Talk: Is the FRM a Design Weakness in Mini Coopers?
Let’s be honest about this. The FRM is one of the most frequently discussed problem areas in Mini Cooper ownership forums, Facebook groups, and repair shops that specialize in these cars. It comes up constantly.
Does that mean Mini Coopers are unreliable? Not necessarily. But it does mean that this is a known vulnerability, and one that BMW and Mini have not exactly rushed to address. The design places a critical module in a location that is exposed to foot traffic, potential moisture, and significant electrical load.
The good news is that the FRM failure issue is very well-documented. That means repair solutions are widely available, and finding someone who has dealt with this exact problem before is not difficult. The community knowledge around FRM repair has grown substantially over the years, which makes navigating it less overwhelming than it used to be.
If you love your Mini Cooper and want to keep it running well, understanding the FRM is just part of the ownership experience. It is not a reason to avoid the car. It is a reason to stay informed and proactive.
What Happens If You Ignore a Failing FRM?
Ignoring it is not really an option, and here is why. The FRM controls safety-critical systems. Hazard lights that do not work are a safety issue. Headlights that will not turn on or off are a safety issue. Windows that will not close properly are a security issue, especially if you get caught in rain.
Beyond the immediate functional problems, a failing FRM that keeps detecting faults will keep shutting down more and more outputs. What starts as a flickering interior light can eventually progress to a complete electrical lockdown of multiple systems. The longer you leave it, the more the module deteriorates, and the harder it becomes to repair versus replace.
Catching this early, when the symptoms are still minor and intermittent, gives you the best chance of a straightforward software-level fix. Waiting until the car is barely functional often means a more expensive repair or full replacement.
Mini Cooper FRM Reset: Hardware vs. Software Problem at a Glance
One of the most common points of confusion for Mini Cooper owners dealing with FRM issues is figuring out whether they are facing a software problem or a hardware problem. The distinction matters because the solutions are completely different.
| Factor | Software Issue | Hardware Issue |
|---|---|---|
| Circuit board appearance | No visible damage | Burn marks, damaged capacitors, cracks |
| Response to programmer | Board communicates with HexProg | No response or incomplete communication |
| Cause | Voltage spikes, battery events, corruption | Water damage, physical impact, severe short |
| Fix | EEPROM reset and reprogram | Component-level repair or full replacement |
| Cost estimate | Lower (tool cost or specialist fee) | Higher (rebuild or new module) |
Choosing the Right Professional for FRM Repair
If you decide to go the professional route, which many Mini owners wisely choose, make sure you are selecting the right type of shop. Not every mechanic knows how to handle FRM issues, and taking your car to a shop without Mini or BMW experience can result in misdiagnosis, unnecessary parts replacements, or making the problem worse.
Look for:
- Shops that specifically list BMW or Mini Cooper as a specialty
- Technicians who have experience with module-level programming
- Online reviews that specifically mention FRM repair or electrical system work
- Shops that use professional BMW diagnostic tools, not just generic OBD scanners
It is also worth calling ahead and directly asking whether they have experience repairing FRM modules on Mini Coopers. A shop that knows what you are talking about without hesitation is a good sign. A shop that needs you to explain what an FRM is might not be the right fit for this job.
A Note on FRM Coding After Replacement
If your FRM ends up needing full replacement rather than repair, there is one more critical step that many people overlook: coding the new module to your specific vehicle.
Every Mini Cooper FRM is programmed with vehicle-specific data. When you install a replacement module, whether it is new, remanufactured, or used, it needs to be coded to match your car’s VIN, equipment configuration, and other parameters. Without that coding step, the module will not function correctly, and you may end up with the same symptoms you had before, despite having a brand new part installed.
This coding process requires professional-grade BMW diagnostic software. It is not something a standard OBD scanner can accomplish. Factor this into your cost and planning when budgeting for an FRM replacement.