
If you own a Mercedes-Benz, you already know the electronic parking brake is one of those features that just works, quietly and reliably, until the day it does not. Maybe you just finished swapping out the rear brake pads. Maybe the system is throwing a warning light and refusing to behave. Either way, you need to reset it, and you need to do it correctly.
The good news is that resetting the Mercedes electronic parking brake is something you can handle yourself with the right steps. No specialty shop required, no expensive diagnostic bill, just a clear process followed carefully. This guide walks you through the full reset procedure, covers the safety precautions you should not skip, and explains what to do when things do not go as planned.
Why You Need to Reset the Mercedes Electronic Parking Brake
Before getting into the steps, it helps to understand why a reset is necessary in the first place.
On a traditional drum or disc brake setup with a mechanical handbrake, changing the brake pads is a straightforward compression job. You push the caliper piston back in, slide the new pads in, and you are done. But the Mercedes electronic parking brake is different. The rear calipers use an electric motor-driven actuator to engage and release the parking brake function. That actuator physically moves the caliper piston using a screw mechanism.
If you try to compress that piston without first putting the system into service mode, you will fight the motor the entire time and likely damage the actuator. The reset procedure tells the system to retract the piston to a position that allows brake pad replacement, and then, once the new pads are in, it moves everything back to the correct operating position.
Beyond brake pad changes, a reset is also needed when the system throws a fault after a battery disconnect, after a software update, or when a warning light appears on the dashboard without a clear mechanical cause.
What You Will Need Before Starting
This procedure does not require a lot, but having the right things ready before you start will save you frustration mid-job.
- Your Mercedes-Benz key (physical key, not just the key fob)
- Access to the vehicle’s center console control buttons (Call button and OK button)
- New brake pads if you are doing a pad replacement
- Basic brake service tools: socket set, brake cleaner, brake grease, and a flat surface to work on
- A scan tool capable of Mercedes diagnostics if the standard menu navigation method does not work on your specific model year
Also, make sure the vehicle is parked on flat, level ground. Do not attempt this on a slope. And make sure the transmission is in Park before you begin.
Step-by-Step: How to Reset the Mercedes Electronic Parking Brake
These steps apply to the Mercedes CLA and several other Mercedes-Benz models that use the same onboard menu navigation system. If your model uses a different interface, the general sequence is the same, but the menu names may differ slightly.
Phase 1: Put the System Into Service Mode (Before Removing Old Pads)
- Insert the key and turn the ignition to position one. This is the position that powers the electronics without starting the engine. You will see the dashboard light up, and the speedometer display should be visible on the instrument cluster.
- Press and hold the “Call” button and the “OK” button at the same time. These are located on the center console or steering wheel controls depending on your trim level. Hold both buttons together for a few seconds until the display changes.
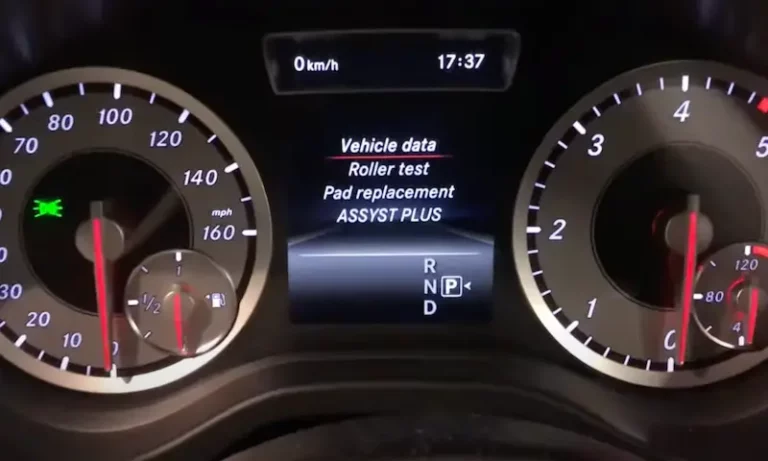
- The display will change to show a menu. You are looking for an option that reads something like “Vehicle Data: Roller Test / Pad Replacement / ASSYST PLUS.” Use the scroll buttons to navigate through the list.
- Scroll down until you find “Pad Replacement” and press OK to select it. The system will prompt you to move to the fitting position.
- Make sure the handbrake is not engaged. The parking brake must be fully released before you confirm. Press OK to confirm, and the system will begin moving the caliper actuator to the open service position.
- Wait for the system to finish moving. The display will indicate when the process is complete. Do not rush this step. Let the actuator fully retract before you touch anything.
- Turn off the ignition and remove the key. The calipers are now in service position, and you can safely proceed with the brake pad replacement.
Phase 2: Replace the Brake Pads
With the system in service mode, the caliper piston should be retracted far enough to give you the clearance you need for the new pads. Go ahead and complete the brake work:
- Open the brake fluid reservoir cap to relieve pressure before compressing the piston.
- Remove the caliper, slide out the old brake pads, and inspect the caliper bracket and hardware for wear.
- Clean the caliper bracket contact surfaces and apply fresh brake grease to the slide pins and pad contact areas.
- Install the new brake pads, reassemble the caliper, and torque the caliper bolts to the manufacturer’s specification.
- Replace the brake fluid reservoir cap once everything is back together.
One important note: do not pump the brake pedal at any point during this process until specifically instructed to do so in the reset steps below. Pumping the pedal before the system is reset can push the caliper piston out against the new pads before the actuator is properly synchronized, and that causes problems.
Phase 3: Reset the System After Installing the New Pads
- Return to the driver’s seat, insert the key, and turn the ignition back to position one. Do not start the engine yet.
- Press and hold the “Call” button and the “OK” button simultaneously again. Navigate back to the same menu as before.
- Scroll to “Pad Replacement” and press OK. The system will ask you to confirm the fitting position again.
- Press OK to confirm. The actuator will now move back into its normal operating position, clamping the new brake pads into the correct working position against the rotor.
- Wait for the process to complete. The display will confirm when the reset is done.
- Once confirmed, press the brake pedal firmly. This is the first time you press the pedal, and it pumps the caliper pistons out to make firm contact with the new pads. You may need to press the pedal a few times until it feels solid.
- Confirm the reset by pressing OK when prompted on the display.
- Turn off the ignition. The electronic parking brake is now reset and ready for normal operation.

Bonus: How to Check and Reset Service Reminders While You Are In There
Since you are already navigating the instrument cluster menu, it is worth knowing how to check your service intervals at the same time.
With the ignition in position one, use the same control buttons to navigate to the service data menu. The display will show your next scheduled service intervals, including oil, brake fluid, and other maintenance items. If a service has been completed and the reminder needs to be reset, press the relevant confirm button when prompted by the display.
This takes less than two minutes and can save you an unnecessary trip to the dealer just to clear a service reminder.
Safety Rules You Should Not Ignore During This Process
Working on a braking system is not something to rush. These are the precautions that matter most when resetting the Mercedes electronic parking brake.
Always Work on a Level Surface
The vehicle needs to be on flat ground with the transmission in Park. The parking brake will be released during part of this procedure, which means the only thing keeping the car stationary is the transmission and flat ground. Do not take shortcuts here.
Never Force the Caliper Piston
On a standard brake caliper, you can compress the piston straight back with a C-clamp or piston tool. On the Mercedes rear calipers with the electronic parking brake, the piston has to rotate as it compresses. You cannot just push it in. Forcing it without the right tool and without putting the system in service mode first will damage the actuator mechanism, and that is an expensive repair.
If you do not have a proper brake piston wind-back tool set, get one before starting this job. They are available at most auto parts stores for $20 to $40.
Do Not Pump the Brake Pedal at the Wrong Time
This was mentioned earlier, but it is worth repeating. Only press the brake pedal after the system has completed its reset and specifically prompts you to do so. Pressing it during the service procedure or immediately after installing the pads, before the actuator has returned to its operating position, can cause the caliper to bind or the piston to move out of sync with the actuator.
Check the ABS Sensor and Wiring
While you have the wheel off and the caliper removed, take a minute to inspect the ABS wheel speed sensor and its wiring harness. These sensors sit close to the rotor and can get knocked or pinched during brake work. A damaged ABS sensor can trigger warning lights after the job is done and make it look like the reset failed, when the actual problem is just a displaced sensor cable.
Deal With Any Warning Lights Before Starting
If your dashboard is showing a red parking brake warning light before you begin the reset, do not just power through the procedure and hope it clears. That warning light is telling you something. It could be a simple issue like worn brake pads, or it could indicate a sensor fault, a wiring problem, or a failing actuator motor. Find out what is causing the light first, address it, and then proceed with the reset.
Check the Fuse First If Nothing Else Is Working
If the electronic parking brake is completely unresponsive and the reset procedure is not working at all, check the fuse before assuming you have a major component failure. A blown fuse for the EPB system can cause the parking brake to fail entirely and trigger dashboard warnings. The fuse location will be listed in your owner’s manual. Replacing a $3 fuse is a much better starting point than assuming you need a new actuator.
Troubleshooting Common Electronic Parking Brake Problems
Even after a proper reset, some issues can persist. Here is a breakdown of the most common problems and what to check for each one.
The Parking Brake Will Not Engage or Release
This usually points to a problem with the electric actuator motor inside the rear caliper. When the motor fails, the caliper can get stuck in either the engaged or released position. A scan tool with Mercedes-specific diagnostics can read the fault codes and confirm whether the motor is getting the right signal and failing to respond, or whether the problem is upstream in the wiring or control module.
If the fault codes confirm a failed actuator motor, the rear caliper will need to be replaced. On most Mercedes models, the actuator is integrated into the caliper unit and is not sold separately.
The Warning Light Comes Back On After the Reset
If the parking brake warning light returns shortly after you complete the reset, pull the codes with a scan tool before doing anything else. Common causes include:
- A displaced or damaged ABS wheel speed sensor
- Brake pad wear sensor not connected properly after pad replacement
- A loose or corroded wiring connector at the caliper actuator
- Low brake fluid level after the reset procedure
- A fault in the CAN bus communication between the EPB module and the rest of the vehicle’s electronics
Each of these has a different fix, so reading the codes first saves you from chasing the wrong problem.
The Brake Pedal Feels Soft After the Reset
A soft or spongy brake pedal after a brake pad replacement and reset usually means one of two things. Either the caliper pistons were not fully pumped back out to make firm contact with the new pads, or there is air in the brake lines. Pump the brake pedal firmly several times with the engine off and see if it firms up. If it does, you are fine. If it stays spongy, you may need to bleed the brake lines to remove any air that got introduced during the job.
The Reset Procedure Menu Is Not Showing on the Display
Not every Mercedes model uses the same menu navigation method described in this guide. Some newer models or those with the MBUX infotainment system navigate differently. If you cannot find the “Pad Replacement” option through the Call and OK button combination, you have two options.
First, check your owner’s manual for the specific reset procedure for your model year. Second, use a Mercedes-compatible scan tool or take the vehicle to a shop that has one. Tools like Autel, iCarsoft, or Launch X431 with Mercedes coverage can access the EPB service function directly and perform the reset through the scan tool interface rather than the dashboard menu.
What Makes the Mercedes Electronic Parking Brake Worth Understanding
A lot of car owners see the electronic parking brake as a black box, something that either works or gets sent to the dealer. But understanding what the system actually does makes it much less intimidating to work with.
The Mercedes EPB does more than just hold the car when you park. Here is what it is actually doing for you every day:
Automatic Engagement When You Park
On most Mercedes-Benz models, when you shift into Park and turn off the ignition, the electronic parking brake applies automatically. You do not have to remember to set it. The system handles it for you, and it releases automatically when you shift into Drive or Reverse. This is particularly useful on inclines where forgetting to engage a traditional handbrake could result in the car rolling.
Brake Hold Function for Stop-and-Go Traffic
Many Mercedes models with the EPB include a brake hold feature. Press the brake pedal to bring the car to a complete stop, activate the brake hold, and the car stays stationary without you keeping your foot on the pedal. In heavy traffic or at long red lights, this reduces fatigue and keeps you from accidentally rolling forward. When you press the accelerator, the brake hold releases and the car moves normally.
More Even Braking Force Distribution
Because the EPB is electronically controlled and integrated with the vehicle’s stability and traction control systems, it can apply braking force more precisely than a cable-operated handbrake. This reduces uneven pad wear and contributes to more consistent braking performance over the life of the pads.
Cleaner Interior Design
From a purely practical standpoint, removing the traditional handbrake lever frees up a significant amount of center console space. Mercedes uses that space for additional storage, larger center consoles, and a cleaner overall interior layout. It is a small thing, but it adds to the premium feel of the cabin.
When to Stop DIYing and Call a Professional
Most of what is covered in this guide is genuinely within reach for someone who is comfortable doing their own brake work. But there are situations where handing it over to a professional is the smarter call.
- The actuator motor has failed and the caliper needs to be replaced. This requires bleeding the brake lines and properly torquing components to spec.
- You are getting communication faults between the EPB module and the ABS or stability control system. This requires advanced diagnostics that most basic scan tools cannot handle.
- The brake pedal stays soft or spongy after multiple pumping attempts and the brake lines need to be bled properly.
- You attempted the reset and something clearly did not work as expected, such as the caliper piston not moving, unusual grinding sounds during the actuator cycle, or a new warning light appearing that was not there before.
A qualified Mercedes-Benz technician or a reputable independent shop with the right diagnostic tools can quickly identify what the standard procedure could not resolve. Spending $100 on a diagnostic appointment is far cheaper than replacing a component that was not actually the problem.
The Mercedes electronic parking brake is a capable, well-engineered system, and it rewards car owners who take the time to understand it. Learn the reset procedure, keep up with your brake pad replacements, and check those fuses before assuming the worst. You will spend less time at the dealer and more time actually driving.