

Start with your owner’s manual and a look at the tires on your car. Rotation moves complete wheel-and-tire assemblies between approved positions. On many front-wheel-drive cars with matching, non-directional tires and interchangeable wheels, the front tires go straight back and the rear tires cross to the opposite front corners.
That pattern doesn’t fit every vehicle. Rear-wheel drive, AWD, directional tires, and different front and rear sizes can all change the instructions. Before you move anything, confirm the approved pattern, the lifting points, the wheel-fastener torque, and any tire-pressure monitoring system (TPMS) requirements.
I’ve done more tire rotations than I can count, and the swap itself is the easy part. What goes wrong is everything around it, like crossing a directional tire, skipping the torque wrench, or lifting at a spot that was never meant to carry the car. This guide walks through the patterns, the home procedure, the schedule and the red flags, so you know when it’s a driveway job and when it belongs in a shop.
Before you touch a jack: the quick checklist
Spend five minutes on this list first. It saves more trouble than any tool in your box.
- Read the rotation section of your owner’s manual and note the approved pattern.
- Check whether the front and rear tires are the same size.
- Look at each sidewall for a rotation arrow or the word “outside.”
- Find the vehicle’s approved lifting and support points.
- Locate the wheel-fastener torque specification and the wheel-lock key, if you have locking hardware.
- Check whether your car needs a TPMS calibration after rotation.
If you can’t answer one of those, stop and find the answer before you lift the car. A shop can confirm most of them in a couple of minutes at the counter.
What rotating tires does
Your four tires don’t share the work equally. Steering, braking, acceleration and the weight of the vehicle load each corner differently. Rotation changes each tire’s position so wear can develop more evenly over time, which is how Michelin explains it in its rotation guidance.
It doesn’t put worn rubber back. It also won’t repair a puncture, straighten a bent wheel, or correct an alignment problem. I think of rotation as preventive maintenance with a free inspection built in, because with the wheels off you get a good look at the tires, the brakes and the hardware.
Choose the right tire rotation pattern
The best pattern is the one approved for your exact vehicle and wheel setup. Drivetrain is only part of that decision, and people who stop at “it’s front-wheel drive” are the ones who end up with directional tires on the wrong side.
Check these details first:
- Are the front and rear tires the same size?
- Are the wheels interchangeable between those positions?
- Does a sidewall arrow specify a direction of rotation?
- Does the manual permit rotation and identify a particular pattern?
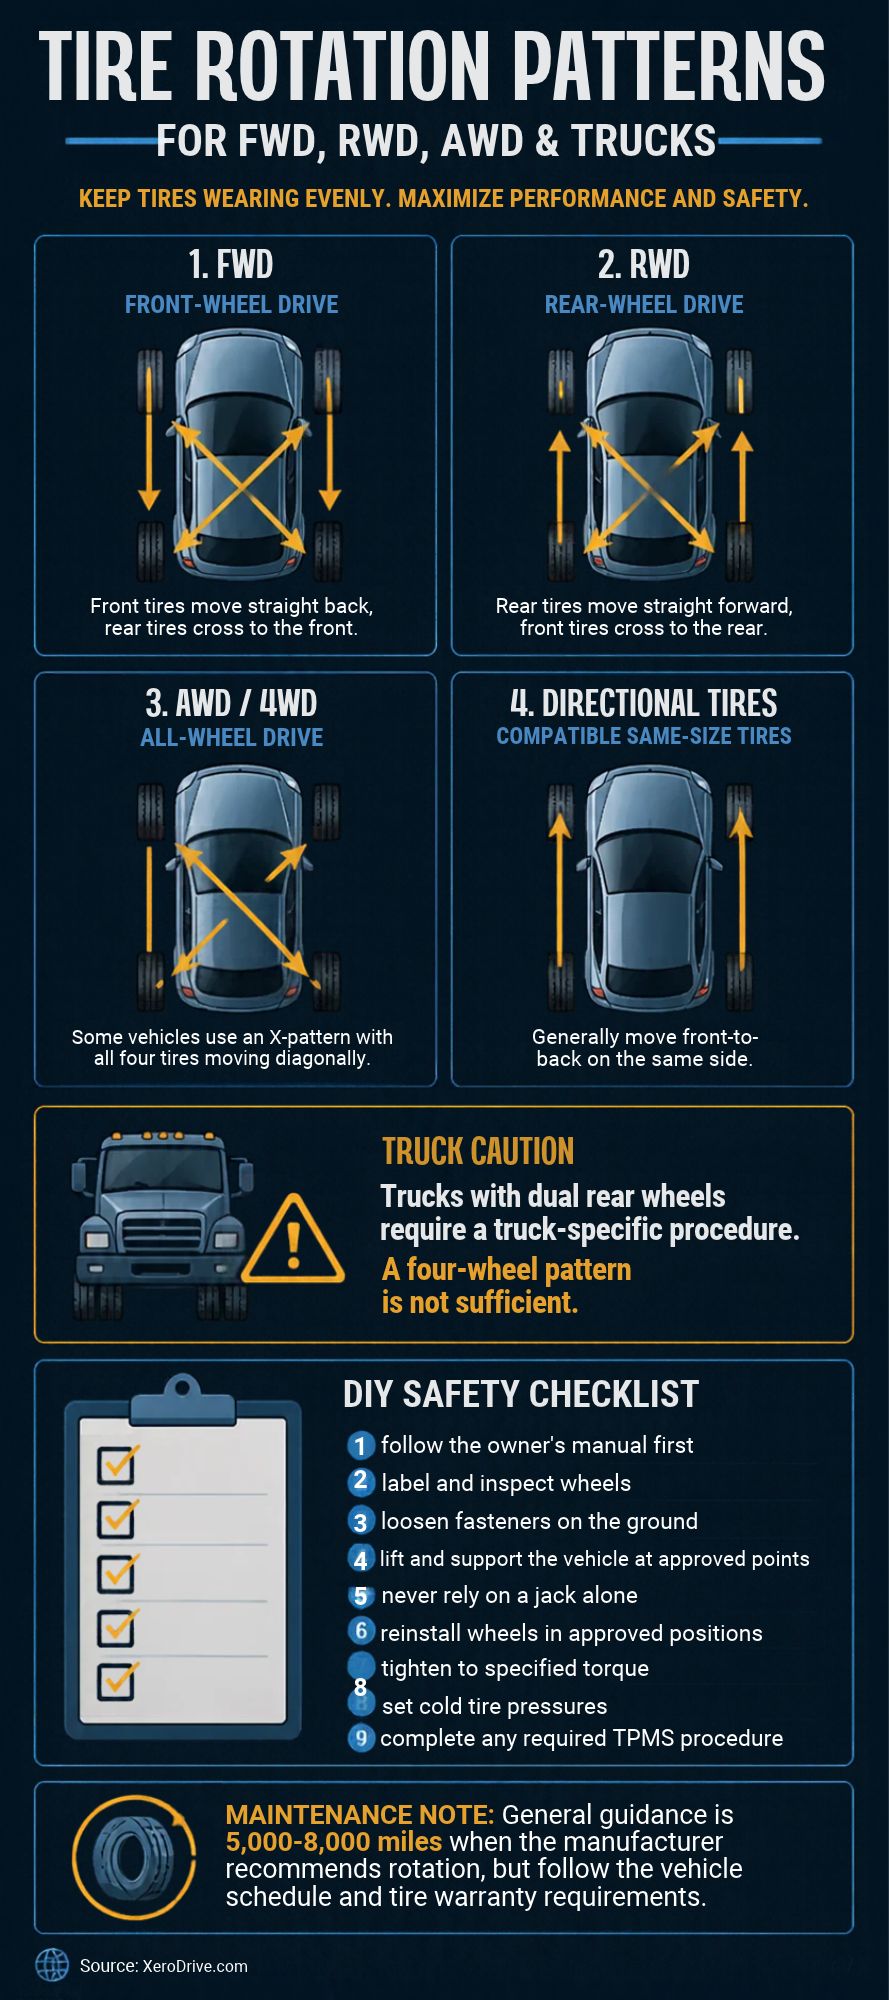
For four matching, non-directional tires on interchangeable wheels, these are the common patterns. Your manual takes priority over this table.
| Pattern | Common application | Front-left moves to | Front-right moves to | Rear-left moves to | Rear-right moves to |
|---|---|---|---|---|---|
| Forward cross | Front-wheel drive | Rear-left | Rear-right | Front-right | Front-left |
| Rearward cross | Rear-wheel drive; some 4WD applications | Rear-right | Rear-left | Front-left | Front-right |
| X-pattern | Some AWD and 4WD applications | Rear-right | Rear-left | Front-right | Front-left |
| Front-to-rear | Same-size directional tires, where permitted | Rear-left | Rear-right | Front-left | Front-right |
Left and right mean the vehicle’s left and right as seen from the driver’s seat, facing forward. Bridgestone’s pattern guide explains the differences between forward cross, rearward cross and X-pattern rotation if you want a second look at the diagrams.
Front-wheel drive tire rotation
The common front-wheel drive pattern is the forward cross. The fronts go straight back, and the rears cross as they move forward. It’s the one most people picture when they hear “rotate the tires.”
Check the sidewalls before you follow it. Directional tires can’t simply cross sides while staying mounted as they are, since that would reverse the way they’re meant to roll.
RWD tire rotation pattern
A common pattern for rear-wheel drive is the rearward cross. The rear tires move straight forward, and the fronts move diagonally to the rear. It’s the mirror image of the front-wheel drive routine.
Check fitment as well as drivetrain. A rear-wheel-drive car with wider rear tires may not allow a front-to-rear swap at all, and that’s common on performance models.
AWD, 4WD and truck tire rotation patterns
There’s no single pattern for every truck or SUV. Some manuals call for an X-pattern, and others use a different approved sequence. Tire size and construction still matter either way.
For trucks, check whether the vehicle has single or dual rear wheels. A four-wheel diagram isn’t a procedure for a dually. Use that truck’s specific service instructions, or take it to a tire shop that works on that setup regularly.
AWD vehicles can also have requirements for matching tire circumference or tread depth. Don’t borrow a tolerance from a different model. If the tires have noticeably different wear, ask for the manufacturer’s specification before you mix positions.
Directional, asymmetric and staggered tires
Directional tires: Look for the rotation arrow on the sidewall. With compatible, same-size wheels and tires, these generally move front to rear on the same side. Crossing them without remounting would reverse the specified rolling direction.
Asymmetric tires: “Outside” marks the sidewall that faces away from the vehicle. That marking alone doesn’t make the tire directional. Check for a rotation arrow too, because a tire can have both requirements.
Staggered tires: Different front and rear sizes usually rule out front-to-rear rotation. Side-to-side movement may be possible for a compatible, non-directional setup if the manufacturer allows it, and some configurations can’t be rotated conventionally at all. Michelin’s sizing guidance explains why staggered fitments limit your options.
Don’t add a temporary spare into a rotation. A matching full-size spare belongs in the sequence only when the vehicle and tire instructions allow it.
How to rotate tires at home
DIY rotation is reasonable only if you can safely lift and support the vehicle and put the wheels back on correctly. If the support arrangement is unclear to you, have a shop do the work. A rotation is cheap compared to what a fallen car costs.
Gather the equipment and specifications
- Vehicle-approved lifting and support instructions.
- A properly rated jack and compatible jack stands, or suitable professional lifting equipment.
- Wheel chocks and a firm, level work surface.
- The correct socket, hand wrench, and wheel-lock key if needed.
- A suitable torque wrench and the exact wheel-fastener torque specification.
- A tire-pressure gauge and access to an air supply.
- A tread-depth gauge and a way to label each wheel’s starting position.
Safety warning: Never rely on a hydraulic jack alone to support the car while removing wheels. Do not work under an unsupported vehicle. If you can’t identify approved lifting and support points, stop before lifting.
I don’t say that lightly. A jack is for lifting, and stands are for holding. If you only have a jack, you can still check pressures, inspect tread and book a shop visit.
1. Record the starting positions
Label the wheels front-left, front-right, rear-left and rear-right. Write down each destination before you loosen any hardware. It’s far easier than trying to remember the pattern with four wheels lying around the driveway.
Inspect for damage and uneven wear while you’re at it. A tire with a bulge, exposed cords or significant pressure loss needs assessment before it goes into another position. If a puncture changes your plans, Car Talk has a tire repair cost guide that explains the related expense, though a professional still has to decide whether that tire is repairable.
2. Prepare the vehicle and loosen the fasteners
Park on a firm, level surface, switch the vehicle off, and follow its parking-brake, transmission and chocking instructions. Slightly loosen the wheel fasteners while the tires are still on the ground. Leave them installed until the vehicle is properly supported.
Loosening first matters because the tire’s grip on the pavement keeps the wheel from spinning while you pull on the wrench. Tire Rack’s installation instructions describe the same order, loosening the hardware before lifting and using jack stands on a level surface.
3. Lift and support at approved points
Use the vehicle’s lifting procedure together with the equipment instructions. The safe support arrangement depends on which wheels you need to remove, so there’s no universal jack-and-stand sequence for every car.
Some vehicles need a special lifting mode. Tesla’s Model X instructions, for example, require Jack mode and warn against placing lift pads under the battery or side rails. Don’t assume another vehicle uses the same points or controls, because lift points on one car can be a crush hazard on the next.
4. Move and reinstall the wheels
Remove the supported wheels and move them to their planned positions. Confirm that any directional arrows still agree with forward travel before the wheel goes on.
The wheel has to seat correctly against the hub. Stop if you find damaged threads, hardware that binds, or a wheel that won’t sit flush. Start each fastener by hand so you feel any resistance before you apply force.
5. Tighten to the correct torque
Follow the specified snugging, lowering and final-tightening procedure. Use a torque wrench and the manufacturer’s tightening sequence, commonly a crisscross or star pattern.
Don’t guess a torque value, and don’t rely on an impact wrench to set the final number. Tire Rack’s wheel-fastener guidance explains why correct torque and clean hardware matter. Skip oil and anti-seize on the threads unless the vehicle’s specific service procedure calls for it.
Follow any manufacturer-required torque recheck after wheel removal and installation. I’ve seen wheels come back from rushed jobs with fasteners that were barely snug, so this step is worth doing even when the first pass felt solid.
6. Set pressure and complete the TPMS procedure
Adjust pressure for each tire’s new position, since front and rear specifications can differ. Use the vehicle’s placard or manual, not the maximum pressure molded into the tire. NHTSA recommends checking cold tires, meaning the vehicle has been parked for at least three hours.
Check the manual for TPMS calibration or sensor-position relearning, because requirements vary. The 2026 Honda HR-V manual requires TPMS calibration after rotation on U.S. models. That’s a model-specific instruction, not a universal reset method.
Record the mileage and date when you finish. If the car develops shaking, knocking or unusual handling afterward, stop safely and have the installation checked.
Mistakes I see most often
Most rotation problems come from skipped checks, not from the swap itself. Here are the ones I’d watch for.
- Crossing directional tires: an arrow on the sidewall means the tire has a specified rolling direction.
- Forgetting the torque wrench: guessing at tightness or using an impact wrench for the final pass is a bad habit.
- Trusting the jack alone: support the car properly before removing wheels.
- Using one pattern for every car: drivetrain doesn’t settle it, so fitment and the manual matter too.
- Setting pressure to the sidewall number: use the vehicle placard or manual instead.
- Skipping the TPMS step: some cars need a calibration or relearn after rotation.
- Moving a damaged tire to the rear: that’s not a repair, and a damaged tire needs assessment.
- Not keeping records: without notes you won’t know when the next rotation is due.
How often should you have your tires rotated?
Use the schedule in your owner’s manual and check the tire warranty’s maintenance conditions. A reminder tied to engine-oil service doesn’t automatically cover every tire requirement. Some warranties ask for proof of maintenance, so keep your receipts or notes.
NHTSA gives 5,000 to 8,000 miles as guidance when the vehicle manufacturer recommends it. Your vehicle may specify something different, or it may prohibit rotation for its setup. Write the date and mileage down each time, because memory isn’t reliable over a year.
If a dashboard reminder has you confused, Car Talk’s guide to the maintenance required light explains how rotation can fit into scheduled maintenance. Treat the light as a prompt to check your manual, not as a substitute for it.
Reading what your tires are telling you
Rotation day is a good time to inspect. With the wheels off or at least accessible, check tread depth with a gauge, look at both shoulders, and run your hand carefully over the tread for scalloping or a feathered edge. Compare the four tires against each other too, because a tire that looks very different from the rest points to a cause.
Rotation can help distribute future wear, but existing damage to the tread doesn’t disappear. Michelin’s wear guide explains that alignment, pressure and suspension problems need their own corrections. If one shoulder is heavily worn, or the tread looks scalloped, that deserves an inspection, not just a new position on the car.
Hyundai’s tire-maintenance bulletin lists alignment, balance and worn suspension components among the causes technicians should investigate. I’d give the same advice for any brand. If you rotate and the wear pattern keeps coming back, you’re treating the symptom.
Questions about tire rotation
How do you rotate tires without crossing them?
Swap front and rear on the same side, but only when the wheel sizes, tire sizes and manufacturer instructions allow it. That’s the usual approach for same-size directional tires. It isn’t automatically the preferred pattern for every non-directional setup.
Is tire rotation the same as balancing or alignment?
No. Rotation changes tire positions. Balancing addresses uneven weight distribution in a wheel-and-tire assembly, and alignment adjusts wheel angles. A rotation doesn’t automatically include the other two services, so ask what your appointment covers.
Will rotating tires fix uneven wear?
It may help spread future wear, but it won’t undo damage already in the tread. If the wear is sharply uneven, look for the cause first. Pressure, alignment and suspension all come into it.
Can I rotate the tires myself?
Yes, if you can lift and support the car safely, identify the right pattern, and tighten the wheels to specification with a torque wrench. If any of those is missing, hand it to a shop. A first-timer should plan to work slowly and not rush the torque step.
What it costs and how long it takes
I won’t quote prices, because shop rates, wheel types and local labor costs vary too much. Some shops include rotation with a tire purchase, and others charge separately, so ask when you book. If you do it at home, the main cost is the equipment, mostly a decent jack, stands and a torque wrench.
On time, expect a first DIY rotation to take longer than you’d guess. Labeling, loosening, lifting, swapping, torquing, setting pressure and checking TPMS all add up, and you shouldn’t hurry any of them. A shop with a lift and an impact setup will move faster, which is fine as long as they finish with a torque wrench and give you the pressures you asked for.
If you’re deciding between DIY and a shop, think about your equipment and your confidence. A rotation done with the wrong support is worse than no rotation. The shop route also gets you a second set of eyes on brakes and tires.
When to see a tire professional
Book a tire inspection if you can’t confirm the rotation pattern, lack a safe support setup, find damaged hardware, or notice wear that differs sharply between tires. Those are all signs that guessing would be a poor idea.
Stop driving and arrange assistance for a visible tire bulge, exposed cords, a loose wheel, rapid pressure loss, or severe vibration. Moving a damaged tire to the rear isn’t a repair, and a bulge can fail without much warning.
Bring the technician your vehicle details, your rotation history and any symptoms you noticed. Ask them to confirm the approved pattern, inspect the tires, set the correct pressures and complete any required TPMS procedure. That turns a routine wheel swap into a proper maintenance check.
The expert verdict
Here’s what I’d do. Read your manual, confirm the pattern for your drivetrain and tire setup, and write down the date and mileage when you finish. Follow the schedule your vehicle and tire warranty call for, with NHTSA’s 5,000 to 8,000 miles as general guidance when your manufacturer recommends it.
DIY is reasonable when you have proper stands, a torque wrench, a level surface and the correct specifications. It’s also reasonable if you’re comfortable with the TPMS step on your car. Go to a shop if you have directional, staggered or dual-wheel setups you’re unsure about, if you can’t find safe lift points, or if the tires show wear that doesn’t look normal.
Don’t skip the torque and pressure steps on your way out the door. Those two checks are the difference between a routine job and a problem on the highway.
One clear takeaway: follow the pattern approved for your exact car and tires, support the vehicle properly, torque the wheels to spec, and set the pressures and TPMS before you drive away.