
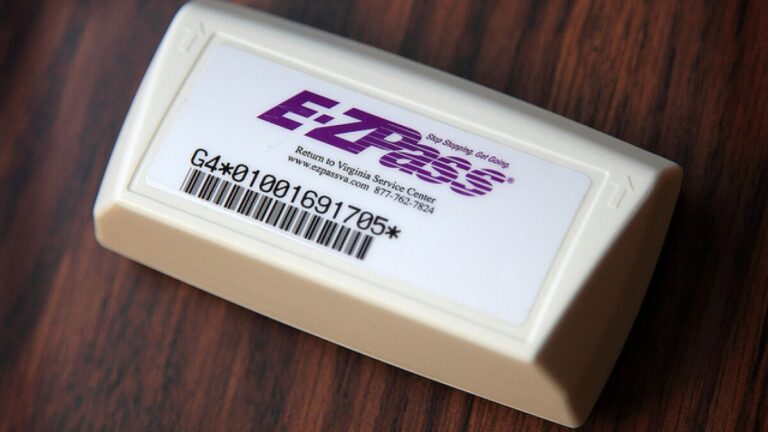
A customer pulled into my bay a while back for an oil change with a brand new E-ZPass tag still in its envelope. He’d had it for three weeks. The website kept asking him for a “validation code,” he couldn’t find anything by that name, and he’d given up and been paying cash at the booths.
That’s a common snag, and it’s an easy one to fix once you know what the code is and where to look. This guide covers what the E-ZPass validation code does, where it usually lives, how it fits into enrollment and activation, how to mount the tag so it actually reads, and how to manage your account afterward. I’m a mechanic, not an agency rep, so details like exact fees and procedures vary by state. Check your own E-ZPass agency for the final word.
What the validation code is and why your account asks for it
Your E-ZPass validation code is the number that ties the physical tag in your hand to the account you set up. It’s printed on the back of the tag, and it shows up again in the materials that came with it. The system uses it to confirm that this specific device belongs to you, so nobody else can attach it to a different account.
Think of it like the VIN on a car. The VIN isn’t what makes the car run, but it’s how the title, registration, and insurance know which car they’re talking about. The validation code does the same job for your tag.
The purpose of the code
The code works as a security check. It confirms the device you received was officially registered to your account, and it’s needed for the initial activation. Without it, the tag can’t be used to pay tolls, which is why a tag sitting unactivated in a glovebox does nothing for you at the plaza.
That’s the part people miss. Having a tag in the car and having a working tag are two different things. If the activation step never happened, you’ll roll through the electronic lane and the system will have no idea whose tag it just saw.
Where to find your validation code
Start by turning the tag over. The code is typically on the back of the device, and it’s an alphanumeric string, meaning a mix of letters and numbers. It’s also often in the paperwork or welcome materials that shipped with the tag.
Here’s where I’d look, in this order:
- The back of the tag itself.
- The welcome kit, instruction sheet, or packaging it came in.
- Your online account, if you’ve already enrolled and the tag is linked.
- Customer service, if all of the above come up empty.
Some guides online explain that each segment of the alphanumeric code on your tag has a specific meaning. I’m not going to guess at what each piece stands for here, because it can differ by agency, and I’d rather send you to your own agency’s documentation than hand you a wrong answer.
If you’ve mounted the tag already, don’t peel it off the windshield just to read the back. Check your paperwork and your online account first. Pulling a tag off and re-sticking it weakens the adhesive, and you’ll be fighting read problems later.
Validation code, tag number, and plate: three different things
People mix these up constantly, and it causes most of the activation frustration I hear about. Your account uses several identifiers, and each one has its own job. Which one a given form asks for depends on the step you’re on and your agency, so read the field label carefully.
| Identifier | What it’s for | Where you’ll use it |
|---|---|---|
| Validation code | Confirms the tag in your hand is the one registered to you | Initial activation, linking the tag to your account |
| Tag number | Identifies the specific transponder on your account | Registering the tag online, managing tags, contacting customer service |
| License plate number | Identifies the vehicle, and backs up the tag if it fails to read | Enrollment, vehicle management, paying a missed toll |
If a form asks for a code and you’re not sure which one, don’t guess and don’t keep retyping. Too many wrong attempts can lock you out of a web form, and then you’re on hold with customer service anyway. Read the instruction sheet, or call and ask them which number they want.
How to use the code to activate your tag
Once you’ve got the code in front of you, follow the instructions that came with the tag. Normally that means going online to the E-ZPass website or calling customer service. You’ll be prompted to enter the validation code as part of the process, and that’s what links the transponder to your account so every toll gets recorded and billed correctly.
Have a few things ready before you start:
- The tag, or at least the code from the back of it
- Your account login, or your enrollment details if you’re setting up for the first time
- Your license plate number and vehicle info
- Your payment method
It takes a few minutes if you’ve got everything on hand. Hunting for the one thing you left in the other room is what stretches it into an hour.
Signing up: how enrollment works
Before you ever see a validation code, you need an account. E-ZPass is the electronic toll collection system used by a group of agencies, and each one runs its own enrollment. Whether you’re setting up for a daily commute or the occasional road trip, the first steps are the same.
Start on the website and pick your state
Go to the E-ZPass website and choose your state to begin the enrollment process. That sends you to the agency that handles accounts where you live. You’ll need some basic information, including your vehicle’s license plate number and a payment method, such as a credit card or a cash option.
You can also enroll in person at designated service centers. Still, online registration is the quickest route to getting an account up and running, and I’d go that way unless you have a reason not to. If you pay with cash, an in-person visit may be the easier path, so check what your agency offers.
Pick the plan that fits how you drive
Enrollment often comes with a choice of plans, and I’ll get into those below. For now, know that you don’t have to nail it perfectly on day one. Most people start simple and adjust once they see their real toll usage on a few statements.
Mounting your transponder so it reads every time
Once you’ve enrolled, you’ll receive a transponder to mount on your vehicle. This is the part I know best, because I spend my days around windshields. The tag is a small device that communicates with the toll collection system as you pass through, and where it sits on the glass decides whether that conversation works.
Here’s the basic process:
- Clean the inside of your windshield where the tag will go, and dry it completely.
- Position the transponder inside the windshield, following the placement instructions in your kit.
- Use the provided mounting strips to secure it.
- Press it firmly against the glass and hold it for a few seconds.
Make sure it’s firmly attached. A tag that’s loose or sliding around on the dash is the leading cause of toll problems I see in the shop.
Glass prep matters more than people think
A windshield collects a film over time, from dust, defroster residue, and even the off-gassing of dashboard plastics on hot days. The mounting strip has to grab clean glass, and it can’t do that through a layer of grime. Glass cleaner and a dry cloth cost almost nothing and make the adhesive hold up in July heat.
Avoid wiping the spot with anything oily, like a dashboard protectant or a cleaning wipe with a conditioner in it. That leaves a film and the strip lets go. I’ve seen tags drop off the glass in a week because of that one wipe.
Watch out for coated and metalized glass
Some windshields have a coating or metalized area built into the glass for heat and glare control, and that can interfere with the signal. If your tag reads poorly even though it’s mounted right, check your vehicle manual or the E-ZPass installation guidelines for where the tag should go. Some cars have a marked area near the mirror for toll devices or sensors.
I can’t tell you the right spot for your car without seeing it, because it varies by make and year. Your manual or a glass shop can point you to the right place. If you have a dash cam, a rain sensor, or a tinted strip across the top, keep the tag clear of those too.
The windshield replacement trap
Here’s a shop situation I see a few times a year. A customer gets a new windshield, and the glass shop (understandably) removes the tag or just wipes it off the old glass. The tag ends up in a cupholder, the account is fine, and from then on the car misses reads at the plaza.
If you’re getting glass replaced, ask the shop to peel the tag off carefully and hand it to you, or take it off yourself before the appointment. Mount it fresh on the new glass with a clean surface and new mounting strips if your tag supports that. If the tag’s adhesive is spent, contact your agency about getting new mounting strips or a replacement tag.
Setting up the account after the tag is on the glass
Mounting the tag is half the job. The other half is making sure the account behind it is ready, and that’s where the validation code comes back into play. Setting up your account allows you to manage toll payments without stopping, and the steps are straightforward.
- Activate your transponder following the instructions from your welcome kit.
- Add a payment method to your account for automatic toll payments.
- Register your tag number associated with your transponder in your online account.
Do these in order. Activation is what uses your validation code, the payment method is what funds your tolls, and registering the tag number is what makes sure the transponder in your car matches the one on your account. Skip one and you can end up with a tag that’s attached but not working.
When it’s done, your trips through the toll plaza should be faster, since you aren’t stopping to pay each time. Give it a quick sanity check after your first trip or two by logging in and confirming the tolls showed up on your statement. That’s five minutes well spent.
When activation or reads go wrong
Most of the problems I hear about fall into a handful of categories. The table below covers the usual suspects and what I’d check first. Almost all of it is free to fix.
| Symptom | Likely cause | What to check or do |
|---|---|---|
| Website rejects the validation code | Typo, wrong identifier entered, or the code doesn’t match the tag you’re activating | Re-read the code on the back of the tag, check you’re using the right field, then call customer service if it still fails |
| Can’t find the code anywhere | Paperwork tossed, or the tag is already mounted | Check your online account first, then contact customer service for help |
| Tag is mounted but tolls don’t appear on the account | Tag never activated, or tag number not registered | Confirm activation and tag registration in your account |
| Tag reads some days and not others | Loose mounting, glass film, or a coated area of the windshield | Clean the glass, re-mount per the instructions, and check the manual for the right spot |
| Balance runs out unexpectedly | No automatic replenishment, or an expired card | Update the payment method and turn on automatic replenishment |
| Mismatch fee or penalty shows up | Vehicle or plate on the account doesn’t match the car you drove | Update the tag and vehicle details in your account |
A quick way to sort out a stuck activation
If you’ve tried and the code won’t take, step back and run through this list before you call:
- Make sure you’re on the right agency’s site for your state.
- Check you’re entering the validation code in the validation code field, not the tag number field.
- Read the code slowly, since letters like O and 0 or I and 1 can look alike.
- Try again in a different browser, or switch to the mobile app.
- If it still fails, call customer service with the tag in hand.
The O and zero mix-up is a favorite. I’ve watched people type the same wrong character five times in a row because it looks right on the sticker.
The unactivated tag story
Back to my customer at the start. When he showed me the tag, I flipped it over and the code was right there on the back, printed small. He’d been looking for a card or a paper with the words “validation code” on it, and he’d missed the label on the tag itself. We pulled up the website on his phone, and the whole activation took a few minutes in my waiting room.
He told me later that he’d spent three weeks paying cash at toll plazas for no reason. It wasn’t a hardware failure or a bad tag. It was a small number he hadn’t found.
Managing your account day to day
An activated tag isn’t a set-it-and-forget-it item. You need to keep an eye on your balance and your information so nothing disrupts service. Think of it like checking your oil. It takes a minute, and it stops a bigger problem down the road.
Check your balance
You can check your E-ZPass account balance by logging into the E-ZPass website or the mobile app. Make it a habit to look regularly, because an empty account can cause an interruption in service. Statements are available online too, and they show your recent toll transactions and payments.
Look at the transaction list while you’re there. If a toll shows up that you didn’t drive, or one is missing that you did, flag it early. Details fade fast, and disputing a charge is easier when you still remember the trip.
Update your payment information
Go to your account’s payment settings to update your card. You can securely add or edit your credit card details so toll payments keep going through. Do this whenever your card expires or you get a new one, because that’s when most accounts quietly fall behind.
I tell customers to put a reminder on their phone for the month their card expires. A declined replenishment doesn’t announce itself, and the first sign is often a violation notice.
Add funds to your account
You can add funds with cash, check, or credit card. If you drive tolls often, set up automatic replenishment so the account never runs low, and you can change those settings any time based on how much you use. If you only take toll roads occasionally, a manual top-up before a trip works fine.
Mail and in-person options take time, so they’re a poor choice if you’re leaving tomorrow. A credit card online is the fastest way to get money into the account. Which option you pick depends on how you like to pay and how often you travel.
Manage your tags and vehicles
For managing tags and vehicles, keep your tag number and the associated license plate information handy. In your account you can add or remove vehicles, and you can request new or replacement transponders. Keeping this up to date helps you avoid mismatch fees or penalties.
Here’s when to open your account and make a change:
- You bought a new car or sold your old one
- You got new license plates
- Your tag is damaged or stopped reading and needs replacing
- You moved the tag to a different vehicle
- A family member now drives the car regularly
The car swap is the one I see most. Someone trades in a vehicle, forgets the tag on the old windshield, and a few weeks later gets a notice for tolls on a car they no longer own. Pull the tag before you hand over the keys, and update the account the same day.
Plans and discounts worth knowing about
E-ZPass isn’t only a way to pay tolls. The plan you choose can also unlock discounts, and picking one that matches how you drive can lower your toll costs over time. I’d spend a little time here, since it’s real money for regular commuters.
Choosing a plan that fits your driving
Pick a plan based on your travel patterns, not on whatever sounds best. The Standard Plan is a versatile option, with a required prepayment starting at $25. It’s a good fit if you want a pay-as-you-go approach without specific enrollment requirements.
Other plans are built for frequent travelers on certain routes or bridges. For example, the New York Thruway Discount Plans are tailored that way, and they can provide substantial savings per trip for drivers who use those roads often. If you drive one corridor every weekday, look at the route-specific options before settling on the Standard Plan.
Understanding the discounts
Enrolling in specific plans can get you reduced rates on tolls. The Gov. Mario M. Cuomo Bridge Commuter Plan is one example, offering a notable discount per trip that can add up for a daily commuter. I won’t quote a number, since rates change, so check the plan page for current figures.
Read the eligibility requirements for each discount before you sign up. In general you’ll need a valid E-ZPass tag registered in the issuing state to qualify. Combining several discount plans may help you get more out of your travel, depending on how often you drive and which routes you use, but confirm with your agency which plans can be stacked.
How I’d decide
If I were setting up an account for my own car, I’d begin with the Standard Plan, watch two or three months of statements, and see where my tolls actually pile up. If most of them came from one bridge or one highway, I’d look at the discount plan for that road. If they were spread all over, I’d stick with Standard and leave it alone.
It’s tempting to chase discounts you’ll never use. A plan that saves money on a route you drive twice a year isn’t worth the paperwork.
Mistakes that cost people time or money
I’ll go through the ones I see over and over. Every one of these is avoidable.
- Mounting the tag and never activating it. The validation code is the step that links it to your account.
- Mixing up the validation code and the tag number. They’re different, so check which one the form wants.
- Tossing the welcome kit. Keep the paperwork, or at least take a photo of the code.
- Peeling and re-sticking the tag. The adhesive weakens each time, and the tag ends up loose.
- Leaving a card to expire. A failed replenishment can leave you with an empty balance and no warning.
- Forgetting the account after a car swap or new plates. Mismatches can lead to fees or penalties.
- Sharing your validation code or tag details carelessly. Treat them like account info, and keep them private.
- Ignoring mail from the toll agency. A notice rarely goes away without action.
My verdict and what to do next
The validation code is a small thing with a big job. It’s the number that links the tag on your windshield to your account, it’s found on the back of the tag and in your welcome materials, and without it the tag can’t pay a single toll. Find it, use it to activate, and then do the rest of the setup in order.
After that it comes down to habits. Mount the tag on clean glass in the right spot, keep your balance funded (automatic replenishment makes this easy), and update your account whenever your car, plate, or card changes. Take a moment to compare plans, because a good fit can lower your costs over the long run.
DIY or call someone
Do it yourself: finding the code, activating the tag online, mounting it, adding funds, updating your card, and managing vehicles. All of that is free, quick, and doesn’t need tools.
Call customer service: if you can’t find the code, if the website keeps rejecting it, if you need a replacement tag, or if you’ve received a violation or mismatch notice. See a glass shop or your dealer only if you can’t figure out where on the windshield the tag should go, especially on cars with coated glass or lots of sensors near the mirror.
The one takeaway
Turn the tag over, find the code, and activate it before you ever pull onto a toll road. Everything else, from the mounting to the plan you pick, works better once that first step is done. If you hit a wall, customer service can usually sort it out faster than another hour of guessing, and they’re there to help you keep moving.